Make This Ice Cream Truck Piñata for National Ice Cream Day
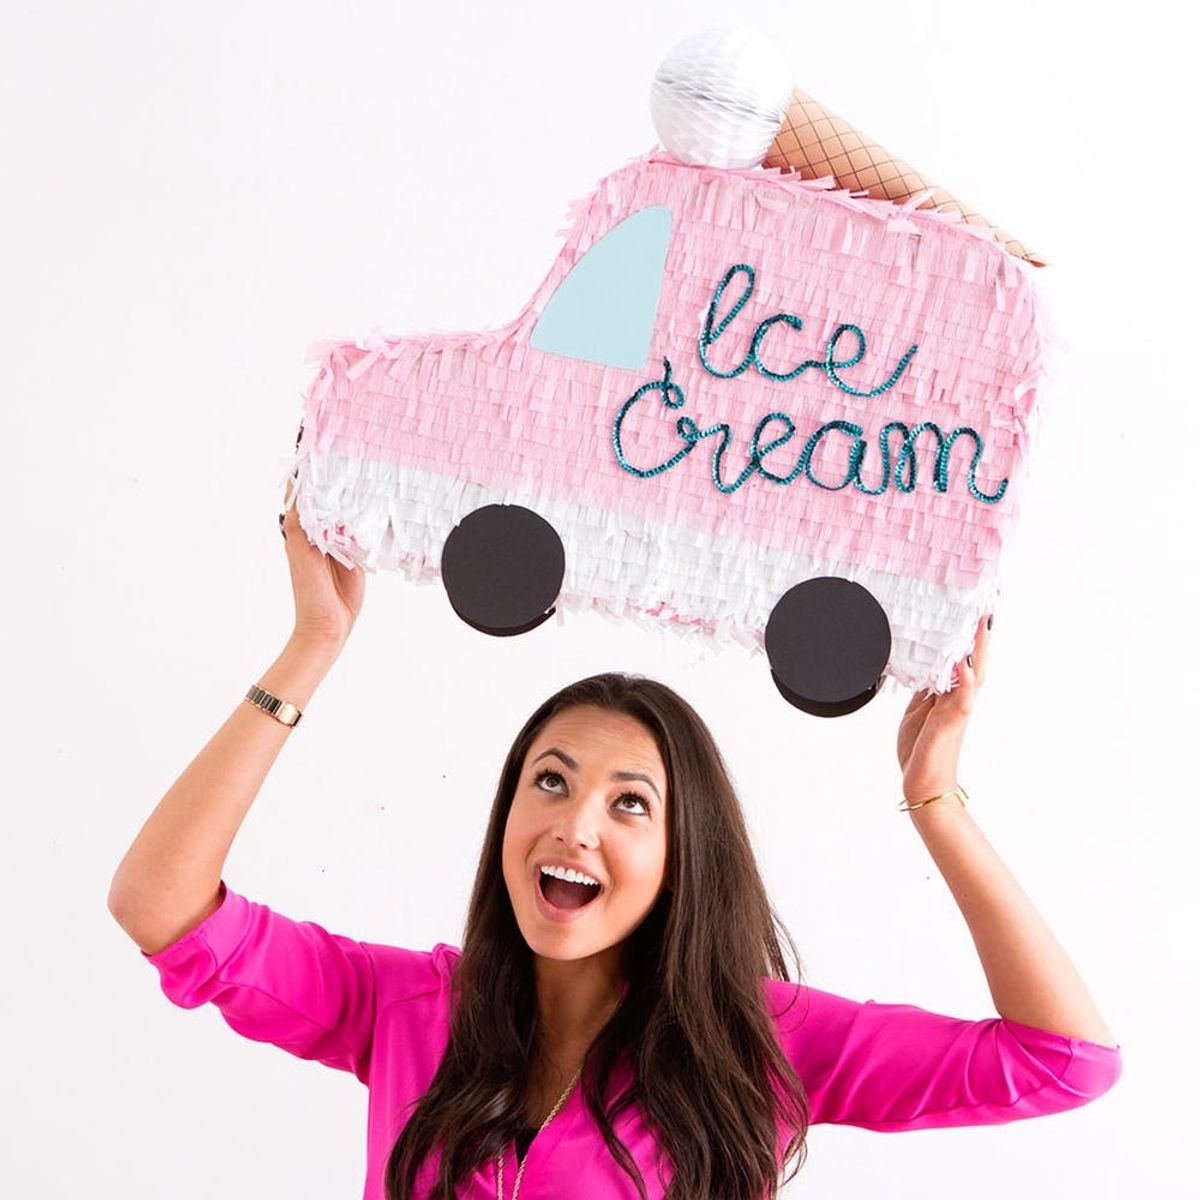
Attention: National Ice Cream Day is today (July 17), and there are a lot of reasons to celebrate. No matter if you’re recovering from getting your wisdom teeth removed, nursing a break-up or simply in the need for something sweet, ice cream is always there for you. Brit + Co tends to celebrate ice cream 365 days out of the year by making scrumptious ice cream DIYs like glitter ice cream sandos, ice cream cake and clay ice cream cone planters, but for this year’s National Ice Cream Day, we’re making this totes amazing ice cream truck piñata.

Materials:
— sheets of cardboard (an old box will do!)

— box cutter

— streamers

— scissors

— masking tape

— hot glue gun

— liquid glue

— permanent market

— pen or pencil

— brown, black and light blue card stock

— round honeycomb

— sequin ribbon

Instructions:

1. Draw a truck (without wheels!) on one of the cardboard sheets. We will add the wheels later, don’t you fret. Cut the truck out with the box cutter.

2. Use that shape to trace a second truck on another sheet of cardboard. Cut it out.

3. Cut out cardboard strips that are three inches wide.

4. Tape the strips along the truck shape so it outlines the entire shape. Tape the second truck on top.

5. Cut a slit for the candy at the top of the piñata.

6. Make fringe out of your streamers.

7. Starting from the bottom of your truck, glue the fringe on the cardboard using the liquid glue. Cover the sides and the back with fringe.

8. Spell out “Ice Cream” with the sequin ribbon. Attach the ribbon with a hot glue gun.

9. Cut out four black wheels and a window from the card stock. (We traced the roll of masking tape to make perfect circles for the wheels.) Glue the wheels and the window on the piñata.

10. Use an extra piece of cardboard to draw a grid on the light brown card stock. Cut a rounded line from a corner of the paper to the top of the paper. If it helps, draw a light rounded line before cutting.

11. Roll up the card stock to make a cone and glue down the end of the paper. You may need to trim a little to create the perfect cone shape. Attach the cone to the top of the piñata with hot glue. Open the honeycomb and glue the inside cardboard pieces together to make the honeycomb stay open. Glue the honeycomb to the top of the truck and to the cone.

Draw a truck (without wheels!) on one of the cardboard sheets. We will add the wheels later, don’t you fret. Cut the truck out with the box cutter.

Use that shape to trace a second truck (the back side of the piñata) on another sheet of cardboard. Cut it out.

Cut out strips that are three inches wide.

Tape the strips along the truck shape so it outlines the entire shape. Tape the second truck piece on top.

Cut an opening for the candy at the top of the piñata.

Make fringe out of your streamers. I recommend watching Netflix while you cut your fringe. My go-to’s are The Office, Clueless and Gilmore Girls.

Starting from the bottom of your truck, glue the fringe on the cardboard using liquid glue. Feel free to play with the design of the truck! For ours, we used white fringe on the lower part of the truck and kept the majority of the truck pink.

Cover the sides and the back with fringe.

Spell out “Ice Cream” with the sequin ribbon. Attach the ribbon with a hot glue gun.

Cut out four black wheels and a window from the card stock. We traced the roll of masking tape to make perfect circles for the wheels.

Glue the wheels and the window on the piñata.

Use an extra piece of cardboard to draw a grid on the light brown card stock. Cut a rounded line from a corner of the paper to the top of the paper. If it helps, draw a light rounded line before cutting. Roll up the card stock to make a cone and glue down the end of the paper. You may need to trim a little to create the perfect cone shape.

Attach the cone to the top of the piñata with hot glue. Open the honeycomb and glue the inside cardboard pieces together. Glue the honeycomb to the top of the truck and to the cone.

All done!

I think I hear the sound of an ice cream truck!

Ice cream o’clock!

How are you celebrating National Ice Cream Day? Share your photos with us on Instagram using the hashtag #iamcreative and tag @BritandCo. Need even more summer inspiration? Head to Pinterest STAT.

DIY Production + Styling: Irene Lee

Photography: Kurt Andre

As cute and clever as store-bought greeting cards are, there's something incredibly thoughtful that can be felt in a homemade birthday card from a friend or loved one. Not only does the act of creating DIY birthday cardsgive you the chance to slow down from the business of life and reflect on what you cherish most about the people you're celebrating, but the one-of-a-kind touch will be super memorable for your recipients as well.

Even if you're not the craftiest person, don't fret, because we've put together a straightforward guide on how to craft your own DIY birthday card for your besties and S.O.'s. Step into the world of DIY magic as we embark on a quest to create birthday cards that will leave your recipients in awe. From unexpected pop-up surprises to mind-bending interactive features, discover fresh ways to make birthday cards burst with fun and excitement. Prepare to unleash your inner artist as we dive into all the tips to help you craft unique and captivating birthday cards. And keep reading for some thoughtful text ideas to ensure that your birthday wishes are just as fun as the card design they're on.

Step 1: Gather Your DIY Birthday Card Supplies

Image via Karolina Grabowska/Pexels

Before embarking on your DIY birthday card adventure, gathering all the necessary supplies is essential. A well-prepared crafter is a confident crafter! So, let's make sure you have everything you need to bring your imaginative card ideas to life.

  1. Start with colored cardstock or paper as the foundation of your cards. Choose a variety of vibrant hues to suit different themes and moods. Scissors are your trusty sidekick, enabling you to precisely cut out shapes, create borders, and trim your cardstock.
  2. Grab glue or adhesive tape to hold everything together securely. Opt for a glue stick for a mess-free experience or double-sided tape for a clean and seamless finish.
  3. Round up all the art supplies you have, from markers and colored pencils, or pens. These magical tools will be your gateway to adding personalized messages, whimsical doodles, and vibrant colors to your DIY creations.
  4. Stock up on a dazzling array of embellishments for an added dose of flair and personality. Let your creativity soar as you explore the boundless possibilities of stickers, sequins, ribbons, twines, buttons, beads, and more. Watch your creations come alive with vibrant colors, textures, and eye-catching details. With these delightful elements at your fingertips, there's no limit to the magic your birthday cards can be infused with.

Step 2: Choose Your Card Design

Image via George Dolgikh/Pexels

The card design will function as the first impression that sets the tone for the entire experience. A well-designed card can evoke emotions ranging from joy and excitement to nostalgia and warmth, leaving friends and family in awe of the thoughtful gesture.

Handmade Watercolor Design:

Express your artistic side by creating a handmade watercolor masterpiece for a genuinely one-of-a-kind birthday card. Start with a blank cardstock or watercolor paper as the base, and let your creativity flow. Use watercolors to paint a vibrant and personalized design, such as flowers, balloons, or a recipient's favorite hobby or color palette. Add a heartfelt birthday message inside to complete the card.

Pop-Up Surprise:

Add an element of surprise and delight to your card with a pop-up feature. Cut out a simple pop-up mechanism using cardstock or colored paper and attach it to the inside of the card. Then, unleash your creativity by designing and cutting out fun shapes, such as cakes, candles, or balloons, and attach them to the pop-up mechanism. When the card is opened, the surprise element will make the birthday celebration of your loved one even more memorable.

Quilled Creations:

Quilling is a paper art technique that involves rolling and shaping thin paper strips to create intricate designs. Use quilling techniques to create beautiful and delicate patterns, flowers, or even personalized messages on your birthday cards. Experiment with different colors and shapes to bring your design to life and make it truly unique. The recipient will appreciate the time and effort put into crafting such an elegant and artistic card.

Hand-Stitched Greeting:

Consider incorporating those skills into your DIY card if you enjoy sewing or embroidery. Use a needle and thread to create hand-stitched designs or patterns on fabric or cardstock. You can stitch the recipient's name, a birthday message, or even cute motifs like balloons or cupcakes. The texture and charm of a hand-stitched card will make it a cherished keepsake.

Interactive Slider Card:

Create an interactive slider card to take your birthday card to the next level. Use cardstock to make a slider mechanism that reveals a hidden message or image as it is pulled. Write a heartfelt message or attach a memorable photo that slides out when the recipient pulls the tab. This interactive element adds a playful touch to your card and makes it truly engaging.

Step 3: Write A Clever Message

Image via June/Pexels

Elevate your birthday card by personalizing it with a heartfelt note to enrich the receiver's experience. Share warm wishes, inside jokes, or memories that make the card even more special and meaningful. Not sure where to start? Here are a few ideas for what to write inside your DIY birthday card!
  1. "Happy birthday, queen of the hashtags! May your day be as fabulous as your Instagram feed."
  2. "You're the avocado to my toast, the squad to my goals. Happy birthday, superstar!"
  3. "It's your birthday, so let's turn up the 'Lit' level and celebrate like it's 1999... or 2023!"
  4. "Birthdays are nature's way of telling us to eat more cake. Enjoy your special day!"
  5. "May your birthday be filled with good vibes and a bottomless brunch. Cheers to another fabulous year!"
  6. "Sending you birthday wishes with all the heart emojis. You deserve all the love and happiness today and always."
  7. "Happy birthday to my favorite extremely online friend. May your Wi-Fi always be strong and your battery never die."
  8. "Time to celebrate another trip around the sun. Let's make this year even more epic than the last!"
  9. "You're not getting older, you're leveling up! Happy birthday, gamer!"
  10. "Happy birthday, trendsetter! May your day be filled with selfie-worthy moments and viral-worthy adventures."

Step 4: Add The Perfect Finishing Touch

Brit + Co

As a bonus, consider creating a DIY envelope to complete the package. Choose decorative paper or repurpose materials like magazine pages or fabric scraps to craft a unique envelope that adds creativity and thoughtfulness to your handmade card. Personalize it by adding hand-drawn designs, stamps, or calligraphy for an extra special touch.

So, there you have it! DIY birthday cards offer endless possibilities for fun, creativity, and the chance to unleash your imagination. With just a few simple steps, you can create customized and sincere cards that will bring joy to your loved ones on their special day. Remember, the beauty of DIY is that there are no limits or rules. Let your creativity run wild, experiment with different techniques, colors, and textures, and, most importantly, have fun. Happy crafting!

For more crafty ideas, check out all of our DIY ideas on Brit + Co.

There are a number of TV shows in the running for best teen drama. I'm ready to press play on The Summer I Turned Pretty, One Tree Hill, and The Vampire Diaries at any given moment, but there is nothing like watching Friday Night Lights season 1. It might not be as glamorous as Gossip Girl, but that's exactly why it resonates so deeply when you watch it — FNL both highlights and honors viewers' real-world experiences because the characters are SO relatable. Instead of leaving you envious of a fictional life, Friday Night Lights welcomes you into a community you feel like you already know.


Image via NBC

Everyone in the fictional town of Dillon, Texas lives and breathes football, and Friday Night Lights season 1 opens just before the first game of the season. Right off the bat, we're introduced to characters that both evoke emotion and spark our curiosity, and we're told exactly where they are in their lives: new head coach Eric Taylor is struggling to win the town's confidence. Fullback Tim Riggins struggles both with motivation and against confident running back Smash Williams. All-American quarterback Jason Street has dreams of playing in the NFL while timid Matt Saracen takes care of his grandmother during the afternoon and serves as second-string quarterback at night.

Not to mention the fact that when I watched Friday Night Lights for the first time, I was pleasantly surprised by how compelling and multi-dimensional the women are. Tami Taylor has the perfect blend of motherly love and the kind of Southern sass that puts you in your place. Minka Kelly's Lyla Garrity is one of my favorite TV characters of all time because she might be wealthy and popular, but she evades "The Curse of the Brunette" that seems to plague early 2000s leading ladies. Instead of turning into a manipulative mean girl like the high school versions of Blair Waldorf and Brooke Davis, Lyla is just kind. Does she still make insanely bad decisions (like kissing her boyfriend's best friend)? Yes, but aren't bad decisions a right of passage when you're 17?

The show's initial plots and character arcs revolve heavily around football, but the sport really just serves as a funnel for all the off-field drama. The tension between the characters makes their gameplay even more passionate — and when Street gets seriously injured during that first game of the season, the town rallies together in a way that highlights how strong a community can bond in the face of tragedy.

Image via NBC

Life in middle-class America can be tough, but it can also be really, really sweet. While I'm neither from Texas nor have attended the kind of football school Dillon High is, the contrast between the characters' responsibilities and the fun that comes with parties and joining your friends at the local burger joint resonates with me every time I rewatch.

Even the fact the show is named Friday Night Lights emphasizes that contrast because it shows just how much of a spotlight is on these kids, and how much weight is on their shoulders when they're truly just trying to survive their teenage years.

Rather than providing an escape from viewers' realities like Outer Banks does, Friday Night Lights season 1 emphasizes the realities of juggling multiple jobs, school, and family responsibility that a lot of viewers experience too. It allows you to understand the characters in a really personal way — and feel like you're a part of the community too. The world can seem so big and scary (now more than ever), which is why the simplicity of Friday Night Lights totally redefines comfort TV.

What's your standout moment from Friday Night Lights season 1? Check out why Gilmore Girls Season 7 Wasn't Supposed To Be The Final Chapter for even more TV show musings!

Lead image via NBC

We're all about colorful Easter egg dye come spring, but if we're honest, we're not always thrilled with the cleanup. Whether you're dyeing with or without a kit, there are tons of bowls, spoons, and paper towels to scrub once your finished. And don't even get us started on what happens if you spill the dye!

If you want to dye eggs this year but are feeling hesitant about everything it entails, don't worry because this hack from Reynoldsis here to save the day. We like to hard boil our eggs before dyeing, but blown eggs work just as well. Then just grab your slow cooker and get dyeing!

An Easy + Clean Egg Dye Hack

Image via Reynolds Kitchens

First, make some DIY slow cooker dividers with cardboard wrapped in aluminum foil.

Once your slow cooker is divided into four sections, line each section with saran wrap, plastic bags, or slow cooker liners. This will let you use more than one color, but still gives you enough space to dye multiple eggs at once!

Next, fill each section with water. Make sure that, while you want to fill them enough for multiple eggs to be submerged, you don't fill them too high. You don't want the water to overflow — that's definitely not mess-free!

Image via Reynolds Kitchens

Add your Easter egg dye to each section. Pink, purple, and blue are classic shades!

Image via Reynolds Kitchens

Gather your hard boiled or blown eggs to add to the water. You can use strips of tape or string to make all kinds of striped and dotted designs. Then all you have to do is just drop them in the water and wait! This is the perfect opportunity to make a colorful Easter cocktail ;).

The longer the eggs sit in the dye, the darker the color will turn out. So if you prefer pastel eggs, only leave them in for a few minutes.

Image via Reynolds Kitchens

When you remove your eggs from the dye, let them dry on a cookie rack before you remove the tape and the string. Display them on a pretty plate along with your Easter desserts, or as a centerpiece!

Image via Reynolds Kitchens

Voilà! A rainbow of colorful eggs, all boasting different designs. And the best part is, all you have to do to clean up is throw away the liners and the cardboard, then put your slow cooker back in your cabinet. We'll definitely be doing this from here on out.

How To Dye Easter Eggs: More Colored Egg Dye Ideas For Display

Marbled Nail Polish Eggs

If you're not too keen on buying food coloring that you'll only use every once in awhile, just use your nail polish! Instead of adding dye to the sections, pour in your polish. You can use a toothpick to swirl everything around and achieve that marbled look. Have some nail polish remover nearby because your fingers will get messy.

Mosaic Easter Eggs

This hack is a great option for using up hard boiled eggs because you have to peel one to make it! (AKA, you'll have a snack to accompany your DIY). After you peel an egg that you've already dyed, use a hot glue gun to attach the broken shell pieces to a second, plain egg. Easy-peasy.

Sharpie Tie Dye Eggs

This Easter egg design only takes ten minutes, which makes it perfect for busy evenings or for kids who can't sit still for too long. Fill your slow cooker sections with nail polish remover instead of water, then color your eggs with as many Sharpie colors as you want. Dunk them into the nail polish remover (or smear with a wet Q-tip) to give them that tie-dye look.

Housefront Easter Eggs

Paint your favorite TV characters' apartment building or your childhood home onto eggs for a fun and nostalgic DIY. Once you've drawn your design, you'll want to tape up the rest of the egg to make sure the dye stays where you want it. Paint the house with the egg dye, or submerge the whole egg in a slow cooker section. Set to dry.

Enjoyed learnign how to dye Easter eggs? Follow us on Pinterest and subscribe to our email newsletter for more Easter egg dye hacks!

Brit + Co may at times use affiliate links to promote products sold by others, but always offers genuine editorial recommendations.

College and high school graduations are just around the corner, and you may be wondering what to get your favorite Gen Z grads. Luckily for you, we compiled a list of 15 fabulous graduation gifts for every price range that are guaranteed to put a smile on your graduate’s face!

Set of 4 Meal Prep Containers

Who doesn’t love pretty Tupperware? Whether your 2024 grad is a gym rat or a library lover, they will definitely find a good use for these air-tight, leak-proof containers.

Benevolence LA New Beginnings Scented Soy Candle

Send them off with this sweet-scented candle that celebrates their achievements, as well as the next steps ahead of them!

A Hundred Other Girlsby Iman Hariri-Kia

This book is like a modern day Devil Wears Prada, and would make the perfect gift for any grad going into journalism, media, or PR — especially if they’re moving to a big city.

Stanley Quencher H2.0

Hydration is key for anyone, especially a new college student that's running between classes, club meetings, and friend hangs! This tumbler will also keep their liquids cold overnight so they don't have to go down the dorm hall in the middle of the night for a fresh refill.

Dagne Dover Mila Repreve® Recycled Polyester Large Toiletry Organizer Bag

If you're sending off a high school grad to communal dorms, they'll definitely benefit from having a compact toiletry bag like this one. This style is particularly nice since it's made from recycled polyester that resists water and debris.

2024 Daily Planner

Using a planner is such an underrated way to stay organized, whether it's prepping for college coursework or adulting stuff like work events, grocery shopping, and plans with friends. This all-in-one daily planner will help your grad keep their ducks in a row with fields for all of life's details.

Honeywell Mini Cool Mist Humidifier

This humidifier, made especially for small rooms and personal spaces (ahem, dorm rooms!) helps maintain humidity levels between 40-60%, which can help relieve congestion and keep the throat and nasal passages hydrated to prevent sickness. This is crucial for soon-to-be college students who may hang around a lot of different people.​

Fresh Sends Flower Bouquet

Flowers are a staple for any major life event, especially a graduation! Fresh Sends is perfect for sending beautiful bouquets for those who live far away, since they ship directly to the recipient's door.

The Beast Mini Blender

This super-effective, high-power portable blender is the perfect size for a dorm room or small apartment, plus it's very aesthetically-pleasing even if it's just sitting on the shelf. It comes equipped with a screw-on lid and straw, too, so your grad can take it on walks and in the car.

Béis The Sport Backpack

Perfect for grads on the go, this bag can hold their water bottle, phone, wallet and so much more when they're trekking across campus.

Loop Quiet Equinox Earplugs

These design-forward earplugs are multipurpose – they block out extra noise for study sessions and sleep time, or even loud parties and concerts! Your grad will appreciate that they come with an easy-to-carry case for keeping them on-hand in unforeseen, noisy situations.

Crush Your Goals Inner Truth Affirmations Deck

For an extra dose of motivation, this 40-count deck of cards will keep them going when times get tough!

Keurig K-Mini Single-Serve K-Cup Pod Coffee Maker

Coffee will ​always ​be a part of any new grad's life. Keep 'em caffeinated with this convenient coffee maker that's compatible with K-Cups for everyday ease.

Hoka Clifton 9 Sneakers

Hokas are undoubtedly the cool girl of running shoes, and they will definitely make your grad hit the pavement smiling, no matter if they're stepping foot on their college campus for the first time or making big moves in a new city.

Great Jones The Starting Lineup

This trio of cookware is such a stylish way to give your recipient's post-grad kitchen an upgrade. All three pieces are oven-safe and dishwasher-friendly to make cleanup a breeze.

Find all of the greatest gifts with Brit + Co!

Brit + Co may at times use affiliate links to promote products sold by others, but always offers genuine editorial recommendations.

This post has been updated with additional reporting by Meredith Holser.

I have such a love/hate relationship with haircuts. While I love the feeling of a fresh look as much as the next girl, I hate having to spend $100+ for a simple cut and blow dry session. During my recent trim, I talked with my hairdresser, Jack Rehak of Jack’s Hair Design in Hinsdale, Illinois, about ways to keep a haircut looking new and best practices for keeping hair healthy. Here's what he had to say!

Here's How Often You Should Cut Your Hair, According To Professionals

Photo by cottonbro studio/PEXELS

I’ll admit it — it had been eight months since my last haircut. My hair had lost its shape, my layers were nowhere to be found, and my ends were begging for mercy. Life got busy over the last few months and I was neglecting my haircare like never before.

My hairdresser could immediately see that I was beyond due for a cut and said I needed to get more taken off than I was hoping. I was definitely disappointed — I'd been working on growing out my hair for a while now, and it just felt like my hard work had completely gone to waste. He explained that getting consistent haircuts is the key to growing out healthy and strong hair, rather than letting it grow and grow until it eventually breaks. So let's dig into the top three things you can do to avoid this scenario!

1. Just Get The Dang Haircut

Photo by RDNE Stock project/PEXELS

Also avoiding a haircut like I was? You might want to schedule one at your nearest salon. Like my stylist said, when you wait too long between trims like I did, you risk your hair becoming heavy, dull, and lifeless. When the hair is dry or even dead, it’s nearly impossible for it to hold a curl or style, essentially collapsing on you and taking on more and more heat damage all the while. I know the pain of spending time on a blowout only for it to fall minutes later — it’s the worst.

According to Jack, getting a haircut every 10-12 weeks is the best time frame or your ends will pay the price. Between blow-drying, curling, straightening, sun, and weather, our ends get dry and start to break without the proper care. Getting consistent haircuts allows hair to bounce back, shine, and perform the way we want in a healthy way.

2. Leave-In Conditioners Are Your Friend

Photo by cottonbro studio/PEXELS

His top piece of advice to keep your hair looking and feeling hydrated between trims? Invest in conditioning treatments. Jack swears by the Olaplex conditioning system, specifically the No 3 Hair Perfector. Made with patented OLAPLEX Bond Building Technology™, this conditioning treatment repairs and prevents damage in as little as three minutes. No 3 promises to reduce breakage and visibly strengthen hair, so it’s the perfect assistance to keep ends fresh between cuts. Another conditioning treatments I’ve used and loved for years is the Moroccanoil Intense Hydrating Mask, which is designed to restore moisture, elasticity, and shine to dry hair.

3. Switch Up Your Shampoos

Photo by Karolina Grabowska/PEXELS

Switching shampoos frequently is a pretty hot tip that I honestly hadn't thought of. Our hair gets used to the same products and grows tired of them, resulting in lackluster locks. Jack’s advice is to switch brands after finishing every bottle of shampoo to bring life back to your hair. Have two brands that you’re loyal to? Even switching back and forth between them after every bottle should make a big difference in your hair. I’m a huge fan of the R+Co Dallas Biotin Thickening Shampoo, which makes my hair look thick and full, as well as the Moroccanoil Hydrating Shampoo, which is so hydrating and gives so much shine.

Photo by cottonbro studio/PEXELS

In the end, navigating your back-and-forth relationship with haircuts often feels like a rollercoaster ride between wanting that fresh look and cringing at the receipt. Luckily, by using conditioning treatments and switching up your products,, you can keep your locks healthy, shiny, and full of life between trims. But take a newly learned lesson out of my book: don't let your ends pay the price for procrastination and just book the haircut.

If you need some more hair inspo and advice, be sure to sign up for our weekly email newsletter!

Brit + Co may at times use affiliate links to promote products sold by others, but always offers genuine editorial recommendations.

Header image via Nataliya Vaitkevich/PEXELS