The ONE Technique You Need to Know to Make Beautiful Paper Flower Crowns

We’ve been around the block with DIY blooms, so we know that paper flowers can be serious business — concerts, summer festivals, warm weather weddings and the list goes on. Making a beautiful paper flower is easier than it may look, so we wanted to create a beginner-friendly guide to help our budding makers out there. Use our Paper Flower Crown Kit and start making!

This is a DIY best done with buds (ha!.. get it?), so grab a few friends and a mimosa or two and we’ll walk you through this intro to the world of paper flower arts. We used one *must-know technique* to make every flower and leaf on these crowns. I know, it’s crazy — but keep reading and we’ll show you how!
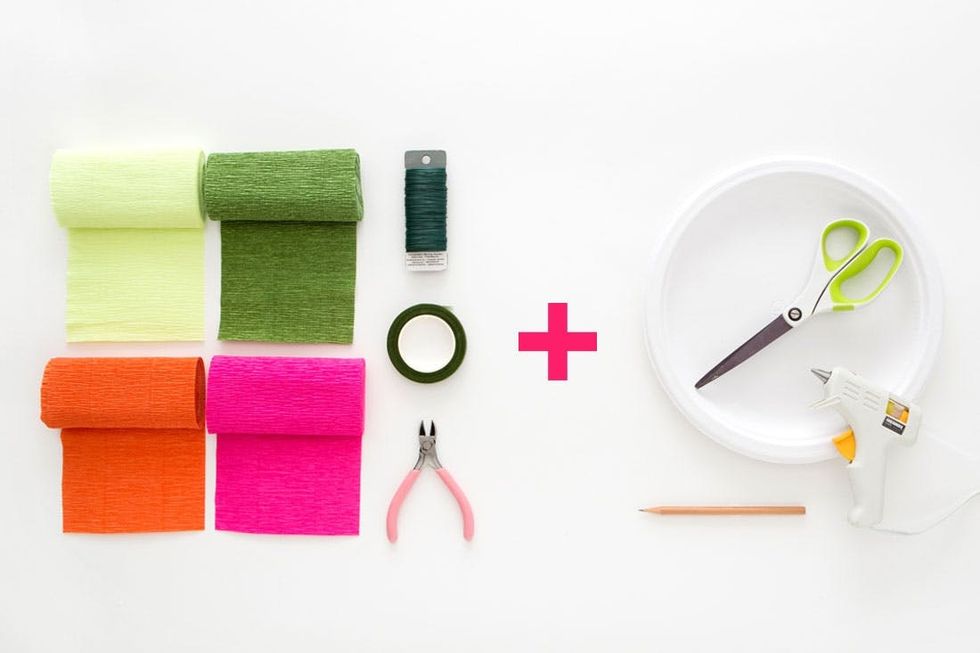
Materials:

– Heavy Crepe Paper

– Floral Tape

– Floral Wire

– Wire Cutters

Additional Tools:

– Glue Gun

– Glue Sticks

– Scissors

– Pencil

– Paper Plate

Instructions:

1. Wrap floral wire around your head twice to make a loose-fitting crown.

2. Cut with your wire cutter and twist the loose ends around the circle.

3. Cut a 6-inch length of wire, fold in half and twist around itself.

4. Tightly wrap the wire stem in floral tape.

5. Cut out flower petals with scissors.

6. Curl petals lengthwise by tightly wrapping around a pencil.

7. Place a dot of hot glue onto wire stem and stick on first petal.

8. Continue gluing on 5 more petals, working around in a circle.

9. Wrap floral tape around the base of the flower and down the stem.

10. Curl back flower petals using a round pencil.

11. Repeat this process to make more flowers and leaves.

12. Twist flower stems around wire circle to form your crown.

13. Wrap floral tape all the way around wire circle to cover all exposed wire.

Grab your main materials (pictured left, and included in our kit!) and a few household craft supplies (pictured right) and let’s get started.

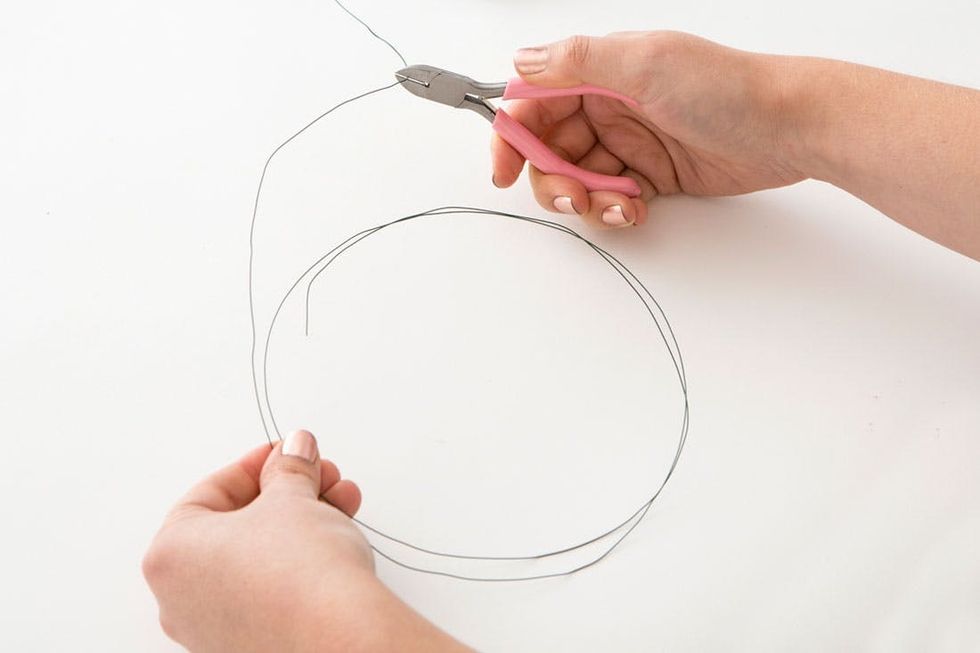
First, unravel enough wire to go around your head twice and cut with wire cutters.

How to Make Wire Crown + Stems

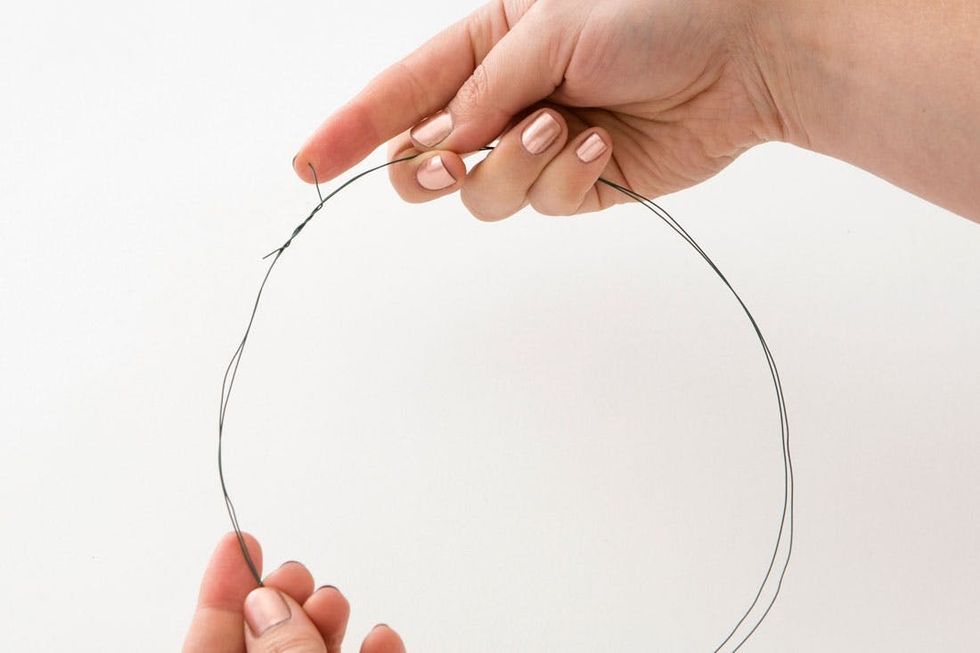
Twist the loose ends around the rest of the wire circle to secure. Double check that this circle sits nicely on your head, and set aside.

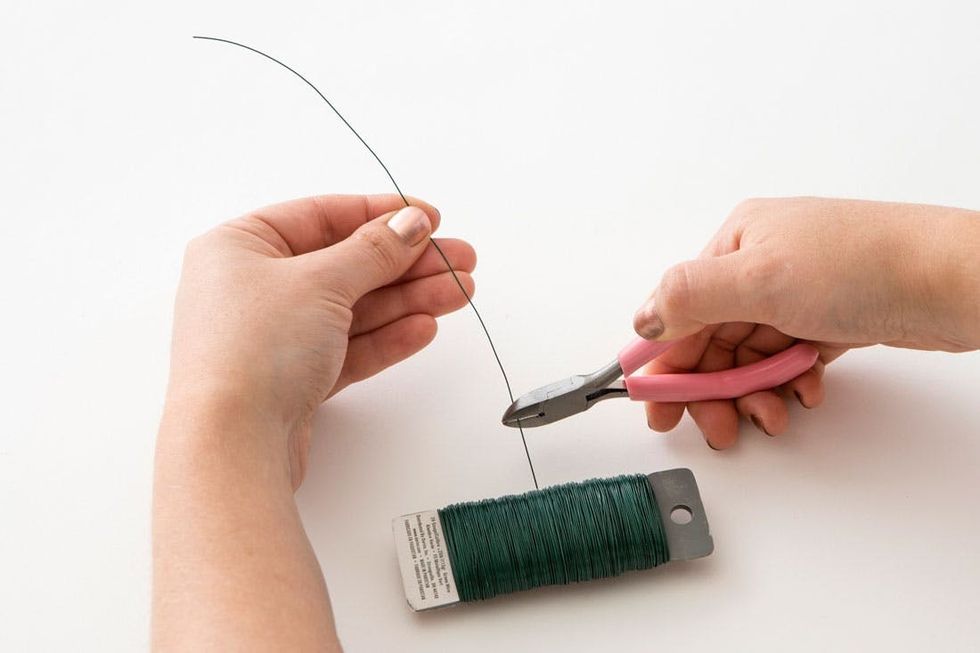
Now that you’ve made the base of your crown, its time to start making flowers! Cut about a 6-inch length of wire using your wire cutters.

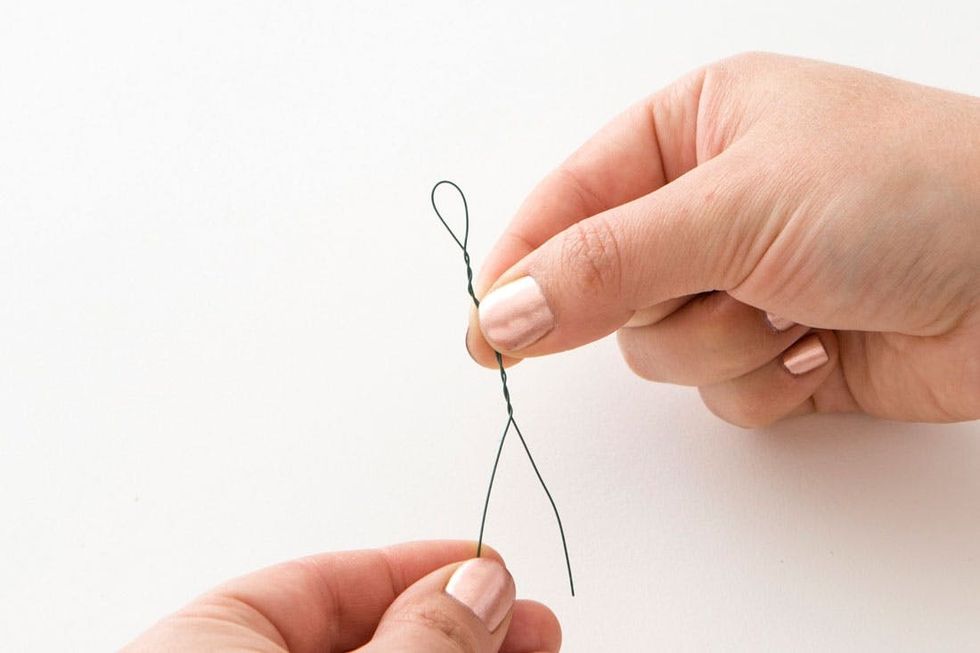
Fold wire in half and twist the ends around each other, forming a stem with a small loop at the top.

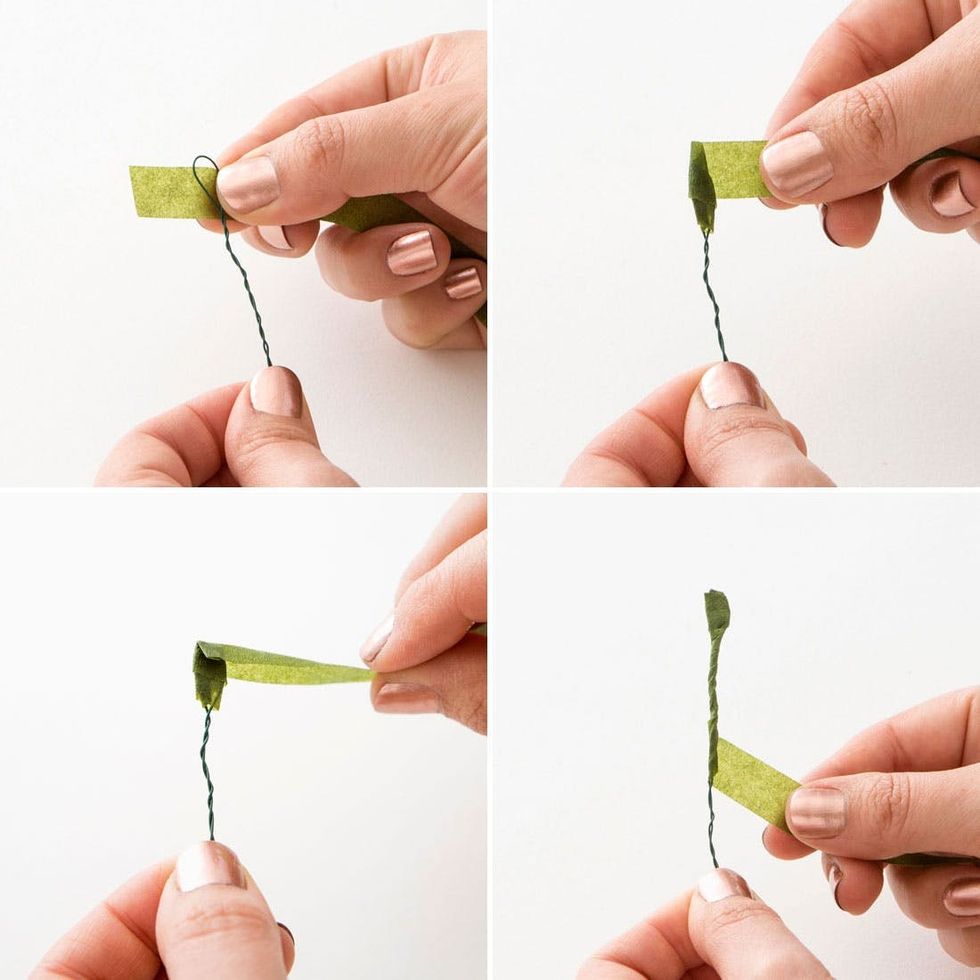
Tightly wrap the small loop and the rest of the stem in floral tape. Note that the tape only sticks to itself, so make sure to tightly overlap tape-on-tape the whole way down.

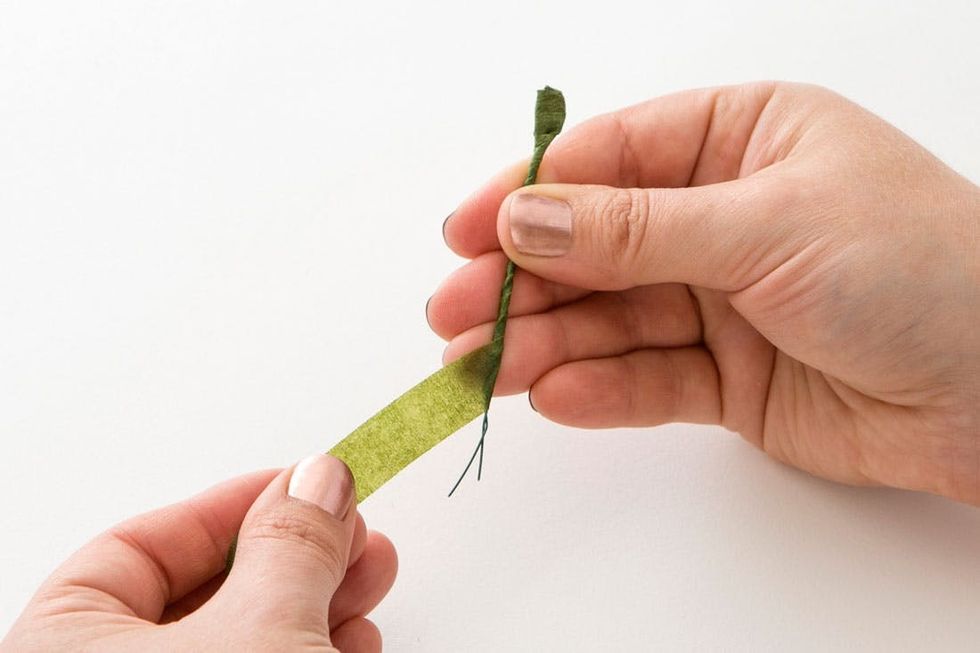
Pro tip: this goes much faster if you hold the tape away from the stem at a diagonal, and twist the stem with your fingers to wrap it up. Cut off excess tape with scissors and wrap the end around.

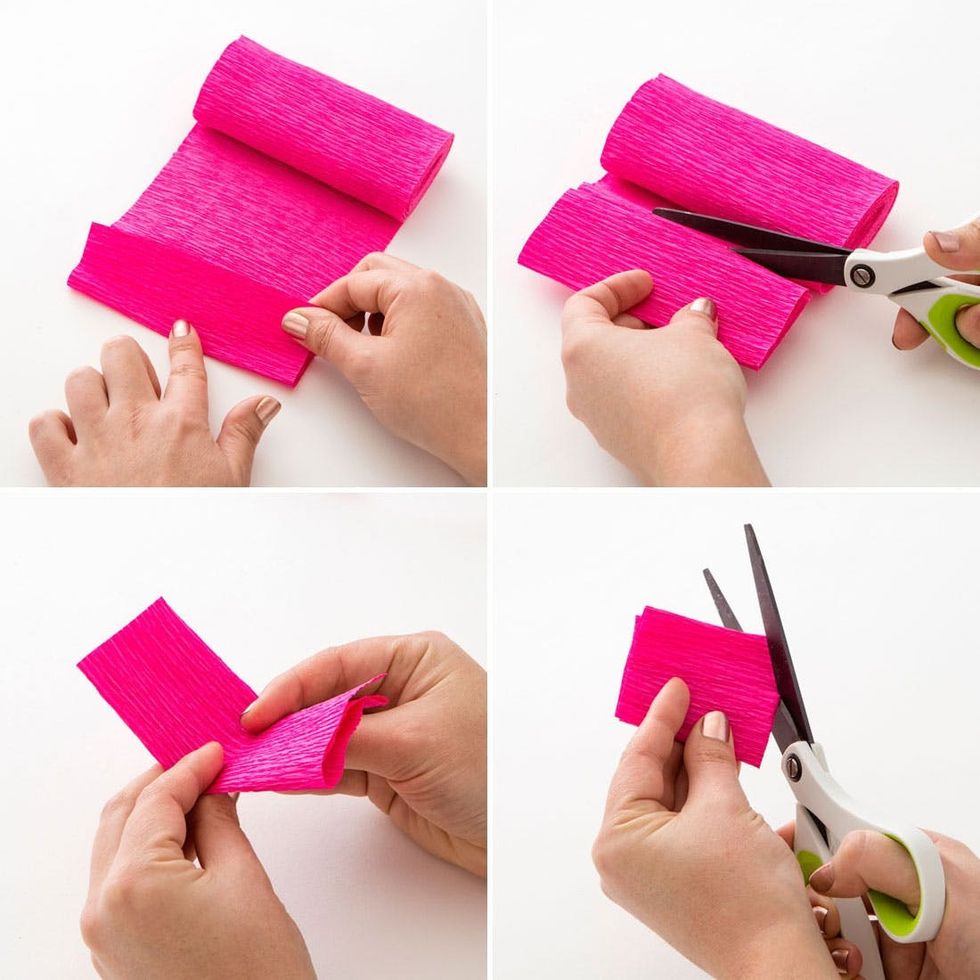
Ain’t nobody got time for individually cut flower petals. Accordion fold about 1 1/2 inches of crepe paper over itself a couple of times, fold in half and cut through multiple layers at once.

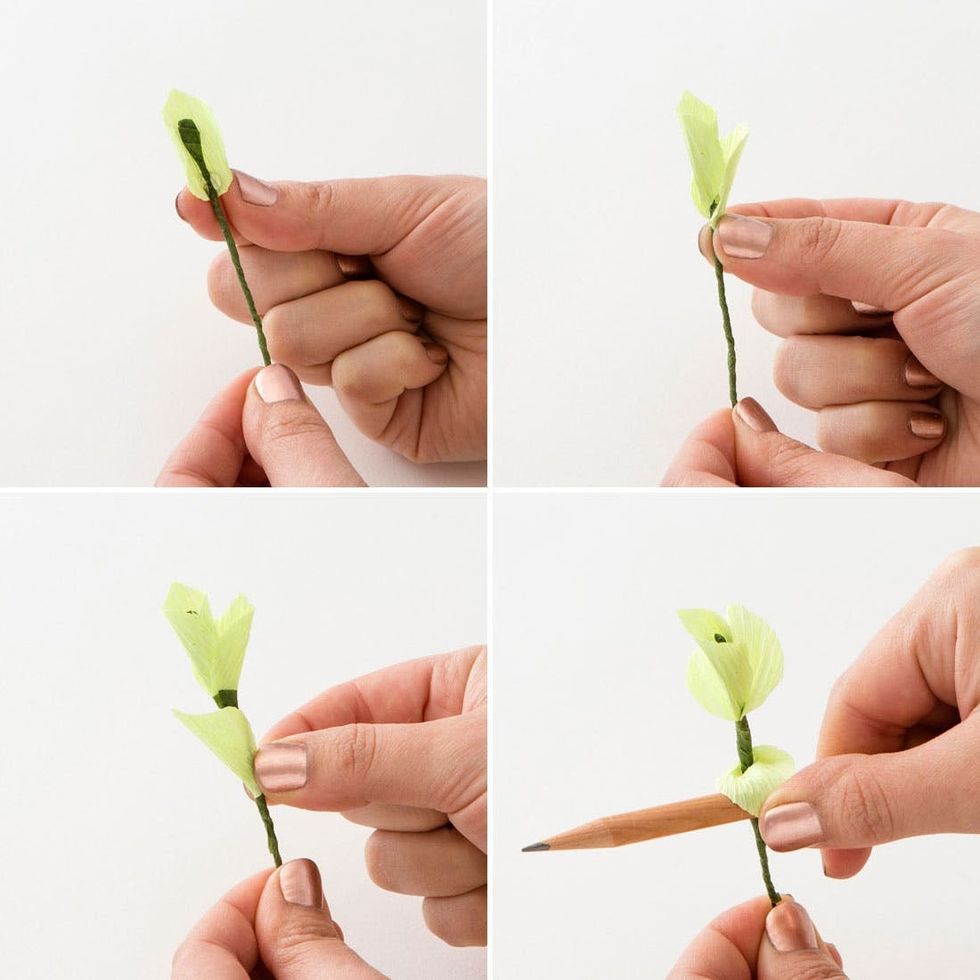
How to Make Paper Flowers + Leaves

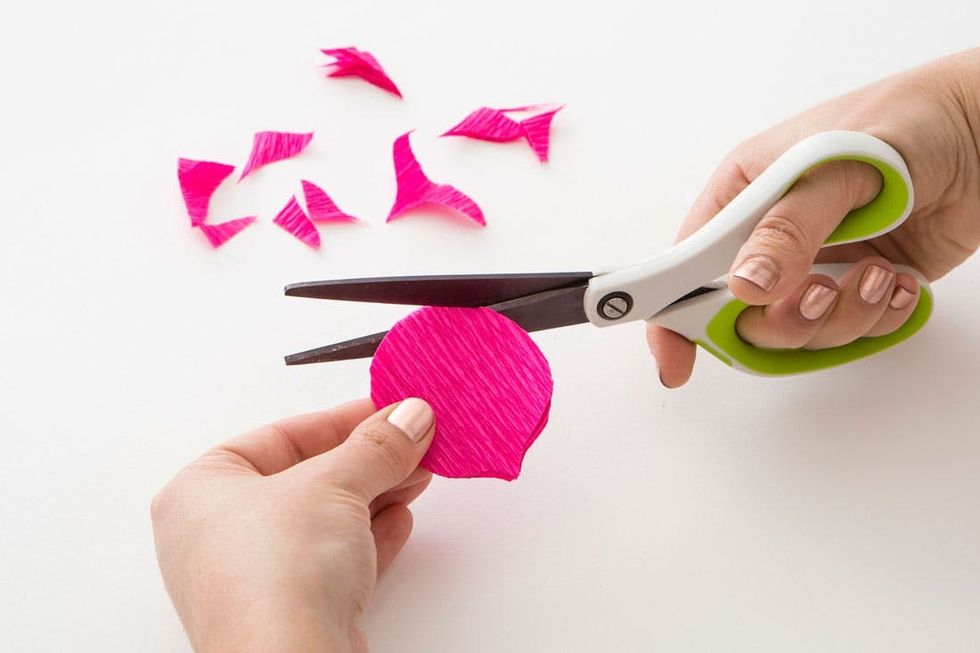
Cut out this rounded flower petal shape with a small point at the top, making sure to cut through all the layers on all sides so that the petals are unattached. We made these petals about 2 inches tall by 1 1/2 inches wide, but any size will work.

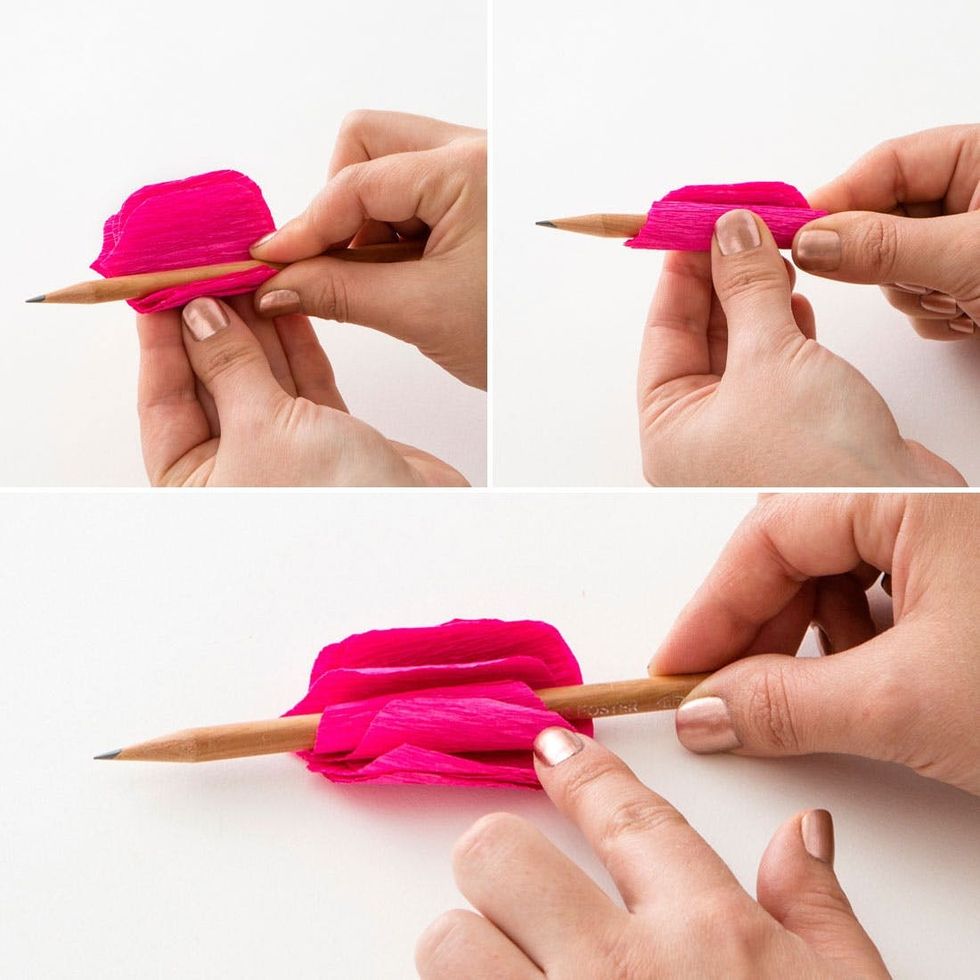
While your petals are still in a neat stack, tightly wrap them around a pencil lengthwise and curl them all at once. Note that the grain of the crepe paper (those thin little lines) should run parallel to the pencil.

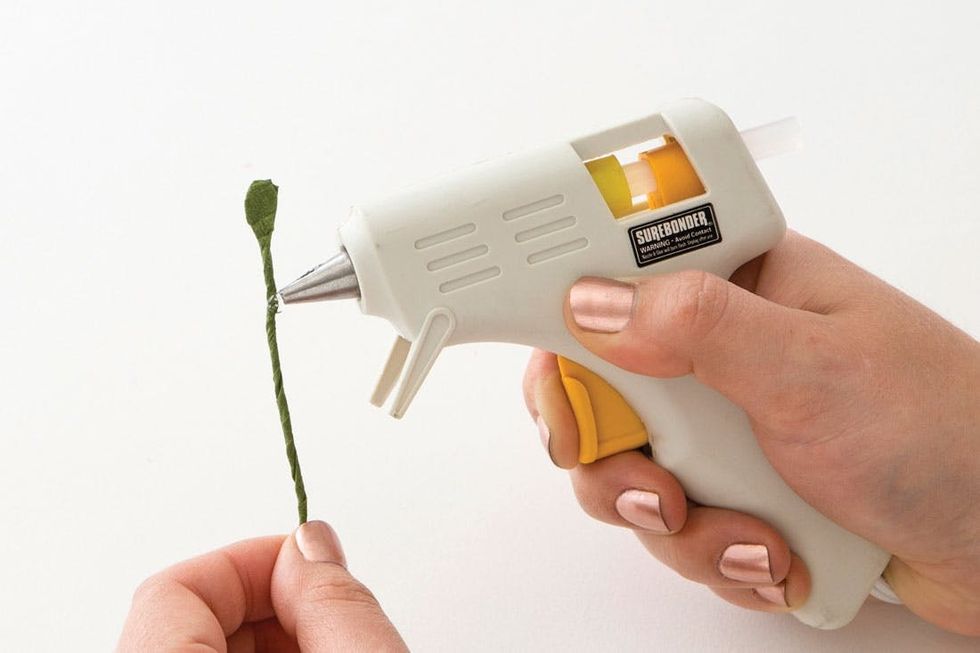
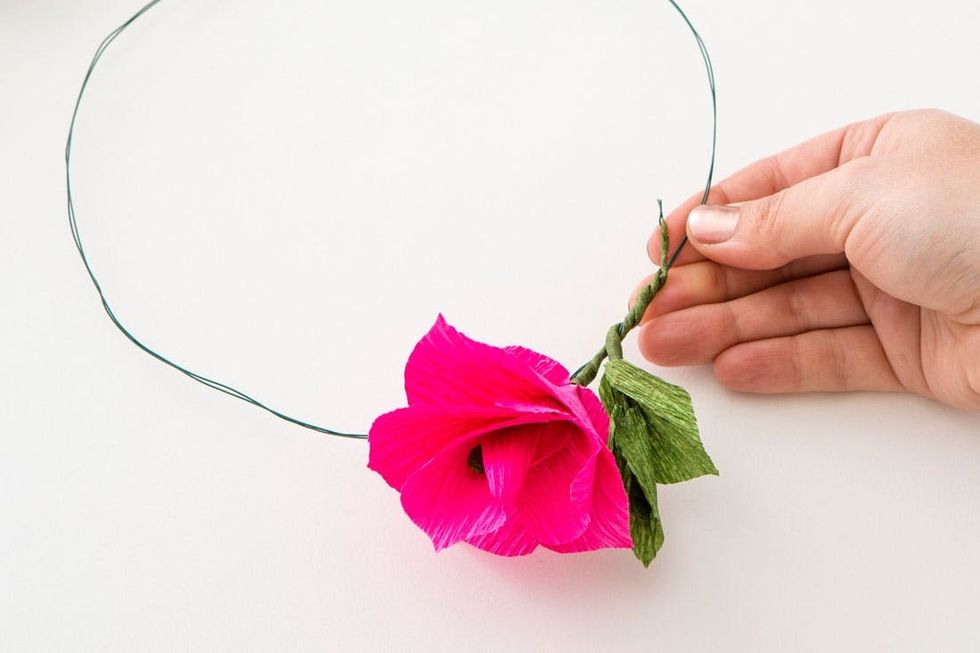
Place a small drop of hot glue onto your stem, about 1 inch from the top.

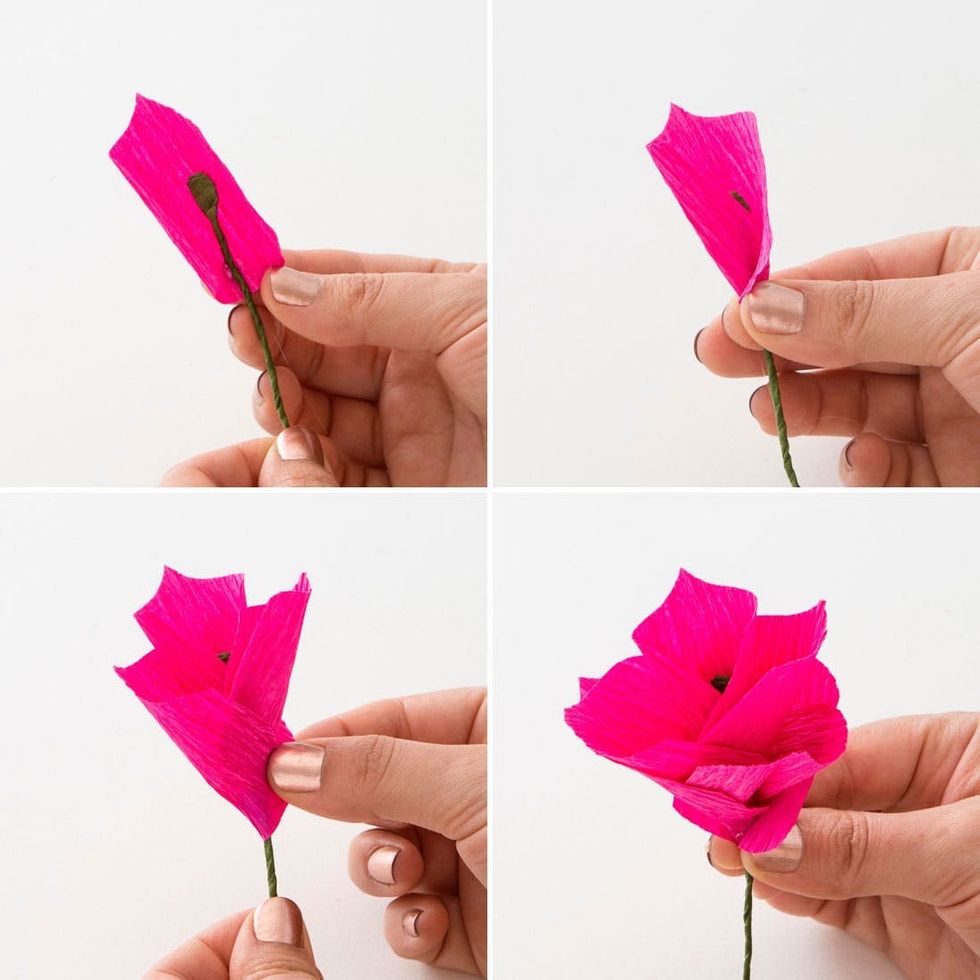
Let glue cool down for two seconds and then stick on your first flower petal. Pinch that first petal around your stem, and continue glueing on five more petals, working around the stem in a circle.

Once all six petals are glued on, wrap floral tape around the base of your flower and down the stem. It helps to pinch the tape just underneath the flower so that you can wrap it tight enough to stick.

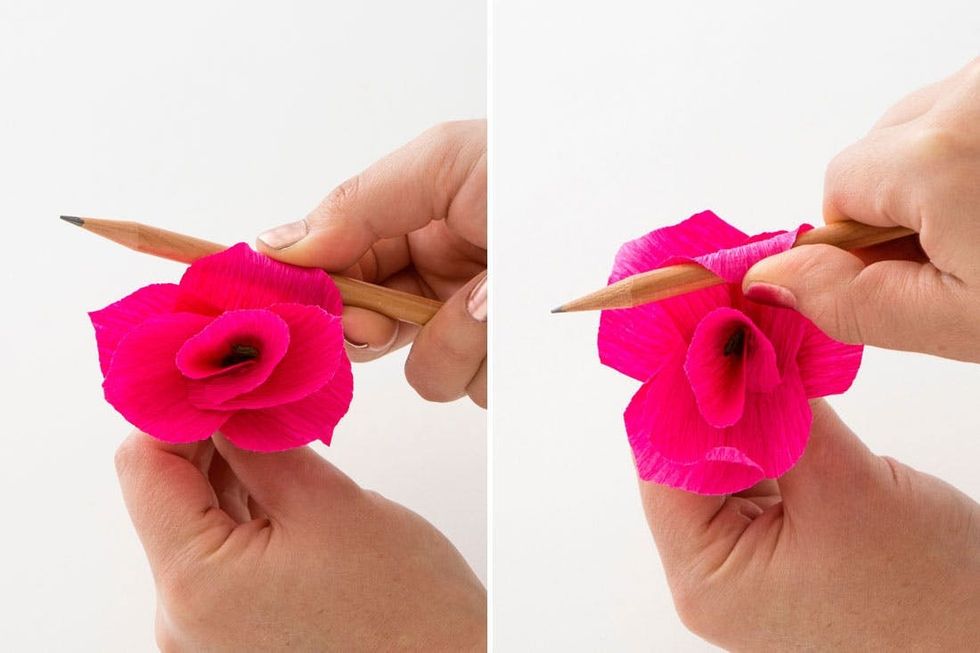
Your flower may look a little cone-like at this point, so its time to shape those petals! Curl petals outward by wrapping around a pencil, and curl one or two petals inward for variety and a more natural look.

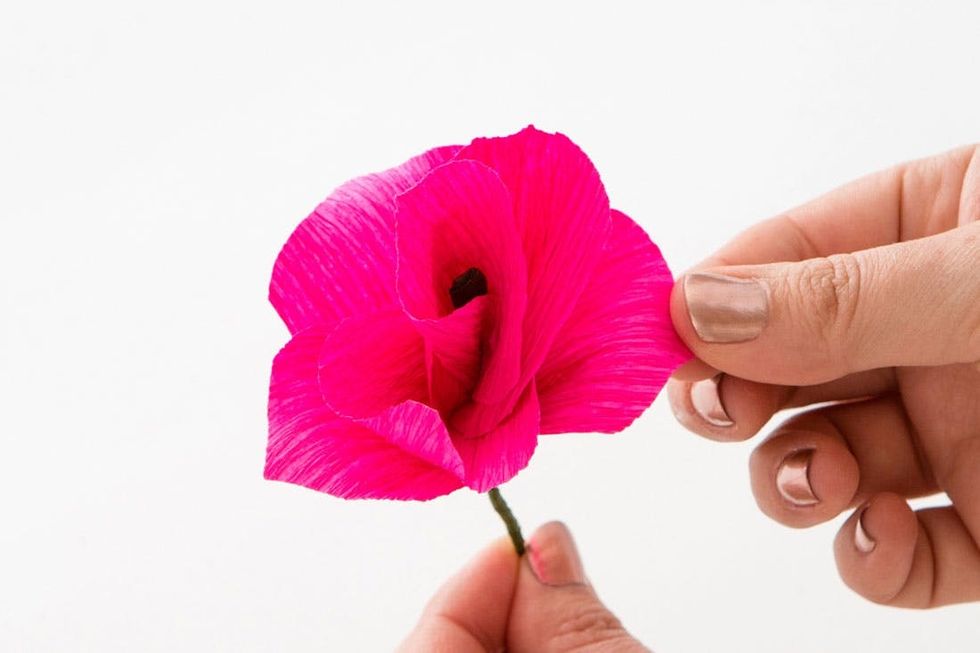
Ta-da! Look at that big beautiful bloom! Once you’ve mastered this, the rest is easy.

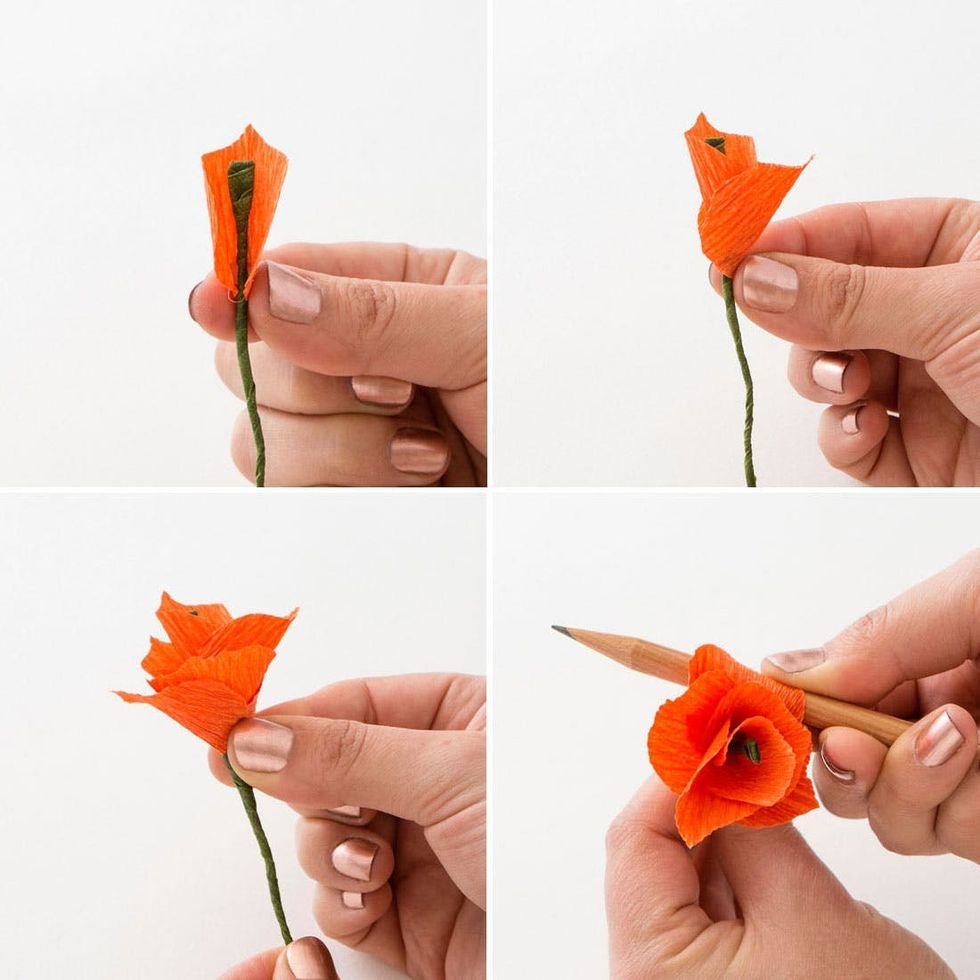
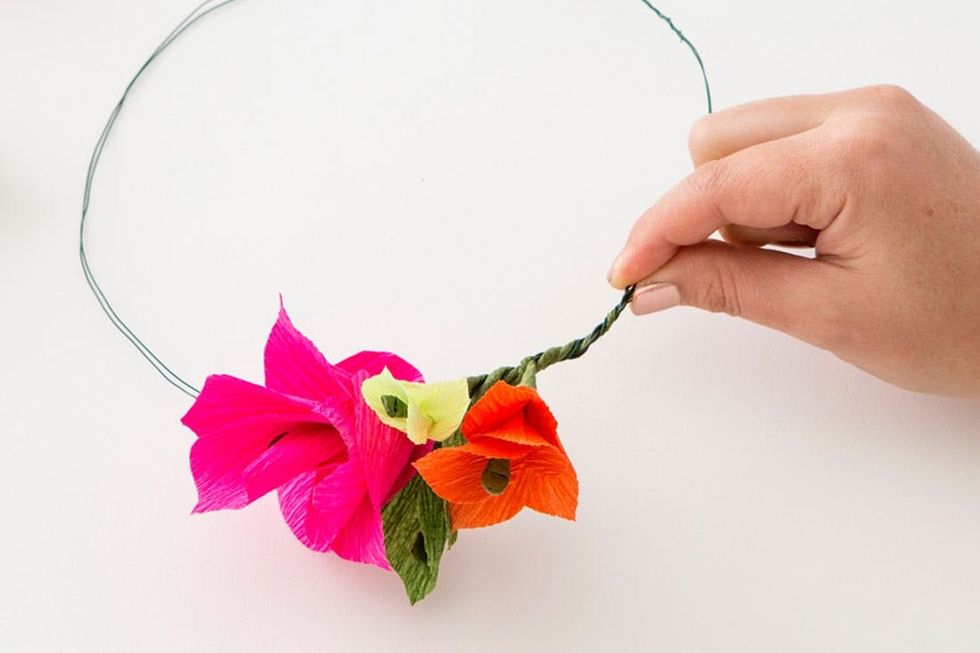
We cut the petals of these orange flowers smaller than the pink ones, at about 1 1/4 inches wide and 1 1/2 inches tall, to give the final crown some variety and depth. But the process is just the same!

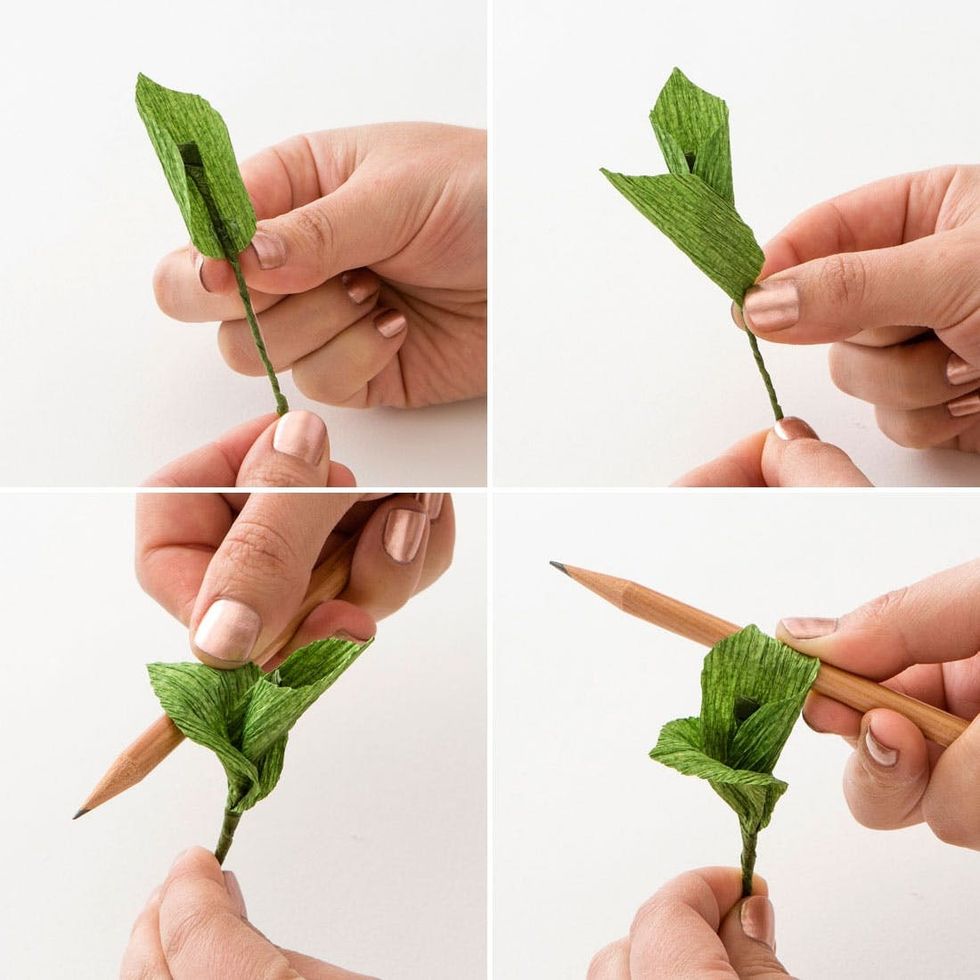
And these leafy greens? Same process, but instead of six petals, just add on two or three.

These bright green guys are just smaller versions of their dark green friends. Simple enough!

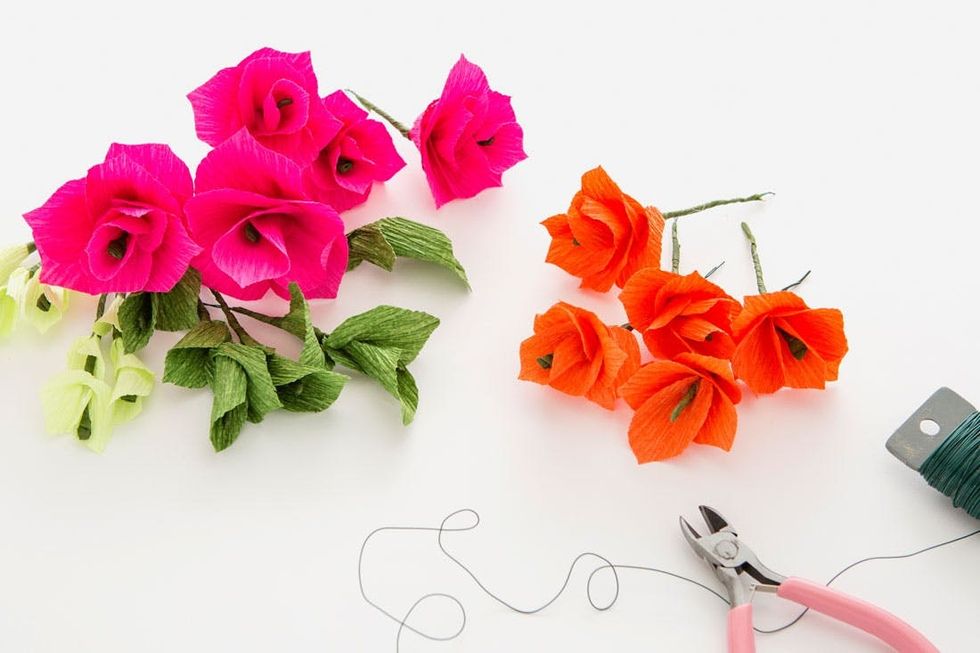
Put on some good tunes and repeat this process until you have a nice assortment of flowers and leaves. We found that five of each color is enough to make a crown that goes 2/3 of the way around, leaving some space to pin down and style in your hair.

The crown on the left uses five of each color. The middle crown uses two large blooms, three small and 16 leaves. And for a classic, full circle crown (pictured right), we used eight large flowers, 12 small and 15 leaves.

How to Build a Flower Crown

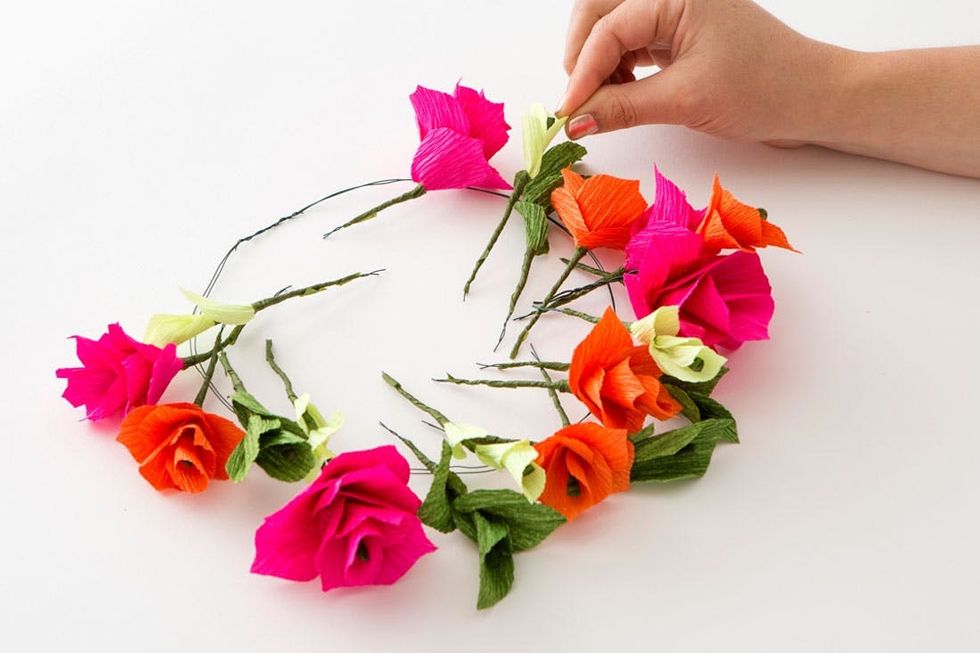
Position your flowers and leaves around your wire circle, highlighting your favorites up front, and framing with leaves along the way.

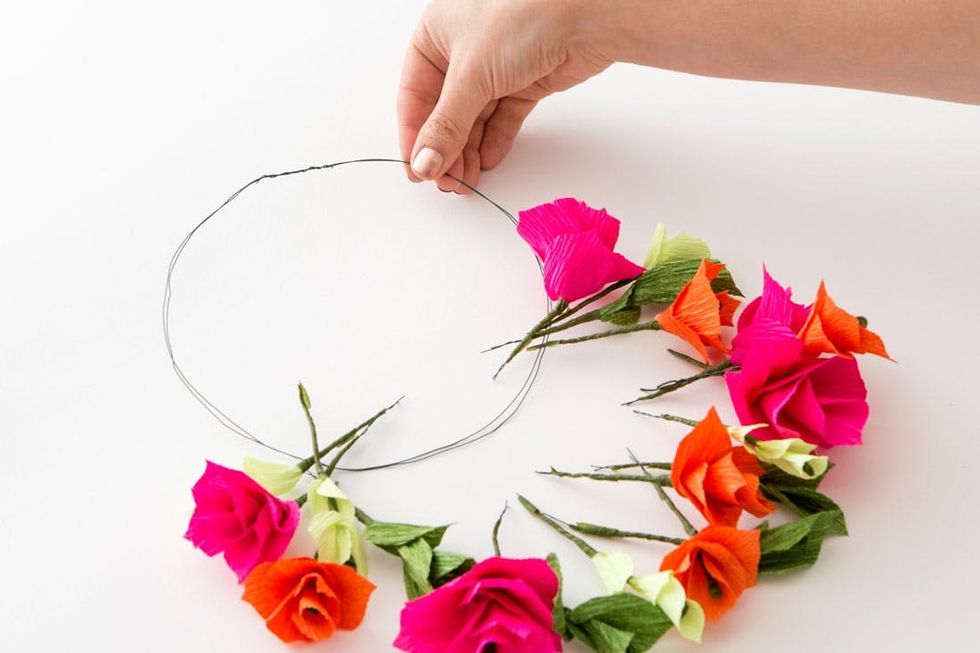
Now carefully pull out the wire circle from underneath, keeping your arrangement fairly intact.

Start twisting the stems of your flowers and leaves around the wire circle, overlapping them so that they sit nicely tucked together.

Keep building up your crown, minding your Thrillers (large statement flowers), Fillers (small flowers to bulk it up), and Spillers (greenery that shoots out to frame the whole thing).

Wondering what the heck we’re talking about? Check out our Flower Arranging 101 online class to really ramp up your arrangement game!

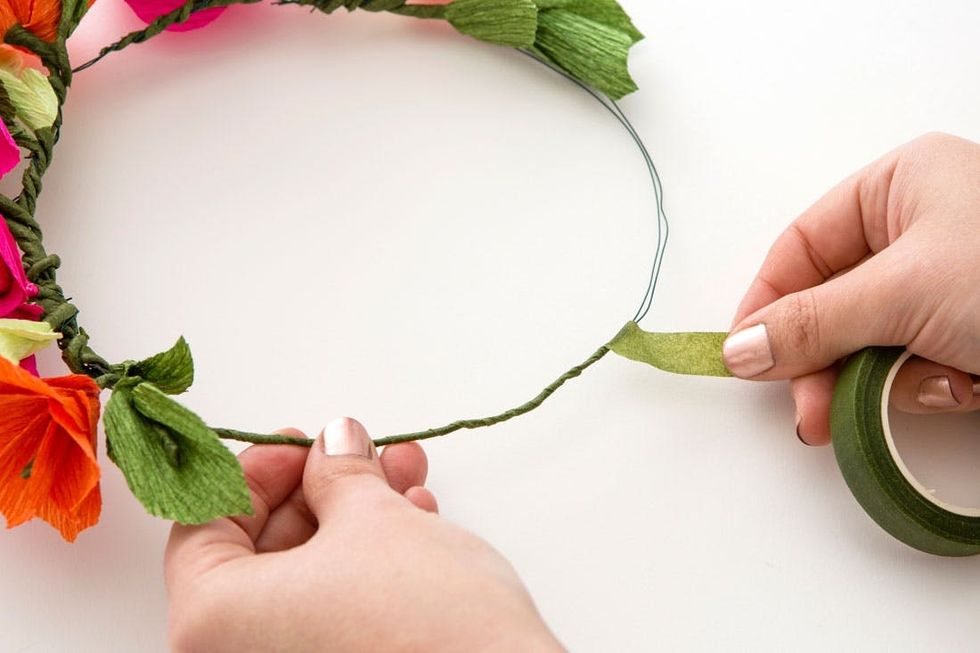
Once you’ve added all the flowers and leaves you’d like, seal the deal with floral tape by tightly wrapping it around the entire circle.

Yes, that includes in and amongst those flowers! Bend leaves and flowers upward by the stem to reach tricky areas underneath and cover all exposed wire.

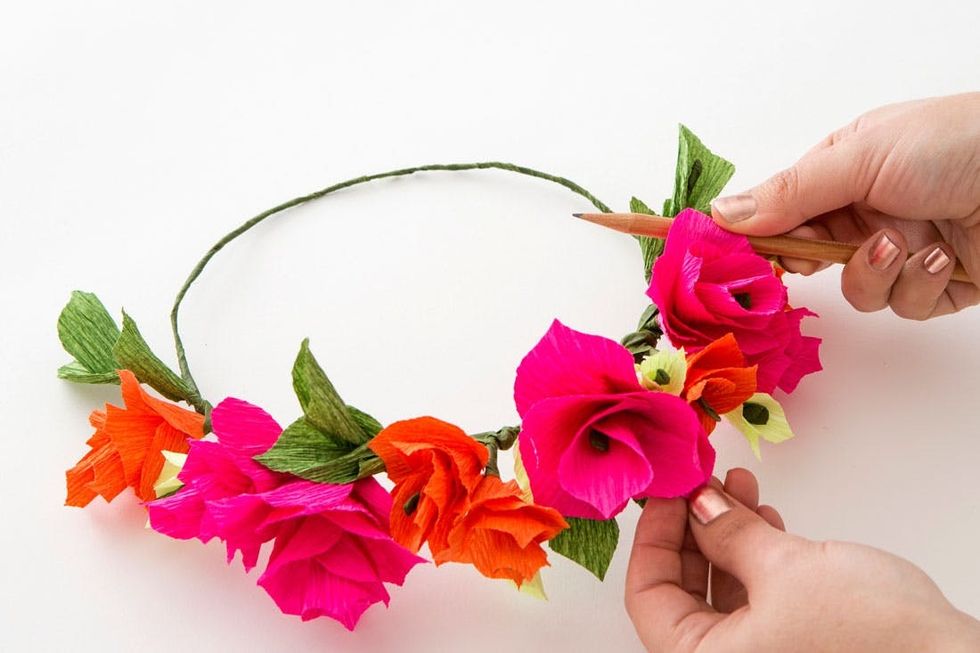
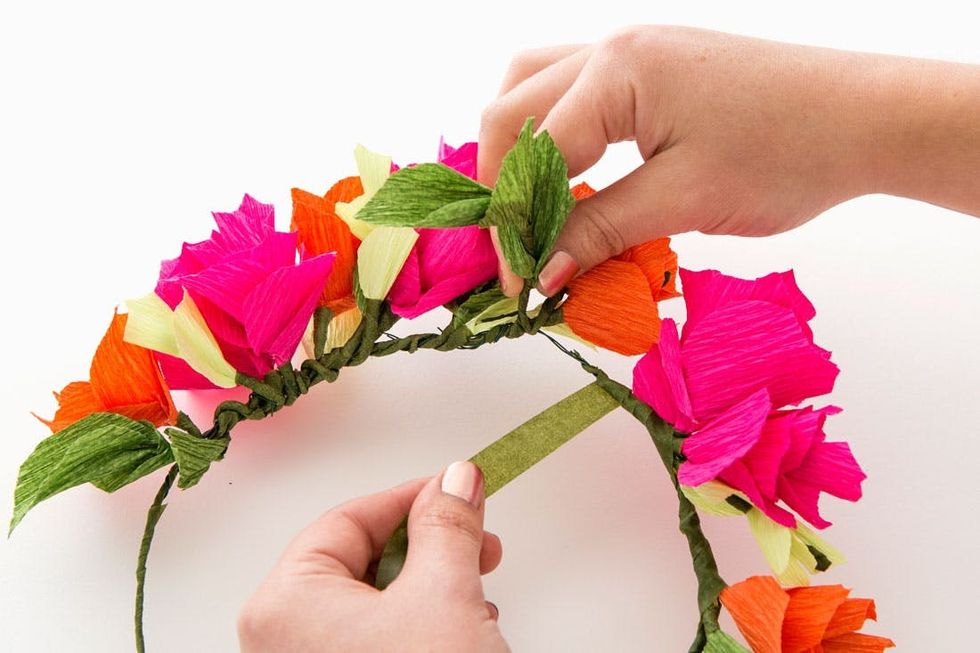
Now that you’ve man-handled these flowers a bit, take some time to reposition them and re-curl a few petals here and there. It’s amazing how well this crepe paper holds up!

Get up close and personal and check out those vibrant colors. Fiery pink and orange vs. deep violet and lavender – which will you choose?

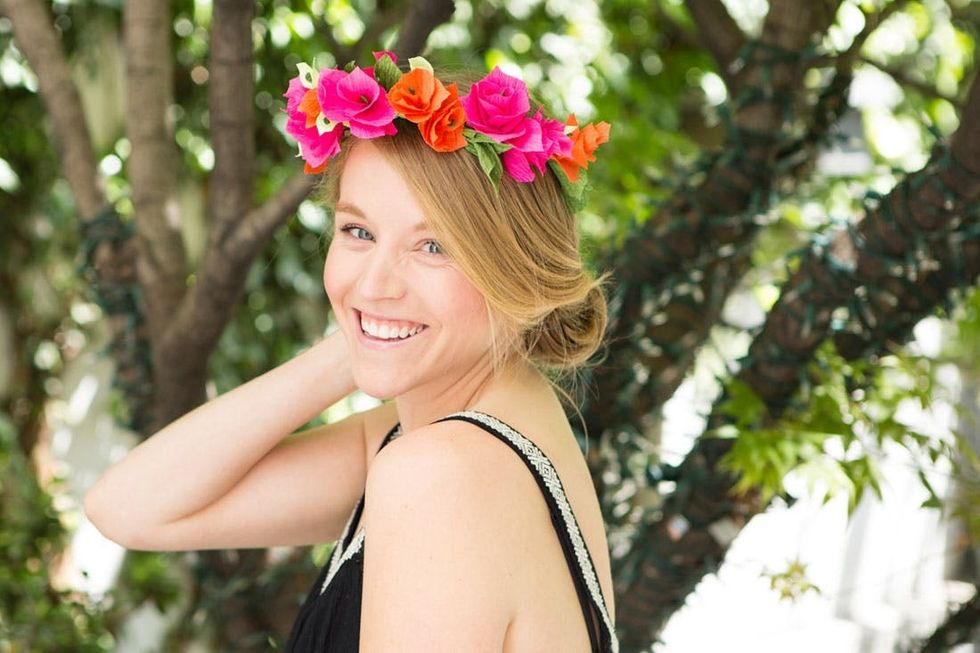
Maddie’s looking pretty in pink and ready to frolic in a damn meadow!

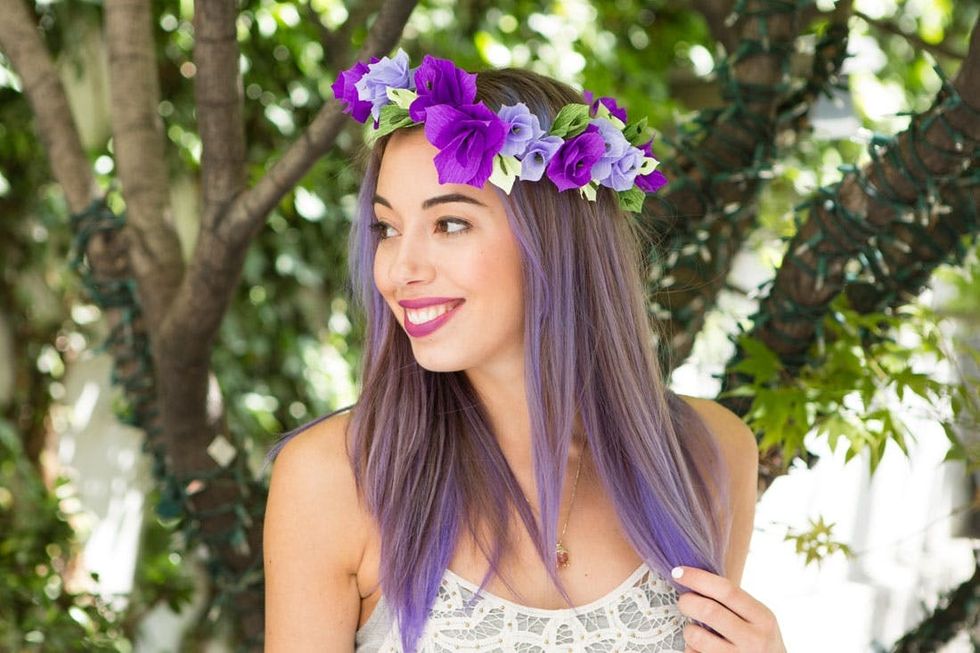
And Kelly’s giving off some serious sultry vibes in violet.

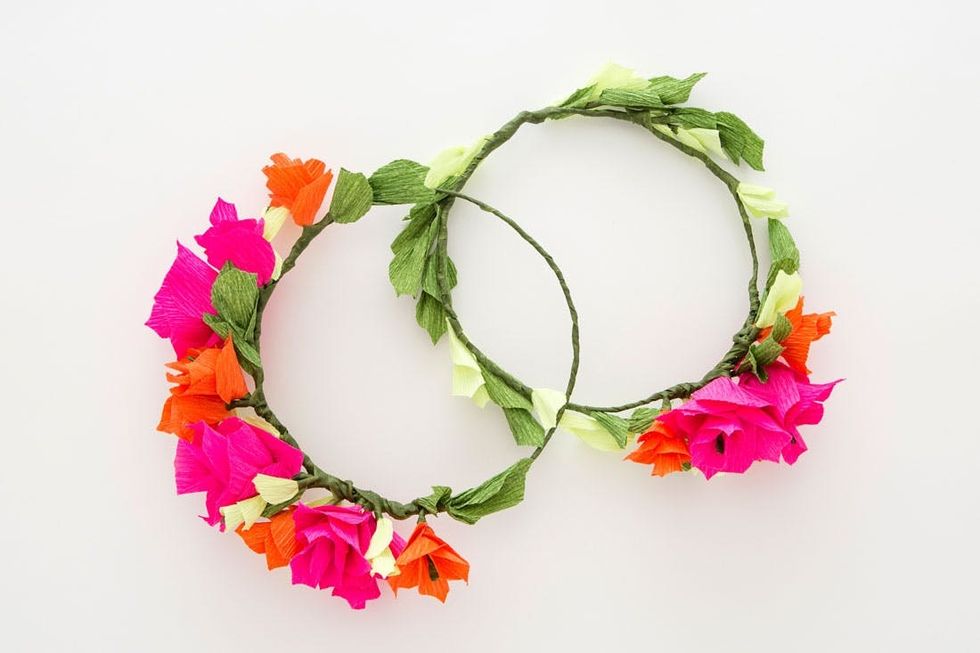
Remember, our kit comes with enough materials to make TWO flower crowns in your favorite color combo. And yes, that includes mess-ups!

So grab your fab bestie..

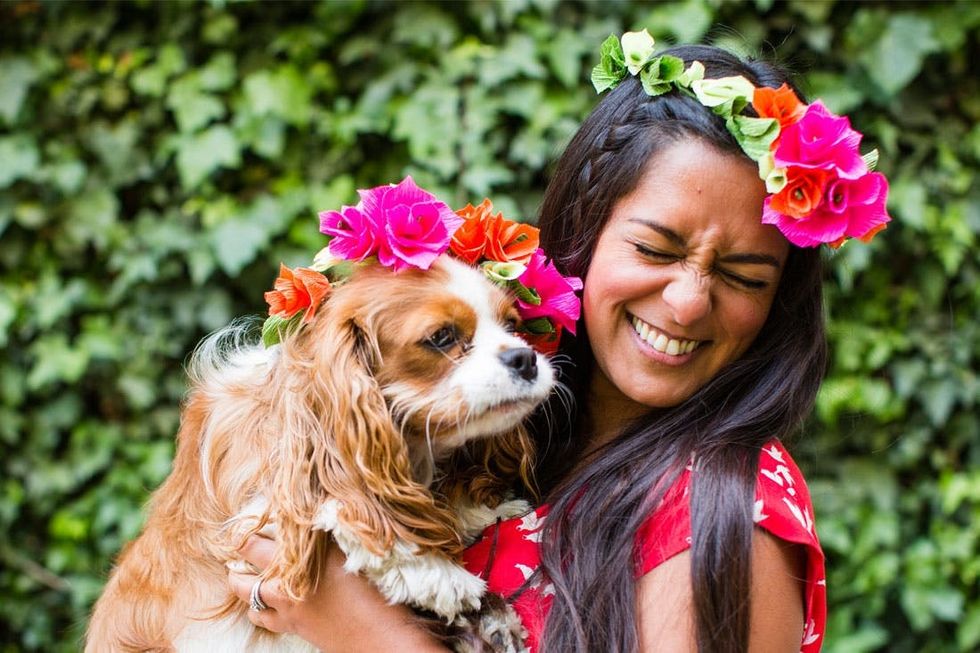
…or your furry one ;)
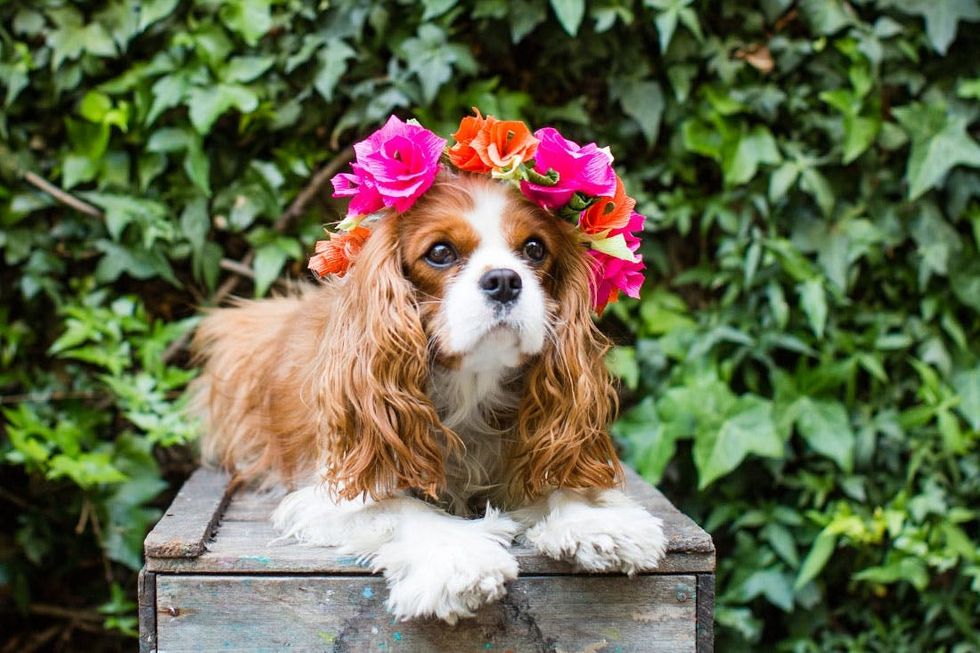
And have a ball!

Dreamy flower fields are popping up in our feeds this spring, making us excited for the warm weather and happy blooms coming our way. I recently road-tripped to one of the best in the country: the Flower Fields at Carlsbad Ranch, just a 45-min drive north of San Diego. This sea of fresh and colorful ranunculus not only offers the perfect photo opp, there are also plenty of events throughout the season to make the trip worthwhile. Here’s the perfect weekend stay in the area, plus more beautiful flower fields around the U.S. to pop by this season.

Image viaFlower Fields at Carlsbad Ranch

Flower Fields at Carlsbad Ranch is 50 acres with millions of vibrant flowers in a rainbow of colors. Head to the fields through May 31 for more than just flowers. There are live music events, creative workshops like Flower Flow Yoga, Charcuterie Workshop, a flower crown-making workshop, a sweet pea maze, tractor rides, picnics, wine tastings, meditation, tea in the garden, food trucks, and more.

Image via FlyBy Photography

Plan to stay the day and bring home beautiful flowers and/or inspo for your own garden. Carlsbad itself is a stunning coastal escape, with seven miles of pristine SoCal beaches, amazing restaurants, and hotels + spas (girls trip, anyone?). Choose your fun of choice: surfing, biking, hiking, sunbathing, or massaging. From a floral-infused spa treatment or sipping on a botanical cocktail, the sleepy town of Carlsbad is actually the perfect year-round getaway.

Where To Stay

Image via Westin Carlsbad Resort and Spa

It was my daughter’s spring break, so after some fun in LA checking out the Tar Pits, California Science Center, Griffith Park, and more, we headed down to Carlsbad for the Flower Fields, Legoland, and a visit with family. We spent a night at the Westin Carlsbad Resort and Spa, a vast resort with fire pits, a spacious pool and jacuzzi so you’re not piling on top of other guests, ping pong and pool table poolside, and a cozy brunch-friendly restaurant.

Image via Westin Carlsbad Resort and Spa

Bonus: if you’re traveling with kids, the Westin offers a private entrance right into the Legoland Park. We had stayed at the Legoland Hotel before, which is fun for kids but not my ideal stay. The Westin was fun for me, my partner, my 9 year old daughter, and our dog!

Image via Omni La Costa Resort & Spa

In celebration of flower field season, the Omni La Costa Resort & Spa nearby has a Petals, Candles & Craft Workshop and a Power of Flowers kids program each Sunday; plus floral-inspired bites at the resort’s Test Kitchen Series. The Cape Rey Carlsbad Beach, a Hilton Resort & Spa also offers a seasonal Red Flower Fields Scrub & Massage at its spa and Floral Infusions cocktails at their bar.

Image via The Beach Terrace

The Beach Terrace also offers a Bloom Bliss Package, which includes accommodations, two tickets to The Flower Fields at Carlsbad Ranch, farm-to-bakery cookies from a local baker, and a donation to The Flower Fields Foundation.

Where To Eat

Image via Jeune et Jolie

Outside of the Flower Fields and resorts, there are some amazing restaurants and cafes in Carlsbad too. We especially enjoyed Harumama Noodles + Buns, which creates adorable animal-themed sticky buns. All of the food was delicious for kids and adults! Other places to try: Jeune et Jolie, a beautiful French spot with SoCal influence, Campfire for comfort food and creative cocktails in an outdoor setting, and Handel's or Jeni's for homemade ice cream.

For Parents

My 9 year old daughter loves Legoland and this was our third time going. Beyond the build sessions and incredible Lego sculptures of our favorite cities, we did a few new things, like saw a fun extreme sports performance, a boat ride in their new dino exhibit, and a submarine ride with an aquarium of sharks, sting rays, and more.

More Flower Fields In The U.S. To See

Image via Shutterstock

Purple Haze Lavender Farm

Purple Haze Lavender is a 7-acre farm located in Sequim-Dungeness Valley of the northern Olympic Peninsula of Washington State. The town was rated one of the best small towns in the northwest by Sunset Magazine. The farm has a gift shop, ice cream stand with lavender ice cream and lavender lemonade (yum!), picnic area and you can pick the lavender from mid-June through early August.

PELINDABA LAVENDER FARM on the San Juan Islands is also worth a visit.

Image via Shutterstock

Skagit Valley Tulip Festival

Nothing says spring more than the arrival of the tulip. The Skagit Valley Tulip Festival in Mt. Vernon, Washington offers four stunning tulip gardens. Find breweries and wineries nearby, museums, tea houses, and more nearby. Here are some recommended stays in the area.

Image via Tabitha Mort

Wooden Shoe Tulip Festival

This family farm in Woodburn, OR has been growing tulips since the 70s. Visit now through the first week of May. Find fresh cut flowers, gift shop items, and all sorts of food and activities on weekends.

Crested Butte Wildflower Festival

This festival celebrates the wildflowers blooming in one of the most picturesque valleys in Colorado. It goes all summer long with hundreds of events and program. The festival takes place July 12-21.

Image via Janice Carriger

Bluebonnets superbloom

You can find bluebonnets growing all over Texas this season, but one of the best places to spot the state flower is at The Lady Bird Johnson Wildflower Center at University of Texas, Austin. Explore nearly 900 different species of plants, including a great view of beautiful bluebonnets.

Find more travel inspiration on our Travel page!

Header image by Josh Hild

I love looking at Zillow listings as much as the best of us, but absolutely nobody loves daydreaming about all the outrageously beautiful (and costly) houses for sale more than my mother-in-law. She finds the most gorgeous gems across the country, saving them all for when she inevitably wins the lottery (if anyone would, it's her TBH) and can take her pick of the housing litter. Instead of gatekeeping these jaw-dropping homes, I had her send them my way so I can share them with you! So without further ado, here are 15 of most insanely stunning — and insanely expensive — Zillow houses for sale right now.

Beach Houses

Image via Zillow

East Hampton Beach Cottage

Cost: $44,500,000

The Hamptons are known for their clean, chic shingle architectural style, and this "cottage" is no exception to that. And while I absolutely adore the inside of this home, it's the grounds that really get me at the end of the day. Think about all the beautiful backyard dinner parties you could throw!

Image via Zillow

Destin Beach House Destination

Cost: $4,100,000​

Who needs a time share in Destin when you could own all this?! This airy, beautiful house takes coastal home style to the next level. I love the sandy, earthy tones paired with the light blues and open space. And for less than 10% of the Bridgehampton beauty above, this is basically a steal, right? 😉​

Image via Zillow

Marvelous Marco Island Getaway

Cost: $5,450,000

I vacation on Marco every year with my in-laws, but I can PROMISE you our one-bedroom timeshare (that I love) isn't anywhere near this stunning super home. Swipe through photos to see how gorgeously staged this multi-million dollar home is — I promise it won't disappoint!

Image via Zillow

Laguna Beach Beauty

Cost: $21,500,000

Obviously Laguna Beach is known for so much more than the hit MTV show, but I can't untangle the two. So in my mind, this is the home Lauren Conrad's parents worked on in Season 1 Episode 1 — a $20+ million dollar stunner that I would later stare at on Zillow. It's not true, but wouldn't it be fun?

Image via Zillow

California Dream House

Cost: $55,000,000

Not only is this a dream house because of how it looks, but also because I could only afford this in my literal wildest dreams. Unless someone decides to discover me on the New York streets for the funny, talented gal my parents think I am, this is strictly a mood board manifestation moment. (But, what if?!)

Image via Zillow

At Home In The Hamptons

Cost: $79,995,000

Oh, how I could wax poetic about this $80 million Bridgehampton beauty. Shall I compare thee to a summer's day? Ya know...the one I would love to have in this very house? Just lounging, living luxuriously? That imaginary inheritance I daydream about could reaaaaaally come in handy right about now.

Image via Zillow

Fantastic Florida Beach Cottage

Cost: $9,950,000

In case you can't tell, none of these homes are "cottages" outside of their aesthetic. While this six bedroom, four bathroom may look humbler than the rest, the cost should indicate what we're working with here. Each room is so perfectly curated, and to have all this right in the heart of Naples is absolutely everything. I could see myself sitting by that fire for SURE.

Condos & Townhouses

Image via Zillow

Gorgeous Georgetown Condo

Cost: $5,495,000

DC is more than just Capitol Hill, and this Georgetown Condo proves it! The natural light, the natural wood accents, and the big, airy rooms make this home a welcomed reprieve in on of the busier U.S. cities. And while you're getting a lot in a small package (three bedrooms for $5+ million...😭), you're really paying for the neighborhood. Georgetown really is full of beautiful townhouses, great restaurants and bars, and overall good vibes.

Image via Zillow

Upper East Side Excellence

Cost: $65,000,000

Hello, Upper East Siders...Zillow Girl here! All jokes aside, this $65 million townhouse is giving all the old money luxe that Chuck Bass and Blair Waldorf would settle into quite nicely. The molding, the wraparound staircases, and the sheer size alone are something else, but the biggest surprise here? TEN BATHROOMS. TEN!!!!!!

Image via Zillow

Totally Airy Brooklyn Townhouse

Cost: $6,950,000

Good new, girls! This totally killer townhouse had a $300,000 price cut last month, bringing it to...just under $7 million! While I try to fix my eye twitch after writing that, scroll through to see the gorgeousness that is this literal mid-century modern four-story home. It's like a little (big) oasis in the middle of the big city!

Image via Zillow

Beautiful Turn-Of-The-Century Brooklyn Townhouse

Cost: $6,995,000

I've said it once and I'll say it again: Carroll Gardens in my dream neighborhood. It's got all the Brooklyn charm with its brilliant brownstones, lively dining scene, and tree-lined streets. Plus, it's so incredibly close to Prospect Park for all your summer strolls with the kids or the dogs or yourself or whomever! And while I could go on and on about the location, the townhouse itself is kitschy with it's mix of classic and modern details.

Mountain And Lake Houses

Image via Zillow

Charming Wyoming Ranch House

Cost: $8,199,000

It feels a little silly to call a nearly $10 million home "charming," but here we are. This modern ranch-style mountain house looks unassuming from the outside. And the four-bedroom inside is really nice, too, don't get me wrong. But what really makes this worth it, if I had to guess? The freaking VIEW. Can you imagine sipping your coffee and staring off into that horizon every morning? Yes, please. I would like one of these.

Image via Zillow

Cozy North Carolina Castle

​Cost: $7,500,000

Ah yes, nothing cozier than a literal castle-sized house in Appalachia. In all seriousness, the dark wood accents give you that almost cabin-esque feel that the mountain range so obviously calls for. With 10 bedrooms, this is the perfect retreat for your family get-togethers! You can enjoy each other's company across the estate, or you could...find a little hiding spot and nobody would know the wiser. 😉​

Image via Zillow

Sante Fe Getaway

Cost: $3,375,000

The most affordable of the bunch, this single-story Sante Fe residence is a dream-come-true! You've got lake views, trails, and even a golf course if that's your thing! My personal favorite part of this lovely little home, however, is the wine cellar. Can you imagine being like, "Yeah, just go grab a bottle from the wine cellar"?! Like I said, dream-come-freaking-true!

Image via Zillow

Lovely Michigan Lake House

Cost: $3,649,000

The windows alone are enough to make this house the dreamiest escape, let alone the private and super exclusive access to Lake Michigan. This home may only have three bedrooms and four bathrooms, but each room feels intentional, spacious, and utterly luxurious. I'd definitely dip my toes in that water!

Looking for more home inspo? Sign up for our weekly email newsletter, and be sure to check out our storefront!

Header image via Zillow

Whether you're looking to personalize your home decor, or plan to gift your bestie a fragrant springtime bouquet, time spent stepping up your floral arranging skills is never wasted. Before going forth and free-styling your next floral arrangement, take some tips from the pros! Putting professional floral arranging methods to work in your own home shows the difference between a store-bought bouquet, and a special bespoke one. You can even use Trader Joe's flowers! Get ready to feel all the inspiration with these easy floral arranging tips! 💐

Photo by Ylanite Koppens / PEXELS

1. Before starting, ideate about the final floral arrangement.

Before buying flowers, think about what you want the final product to look like. Is your ideal floral arrangement big and luscious, or is it bare and playful? Consider the shape, color, and size of your arrangement to create a plan of what flowers and materials to buy! We love to scroll through our socials and Pinterest for the best ideas!

Photo by Jill Burrow / PEXELS

2. Have a range of different flowers.

At the most basic level, floral arrangements make use of several different types of florals: focal flowers, line flowers, and filler flowers.

Focal flowers are larger and hold more visual weight. These are the flowers with eye-catching factor, like lilies or roses. Line flowers are a bit thinner, with blooms growing along the stems — think snapdragons or other line-shaped greenery. Finally, filler flowers are smaller stemmed blooms used to balance out your floral arrangement. Zinnias, baby’s breath, or mums are just a few examples.

"Flowers with stronger stems are ideal for beginners. When you're just getting started, work with carnations, mums, roses, spray roses – basically any grocery store blooms," says Malori Maeva, CEO and Founder of Form Floral. "It'll give you an opportunity to experiment without a huge price tag and they're more forgiving than super delicate blooms like dahlia or poppies. Plus, if you can make grocery store flowers look beautiful, you're going to have no problem making more luxe flowers look beautiful."

Depending on your OG arrangement idea, you may need more of one type of flower than others. Big, lush arrangements (more focal flowers) are most suitable for special occasions and celebrations, while thinned out arrangements (more line and filler flowers) give off an artsy, experimental vibe.

Some floral combos to try out:

  • Rose + Eucalyptus + Tulips
  • Dahlia + Ruscus + Ranunculus
  • Chrysanthemum + Fern + Cornflower

Photo by Kristina Paukshtite / PEXELS

3. Use color theory.

Color theory isn’t as daunting as you may think. Essentially, you can use color theory as a tool to guide which color flowers you’re buying for your arrangement, and how to place them together.

Using monochrome colors means your arrangement will be the same color all around. You can add different hues of the same color for variety – say you’re crafting a red arrangement – then you can also incorporate some pink shades!

Analogous color palettes make use of like colors. More technically, analogous colors are next to each other on the color wheel. So, reds are analogous to oranges, and greens are analogous to blue shades. A good way to think about it for beginners is to either work with a warm or cool color palette.

Complementary colors lie directly opposite from each other on the color wheel. Some pairings include red and green, yellow and purple, and blue and orange.These combos are known for their boldness, so move forward with complimentary colors if you’re looking for a jaw-dropping arrangement!

Considering saturation (strength of the color) and contrast (lightness vs. darkness) is also helpful in building an arrangement.

Though design rules like color theory are helpful in floral arranging, sometimes the best way to learn the art is by getting your hands dirty, says Maeva. "Play around with different heights, shapes, textures, and color palettes. So much of floral design is figuring out your personal style, and the only way to make good work is to make some not-so-good work first."

Photo via Form Floral

4. Start small.

Begin filling your arrangement with line and filler flowers, and small greenery you’ve collected before adding bigger focal flowers. This provides a good foundation for where you want the arrangement to go. Remember, nothing is permanent, and you can experiment with different placements before you’re finished making your floral arrangement!

Photo by Secret Garden / PEXELS

5. Play with layering.

Layering flowers refers to the height each bloom is placed. Instead of having every focal flower stand at the same height, you can layer them by trimming the stems at varying lengths, so they lie closer to the lip of the vase you’re using. This adds visual interest and diversity to your floral arrangement! When layering, aim to get a feel for the natural shape of each stem and flower, and cooperate with that.

Photo via Form Floral

6. After you're done, be sure to take care of your floral arrangement.

Now that you’ve assembled quite possibly the best beginner floral arrangement, make sure you’re caring for it so it lasts! Checking the water levels each day and topping your vase off when it’s low helps your flowers live longer. Adding flower food is better supports them, too!

"Those little packets of flower food that come with your blooms? Use them! The directions are easy to follow and you'll want to make sure you get the right ratio of food to water for most longevity," says Maeva. "If you don't have flower food, don't fret. Changing the water in your vase every day, keeping your flowers in a cool spot out of direct sunlight and away from any air vents, and giving your stems a fresh cut when you change the water out will go a really long way in keeping your flowers fresher for longer."

If you catch your flowers looking a bit dull, trimming the ends of their stems every few days with shears allows them to drink up the nutrients and water more effectively. Once your arrangement is on the way out, repurpose the petals to make some gorgeous flower DIY projects!

Sign up for our newsletter for more home decor tips!

Brit + Co may at times use affiliate links to promote products sold by others, but always offers genuine editorial recommendations.

Lead photo via Form Floral.

This post has been updated.

Sequels that are just as good, if not better, than the original movie are one in a million, but if you ask me, Princess Diaries 2: Royal Engagement definitely tops the list. Anne Hathaway brings a whole new spunk and adultified sass to the freshly 21-year-old Mia Thermopolis, and Julie Andrews shines as Queen Clarisse! (Both on the karaoke stage and off ;)). Not to mention the movie also gave us the blueprint for contemporary enemies to lovers: Nicholas and Mia!

While Bridgerton producer Shonda Rhimes wasn't involved with the first movie, she was the writer for the second — and TBH, that's definitely a reason it's so good!

Image via Frederick M. Brown/Getty Images

"I thought [Princess Diaries 2] would be a really fun thing to do and it turned out to be great," she tells Variety. "I always think it's funny now because I'm working with Julie Andrews now on Bridgerton, but I also spent time writing her as a queen in that movie, and so it was kind of great to get to work with her both times. It's also sort of come full circle in a weird way."

Shonda Rhimes goes on to explain one cut scene she remembers really fondly — and how Andrews' expert performance made it even more heartbreaking to cut. "That was pretty much one of my favorite scenes," she says. "It was this moment where Julie Andrews [has] had her heart broken, and some staff comes in and they start to ask her a question and she screams, 'Do I never get a moment to myself?!' and it was such an amazing moment the way she played it, and the elegance with which she did it. It's really about the pain of being a queen."

"She did it so well," Rhimes continues. "But in general, honestly, she's the nicest person you will ever meet and she was so nice to me, I was nervous to meet her, I was shaking, [but she's] so lovely."

After Julie Andrews sent the sweetest graduation gift to a fan, I'm not surprised to hear how incredible she is. I still have my fingers crossed that we'll see Julie Andrews in The Princess Diaries 3 — and that Shonda Rhimes will return as screenwriter.

What's your favorite scene from the Princess Diaries movies? The mattress surfing scene in Princess Diaries 2 is definitely one of the best movie moments of all time. If you're feeling nostalgic, check out 6 Nostalgic Movies That Feel Like Summer Vacation!

Lead image via Walt Disney Pictures/Buena Vista

‘Tis the season to finally ditch our boots for something on the lighter side: sandals! Sandals season is the best season because it means putting the final touches on our outfits isn’t a total pain (ahem, looking at you, shoelaces and straps).

Warmer weather undoubtedly means more outside time, but we don’t necessarily want to be trodding around in heavy, sweaty walking shoes. That’s where walking sandals come in!

Sandalsneed to be comfy if we’re gonna be walking around in them. Our criteria for the perfect pair of walking sandals includes being able to withstand hours (and miles) of wear without any rubbing, sliding, or blistering. Of course, they need to be cute, too. Style is very hard to sacrifice when it comes to walking sandals, so we definitely prefer ours to be compatible with a variety of different outfits – from casual to more dressed-up.

The B+C team has tried and tested so many types of walking sandals over the years, and these 5 pairs came out on top for their ability to check the boxes for comfort, practicality, and style! Scroll on for thorough reviews of our go-to walking sandals.

Teva Women's Midform Universal Sandals

Comfort: 5/5

For B+C Head of Content, Ali, the Tevas Midform walking sandals are peak comfort. They boast a super soft foam footbed that has heel cupping and elevation around the arches for additional support.

“I’ve worn my Tevas to the ground,” she says. “The inch height boost is appreciated as someone who’s 5-feet 2-inches and they’re incredibly sturdy and cushiony.”

Practicality: 5/5

Ali can walk miles on miles in these easy walking sandals.

“They’ve become my quintessential everyday casual shoe for running L.A. errands like walking my dog, heading to the farmer’s market, and grabbing coffee.”

Although they’re super dependable, Ali feels like the several years of “constant use” from her Teva Midform walking sandals have lost some of their arch support.

Style: 5/5

The Teva Midform sandals are pretty no-frills, but they’re still stylish for today’s age. The 1 ¼-inch height falls somewhere in between flats and platforms, making a fairly casual statement. The thick, adjustable velcro straps that wrap around the toes and low ankle are secure and match with pretty much anything.

They also come in a variety of colorways to suit your own personal style, though the all-black pick is likely the most versatile of them all.

One of the best parts about these walking sandals is their approachable pricing. This black pair is just $65.

Chacos Z Sandals

Comfort: 4/5

The classic Chacos Z Sandals – once you actually break them in – are extremely comfortable, since the footbed tends to meld against the shape of your foot.

To B+C Creative Assistant, Meredith (that’s me!), the break-in period is crucial for Chacos, but it’s not a real pain. Once she wore hers just two times, they softened up and fit smoothly.

Practicality: 4/5

Meredith thinks these Chaco walking sandals are practical for a number of reasons: they work on dry land and in the water, they’re durable to stand up to off-road terrain, and they don’t slip a single bit.

“They work so well as water shoes,” Meredith says. “I’ll wear them on long lake days and I don’t ever have to take them off, even when I’m out of the water.”

The Chacos Z Sandals flaunt a thick, durable rubber sole with their signature ChacoGrip™ layer on the bottom that has a “good amount” of tread, according to Meredith.

The adjustable straps that swarm the big toe, top of the foot, and ankle are amazing at keeping her feet in place with every step.

“I definitely recommend getting your Chacos fitted by an expert and/or tinkering around with the perfect fit yourself,” she says. “It can be hard to find it, but once you have it, you won’t have to worry about adjusting the straps again.”

Although they can withstand weathering pretty well, they’re not all that great for all-day wear. Meredith has gauged over time (she’s had her Chacos for 6 years) that they’re “walkable for a day, but I wouldn’t hike in them.”

Style: 4/5

The Chacos Z sandals are ideal for someone who has more of a granola girl style. They flaunt more technical details (like the chunky sole and noticeable tread), so they’re obviously not as fashion-forward as the Doc Martens or Tevas of the world.

Still, these walking sandals come in a ton of different colors, plus you don’t have to snag the Z-style. Chacos sells a variety of shoe silhouettes with the same comfort levels!

Chaco sandals can be an investment (ranging from $75-$110), but they last a long time. Meredith hasn’t noticed any huge signs of wear over the six years she’s worn them!

OluKai ‘Aka Sandals

Comfort: 5/5

These walking sandals from OluKai changed everything Meredith thought she knew about flip flops. And well, they’re not even quite flip flops, either. They’re like flip flops, but elevated, really.

The ‘Aka silhouette boasts a carefully-crafted footbed that feels as durable as the Chacos sandals, which says a lot for such a lightweight shoe. On top of that, they have a very soft footbed that Meredith is obsessed with since it provides more support than your average slip-on sandal.

Practicality: 4/5

“For a pool day, these are absolutely practical,” Meredith says.

These walking sandals are crafted from a water-resistant material that doesn’t soak up water, but rather, repels it.

This aspect makes them an easy go-to for summer days spent outside.

As far as the actual walking, there’s not rubbing or chafing to be found. The easygoing straps keep the feet in place but don’t feel utterly tight or uncomfortable.

Style: 5/5

The style of these walking sandals is minimal, but adorable. They flaunt some super thin straps (still durable) that knot at the top. Plus, they are shoppable in a handful of other vibrant colors for only $70.

Birkenstock Arizona Sandals

Comfort: 3/5

Ahh, Birks. They’re so classic! Like Chacos, Meredith really had to break in her pair of Birkenstock Arizona sandals for literal weeks before they started to feel just right.

“The cork footbed is supposed to adapt to your step over time, though it takes a while,” according to Meredith.

On the other hand, the wide buckled straps are quite welcoming and have never rubbed her feet the wrong way. They cover a good amount of the foot, so you’re not left with skin sticking out or being pinched weirdly.

Practicality: 3/5

These walking sandals aren’t quite made to go the distance, according to Meredith.

“I'd rather have these on for a quick errand, rather than wandering around for hours at the farmer’s market,” she says. “Maybe I just haven’t broken them in enough yet, though.”

Their flat sole doesn’t have much tread, making it a challenge to navigate any surface that’s not an inside floor or pavement.

Style: 4/5

These Birkenstock walking sandals are the ultimate casual, cool girl shoe. They match with shorts, skirts, pants, and everything in between. They’ve come to have such a classic, unmistakable look, so the brand recognition also boosts their chicness.

These sandals come in a handful of different colors for $110.

Doc Marten Blaire Slide Sandals

Comfort: 3/5

Meredith has been rocking with these Doc Marten sandals since last summer, and she ranks their comfort a total of 3 out of 5. The straps are the main factor that takes away from their overall comfort, since they often rub and give her blisters in very specific places.

Each of the three straps is adjustable, and though she’s toyed with different levels of tightness, they just don’t fit Meredith’s feet right.

The cushy footbed gains a few points back for these walking sandals. Meredith does appreciate the platformed shape for short periods of wear, like getting groceries or stopping by the craft store.

Practicality: 2/5

Since their comfort level is close to intolerable for long periods of wear, Meredith can’t really endorse these walking sandals’ practicality.

“They’re super cute, but I just can’t have them on all day,” she says. “I wish they fit me better than they do.”

Style: 5/5

While the comfort and practicality categories are severely lacking, the cuteness factor of the Doc Marten Blaire Slide Sandals is undeniable.

As a Doc Marten boot enthusiast, Meredith was drawn to them for their easy-to-pair color palette and signature Doc Marten details, like the black leather and yellow stitching.

The Doc Marten Blaire Slide Sandals go for $100.

Subscribe to our shopping newsletter for more editor-approved wardrobe picks!

Brit + Co may at times use affiliate links to promote products sold by others, but always offers genuine editorial recommendations.

Images via brands.