DIY a Kimono in 30 Minutes for Just $10!

We’ve been seeing kimonos everywhere these days, and while the swoon factor is high, the price tags can be even higher. (Case in point, last month I fell in love with a gorgeous silk kimono shawl only to be broken up about the $220 price tag.) That got us thinking we just had to hack the look. Not only did we DIY our own flowy kimono in just 30 minutes — fair warning, this project requires you to have your sewing basics down — but by making the garment yourself, you can choose the print and fabric of your dreams, which means keeping an eye on the price tag, too. Our tropical patterned fabric “set us back” just $10! That’s a much better solution than shoveling out all that dough for the light fall layer, and truth: we feel just as fancy in ours!
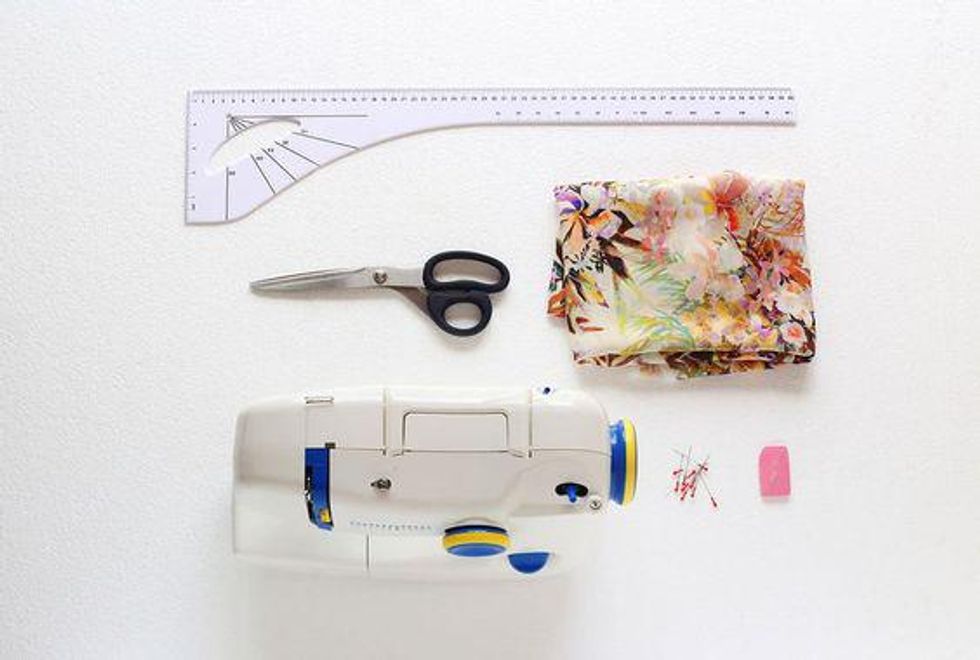
Materials:
– 40 by 55-in piece of fabric (silk or chiffon)

Tools:

– pins

– sewing machine

– tailor's chalk

– fabric scissors

– ruler

Instructions:

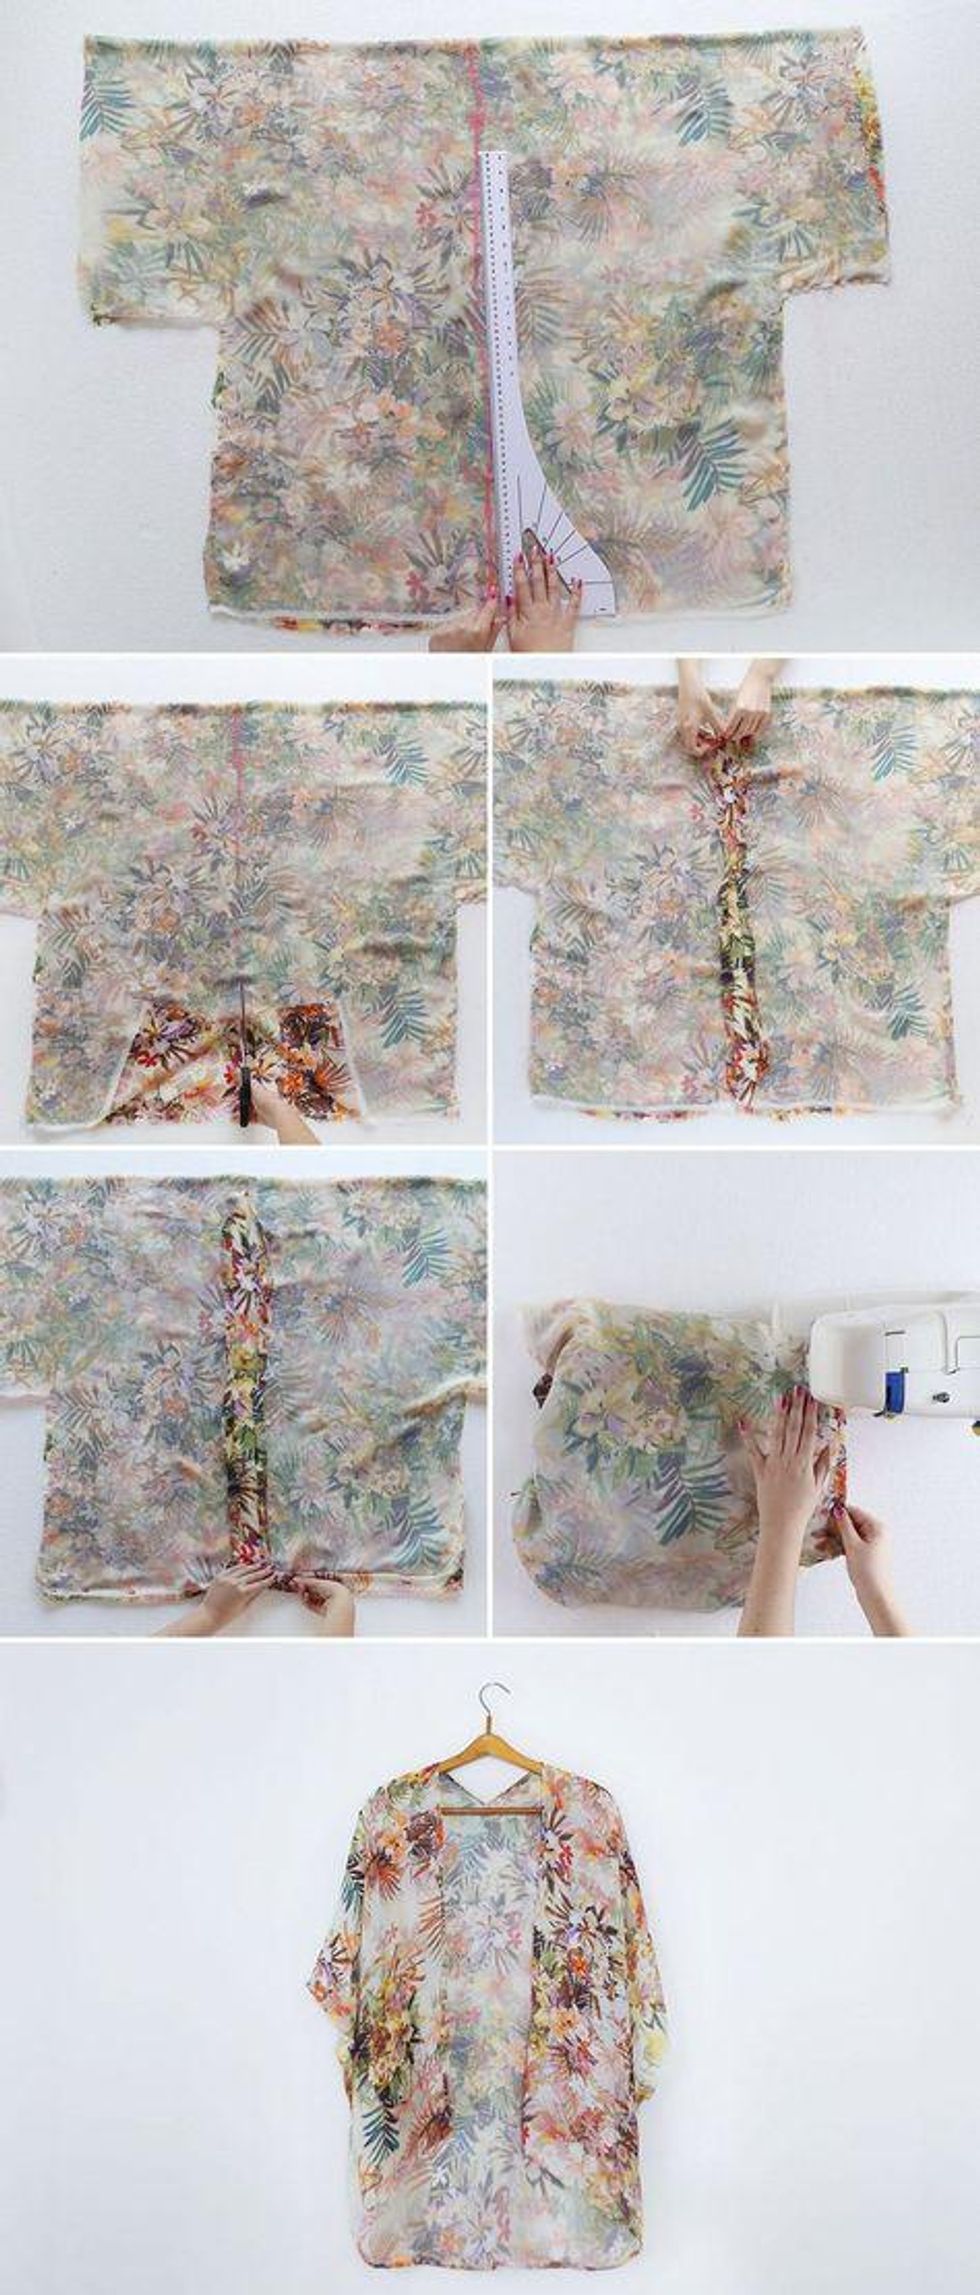
1. Start with a 40 x 55-in piece of silk or chiffon. Fold it in half and be sure that the wrong side (the side you don't want to show) is facing you.

2. Measure down 10 inches and in 6 inches and mark it with your tailor's chalk.

3. Join your marks and draw a sort of L shape. Repeat on the other side.

4. Now pin all along your Ls and cut the excess. Then sew your seams together.

5. At this point, take a ruler and find the exact middle of your rectangle and cut it height-wise from top to bottom, but be sure to cut just the top layer of your fabric.

6. Almost done. Just fold more or less 1 inch of fabric from the center of our kimono, then repeat along the edges and sew.

First, it's all about creating the boxy pattern, which you'll measure and mark out on the "wrong" side of your silk or chiffon with tailor's chalk. Pin, then cut your marks, which will become the sleeves, and sew the seams together. Beginner sewers, not so bad, right? Advanced peeps, you got this!

Now it's time to create the opening, which is beyond basic — no buttons, toggles or zippers to worry about here! Just find the center part of your fabric and cut just the top layer down the center. Then, fold about an inch of fabric along the cut to create a smooth hem and sew it together. You are done! Get ready to feel all kinds of glam.

This kimono is a perfect layer for the first days of fall, not to mention it dresses up nearly any outfit — it can make a tee and jeans look super posh and take a maxi to the next level.

We're all about the simplicity of this breezy look, though you could always amp up the drama by adding fringe along the hems. Ooh la la indeed.

What's the last piece of clothing you've DIY-ed? Did you make it to try out a trend? To get the look for less? Or just because you love to make? Tell us about your style projects @BritandCo!

I don't know about you but as I'm getting older, I'm starting to understand why my parents and grandparents made the choices in footwear that they did. I used to judge silently at the arch support shoes they wore and scoff at their fashion sense, but suddenly I find myself constantly complaining about my feet and knee pain...I get it Grandma, and I'm sorry for judging. But part of the reason why I judged (again, SO sorry Grandma) was because I thought they didn't look as cute as other shoes I saw in stores. Luckily for you, that's where I come in. I'm here to show you why you need arch support shoes and how they can be super stylish as well, so you don't have to compromise on the cute-ness factor while also getting the comfort-factor. Let's get into it!

How do I know if I need arch support shoes?

Photo by Teslariu Mihai/Unsplash

You'll know you need arch support shoes if you're experiencing pain in your knees or your legs or your feet — and maybe even your neck! This means that the way you're walking is causing pain in your body and needs to be alleviated with more support or cushioning. Your legs and feet carry your weight throughout the entire day, so you need to make sure that they're getting the proper support they need in order to distribute your weight evenly.

Shop Cute Arch Support Shoes Here!

Kenneth Cole Lane Sandals

These adorable sandals are cute AND comfy — all the makings for your summer shoe essential. On their website it says that they offer "innovative footbeds made to cushion and cradle for all-day support. Soft, breathable leather insoles remain supple even when wet for long-lasting durability, and innovative padding materials provide ergonomic fits that redistribute pressure for unparalleled comfort." Sounds like the dream combo to me!

Franco Sarto Tinsley Mary Jane

Who says you have to compromise style for comfort? Not these cute babies! With these mary janes not only do you get cute shoes but also ones lined with a cushioned footbed with arch support. A necessary to remain comfortable.

FitFlop Gracie Slide

These sandals are so comfortable that you could wear them all day at Disneyland! If that doesn't prove the test of comfort then I don't know what does! What I love about these is that they're incredibly on-trend with their strap and gold detailing as well!

Dr. Scholls Time Off Sneaker

The perfect all-day shoe! Dr. Scholls knows how to make a comfortable walking shoe that still looks cute and pristine! They're a classic pair of sneakers but little does anyone know that they are lined with perfect cushioned footbeds to offer you the much needed support to get you through the day.

Birkenstock Kyoto Sandal

Birkenstock does it again, ladies and gentlemen! These sandals are a fun take on the classic two-strap sandals you've seen everywhere for years. These are a little different but still have the same classic support!

Hoka Arahi Sneakers

Hokas are notorious for being some of the best arch support shoes, perfect for evenly distributing your weight for going for long walks or runs. Everyone needs a comfortable running shoe!

Birdies Starline Raffia Flats

Raffiaarch support flats? Say no more! I adore the raffia pattern on these Birdies shoes and love even more that they have a seven-layer responsive, cushioned footbed with elevating arch support!

Rothy's Casual Clog

These might be my favorite on the list because of how they achieve a quiet luxury vibe with their minimalist style. They're seriously giving Olsen twinvibes with how simple yet sleek they are. The added bonus: arch support of course! So no complaining about your feet with these shoes!

OluKai Sunbeam Slide

Add these to cart because they are the perfect arch support-beach sandal that you will surely get a lot of wear out of this summer! If you have any summer plans to go on long walks by the beach then all you need are these shoes to stay comfy and cute!

Dr. Martens Carlson Slingback

Free People always manages to keep it cute and quirky and we love that they're doing that for us arch support girlies! Grab these Dr. Martens slingback for a cool look to your summer style.

Rothy's Mary Jane

You'll probably recognize these mary janes from how they went super viral on Tiktok last year for being wearable and fashionable. People have recalled how they wear these babies all day sightseeing and traveling and have no pain in their feet! We love it when style meets practicality.

Follow us on Pinterest for more shopping inspo!

Brit + Co may at times use affiliate links to promote products sold by others, but always offers genuine editorial recommendations.

Header image via Rothy's

When it comes to getting that glow, it’s important to have a dependable routine that not only works for your skin type, but one that’s compatible with your lifestyle, too. Not everyone has the time to slather on 20 different skincare products every day – myself included!

It’s taken me months and months to land on a skincare product lineup that works best for me. Luckily, this glowy skincare routine has saved me so much time, changed the way I approach skincare (including buyingskincare goodies), and makes me absolutely glow to the gods.

@britandco these skincare products have me in a chokehold. link to shop them in our bio! ⭐️ COSRX Low pH Good Morning Gel Cleanser ($11) ⭐️ COSRX Full Fit Propolis Synergy Toner ($13) ⭐️ The Ordinary Hyaluronic Acid ($10) ⭐️ Dieux Air Angel Gel Cream ($44) ⭐️ innisfree Daily UV Defense Mineral Sunscreen ($22) ⭐️Good Weird Cold Brew Undereye ($26) #glowyskin#skincareroutine#easyskincareroutine#affordableskincare#glowup♬ original sound - soph 🦷

This glowy skincare routine is everything to me. With only 6 products and a total of 10 minutes maximum every day, this glowy skincare routine is the key for healthy, youthful-looking skin.

I can’t gatekeep these products any longer. Let’s get into why these picks fit right into a glowy skincare routine and what they can do for your skin!

COSRX Low pH Good Morning Gel Cleanser

Clean skin sets the tone for glowy skin, so having an everyday cleanser in your skincare repertoire is crucial. I like this low-pH one from COSRX since it's very gentle. Though it takes it easy on my skin overall, I still feel a deep clean after I cleanse with it. The low pH makes this gel cleanser widely compatible for most skin types, plus you get lots of product for a low price.

The Good Morning Gel Cleanser is $14 on Amazon.

COSRX Full Fit Propolis Synergy Toner

Toners can come in many forms (like exfoliating and brightening), but I find that I'm drawn to hydrating toners like this one from COSRX for my glowy skincare routine. Unlike the toners most of us grew up with – astringent, harsh, and drying – most toners on the market now are made to boost your skin's hydration! So, toners are friends, not foes.

This literally feels like my skin is chugging water when I put it on. I typically just apply it with my hands and press it in gently, so my face can absorb the most product. I'll also bring it down to my neck for added hydration. The propolis and honey extracts go easy on the skin, adding to the desired glow!

This Full Fit Propolis Synergy Toner is $13 on Amazon.

The Ordinary Hyaluronic Acid

Hyaluronic acid simply brings the moisture that's already hanging out in your skin forward, so you'll appear more moisturized and hydrated when you use it. I only use this before moisturizer when I feel like my skin is especially dry, and like the aforementioned toner, I press it in so my skin can soak it on up.

I enjoy a lot of things about this hyaluronic acid (like the ease of using the bottle, the simple ingredient list, and the elegant dropper), but I love the affordable price the most.

The Ordinary Hyaluronic Acid comes in a bundle alongside the The Ordinary Niacinamide for just $17 on Amazon.

Dieux Air Angel Gel Cream

Oh, this gel cream moisturizer is sooo smooth. I've really never felt anything like it before! I genuinely feel like an angel every time I put Dieux's Air Angel on. I adore it because unlike other heavy cream or lotion moisturizers, it allows my skin to breathe. It goes on super lightweight so I'm not left feeling like I applied way too many layers of product.

It's also very easy to apply – the bottle has a convenient pump with a cap that makes traveling with it a breeze! Moisturizer is a total must when it comes to skin that glows, so don't sleep on product picks like this!

The Dieux Air Angel Gel Cream goes for $44 on dieuxskin.com.

innisfree Daily UV Defense Mineral Sunscreen

Mineral sunscreen is that girl. As opposed to chemical sunscreen, mineral sunscreen contains actual physical barriers that protect your skin from harmful UV rays. That being said, this sunscreen does swipe on with a bit of a white cast, but it immediately blends out with the right amount of rubbing it in.

This SPF 45 formulation from innisfree (one of my fave affordable brands) has a color-correcting aspect to it, so it looks a tiny bit blue when you go to apply it. Once your skin's soaked it in, it leaves a creamy, satin finish that I think is perfect for a makeup base.

Think of this sunscreen as a preemptive measure towards the ultimate glowy skin routine – since you're protecting it from mass amounts of sun damage, your skin will look more youthful, hydrated, and even over time. And yes, you should be wearing sunscreen every day!

The innisfree Daily UV Defense Mineral Sunscreen is $22 at Sephora.

Good Weird Cold Brew Undereye

OMG. This is the first under eye cream that I found was actually effective. It's genuinely like a cup of cold brew for your under eye area – and mine tends to need that extra energy!

Formulated with caffeine to reduce puffiness and diamond powder to fill in fine lines, I saw results from the Cold Brew Undereye from Good Weird (read my full review here) within a few uses. The application is also unbelievably easy. It goes on very soothing since it has a metal application tip. I actually toss this skincare pick in the fridge so the metal can cool down, and ultimately soothe my tired eyes.

I think having a brightened-up under eye area contributes massively to my glowy skincare routine, since darker circles can bring the glow (and the overall evenness of my skin tone) down.

The Good Weird Cold Brew Undereye goes for $26 on Amazon.

Follow us on TikTok for more editor-approved beauty product recommendations!

Brit + Co may at times use affiliate links to promote products sold by others, but always offers genuine editorial recommendations.

Sourdough is having a moment. More specifically, sourdough starters, which have seemingly taken over our TikTok FYP (just check out the channel itself). But for so many, sourdough seems too complex to actually create. It’s not the ingredients or the actual baking that seems the hardest — it’s the patience that’s required during the sourdough starter process (and waiting while it’s cooking in the oven, but who doesn’t love the smell of freshly baked bread?!). To demystify this delicately baked deliciousness and all it's prep, we chatted with expert baker, Annie Paul. Here are some the simple tips for making your sourdough starter experience less of a hassle!

​First, what is sourdough starter?

Photo by Adam Bartoszewicz/Unsplash

The reason you're seeing those aesthetic videos of sourdough starter moving around in a bowl is because, well, it’s technically alive. The starter consists of live fermented culture (wild yeast and lactic acid bacteria) created by fresh flour and water. Why is this an essential part of the sourdough bread baking process? It causes the dough to rise. And don’t get thrown off by the term “wild yeast,” because it’s pretty much found everywhere — fruits, flowers, vegetables, etc. all carry it!

But don't worry — it may seem intimidating to keep this concoction alive, but we've got you covered with one very hot tip.

​The Tip? Establish A Feeding Schedule For Your Sourdough Starter

Photo by Mikhail Nilov/PEXELS

Making a sourdough starter is approximately a seven day commitment. This can sound overwhelming, but if you stay consistent, it’s really not a hard feat! The easiest way to culture a successful starter is to establish a feeding schedule — this means adding in more fresh flour and water and allowing it to ferment for an extended period of time. You can leave it in a jar or bowl on the counter.

Depending on the recipe you're following and if your home is on the warmer side, you’ll likely be doing this twice a day with equal parts water and flour (around every 12 hours). A kitchen scale and written out time chart is one of the simplest tools to keep track of the ingredient amounts and times that your sourdough starter should be fed. Don’t know where to start? Just check out our beginner-friendly sourdough bread recipe.

PSA: You Don’t Have to Make A Sourdough Starter Yourself

Photo by Felicity Tai/PEXELS

To the bakers out there that are still intimated by the length of time it takes to make a good sourdough starter, you actually don’t have to make it yourself. “My best tip is to go to a bakery that makes really good sourdough bread and ask to buy some of their starter,” Annie Paul, winner of Magnolia Network’s Silos Baking Competition and bakery owner of A P Baked Goods in Michigan, said.

Paul added that most bakeries have a starter that’s “years and years old and that will really improve the flavor of your bread.” Asking your local artisanal bakery not only aids small businesses but also may get you the tastiest of results. No matter which sourdough starter path you choose (homemade or bakery bought), you will not be disappointed with a warm slice of bread and butter.

Need more hot tips for the kitchen? Be sure to sign up for our weekly email newsletter for more!

Header image via Karolina Grabowska/PEXELS