 Recommended for you
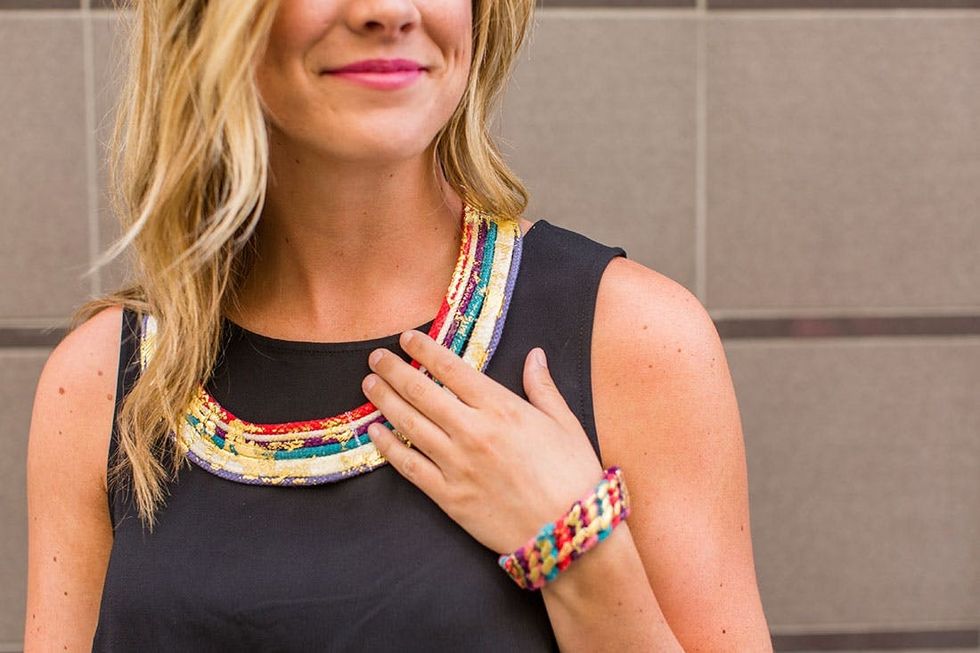
Here at Brit HQ we are always on the hunt for the perfect statement jewelry. Among our requisites is the weight of the bedazzled chain. Most of us don’t have necks or wrists of steel, so it’s important to find jewelry that, while large and impressive, isn’t too heavy. We recently found some beautiful cotton cord and loved the vibrancy of the colors. The cotton material is easy to mold into a shape, so we decided it was the ideal medium for some DIY statement pieces. Today we’re teaming up with Cotton to create the ultimate statement necklace and bracelet set. The best part: They’re lightweight and oh-so comfortable to wear all day long.
Materials:

– 1 1/2 yards of cotton cord in various colors
– 10 cord ends
– 4 large jump rings
– 2 small jump rings
– 2 lobster clasps
– gold transfer foil (Buy the kit here!)
– foil transfer adhesive
– chain
Tools:
– sewing machine
– iron
– paint brush
– parchment paper
– scissors
– pliers
– hot glue gun
– ruler
– sewing pins
Cotton Necklace

Instructions:
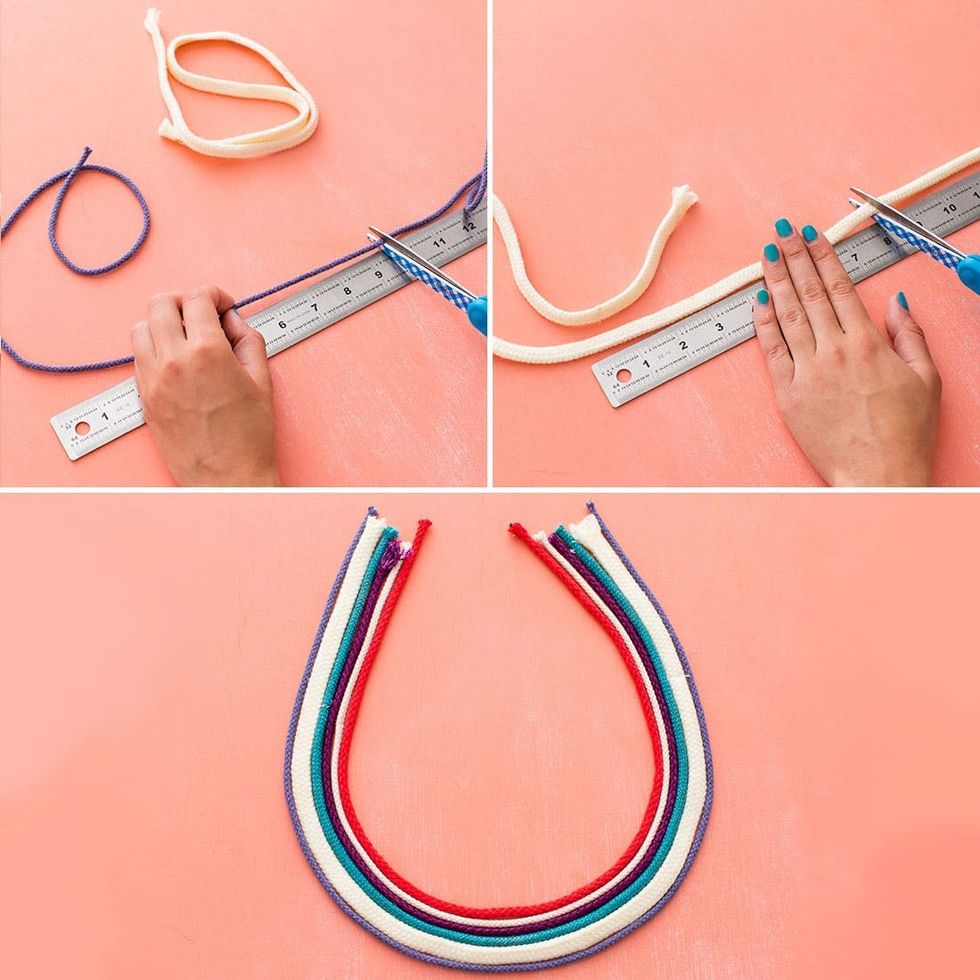
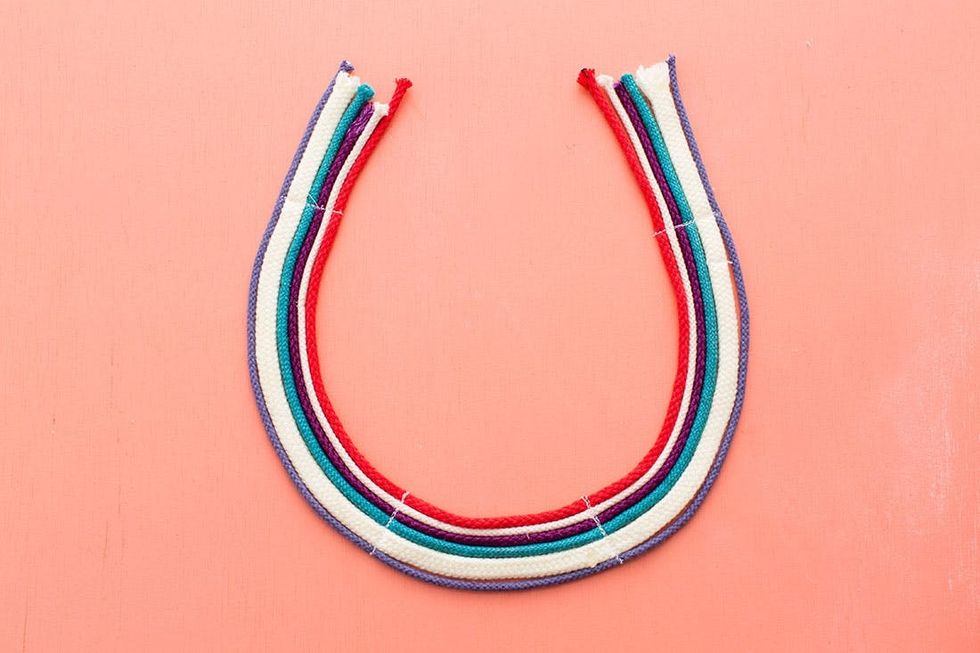
1. Drape a piece of cotton cord around your neck to decide the length of your necklace. Our cord measured 27.5 inches. The next cord will be one inch shorter than the previous cord, and so on. Cut all six cords.
2. Lay all cords in a U shape, and pin them together in four different spots around the necklace.
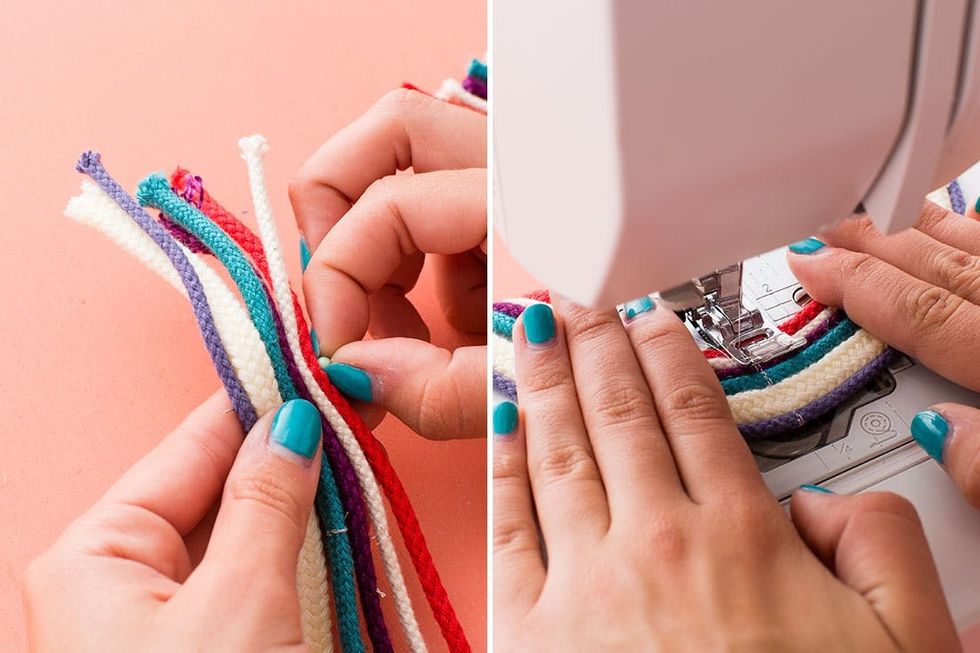
3. Once pinned, use the sewing machine to attach the cords together. Sew four rows of overlapping stitches so they really stay in place.
4. Apply the foil adhesive with a paint brush. Lay the foil on top of the necklace, followed by a piece of parchment paper, and iron for five minutes or as long as the instructions suggest. Let the foil cool, and then peel it back to reveal the gold.
5. Pair two pieces of cord, and join them with a cord end using hot glue. Repeat this step with the remaining pieces of cord. You will end up with three cord ends on each side of the necklace. Use a large jump ring to connect all three cord ends to a piece of chain. Add the lobster clasp to one end of the chain.
Grab a piece of cord and drape it around your neck to determine the appropriate length. Your additional pieces of cord will lay inside of the first one, so each piece of cord needs to be about one inch shorter than the previous piece. Once you have all six cords cut, lay them in a U shape.
Pin the cords together as if you were making a kabob. Add four pins, spacing them out evenly along the necklace. Once you are happy with your shape, sew the rope in place by stitching four rows of stitches on top of each other at each pin. The reverse button will be your best friend!
All stitched up and good to go. Now let’s add some gold foil to hide those stitches.
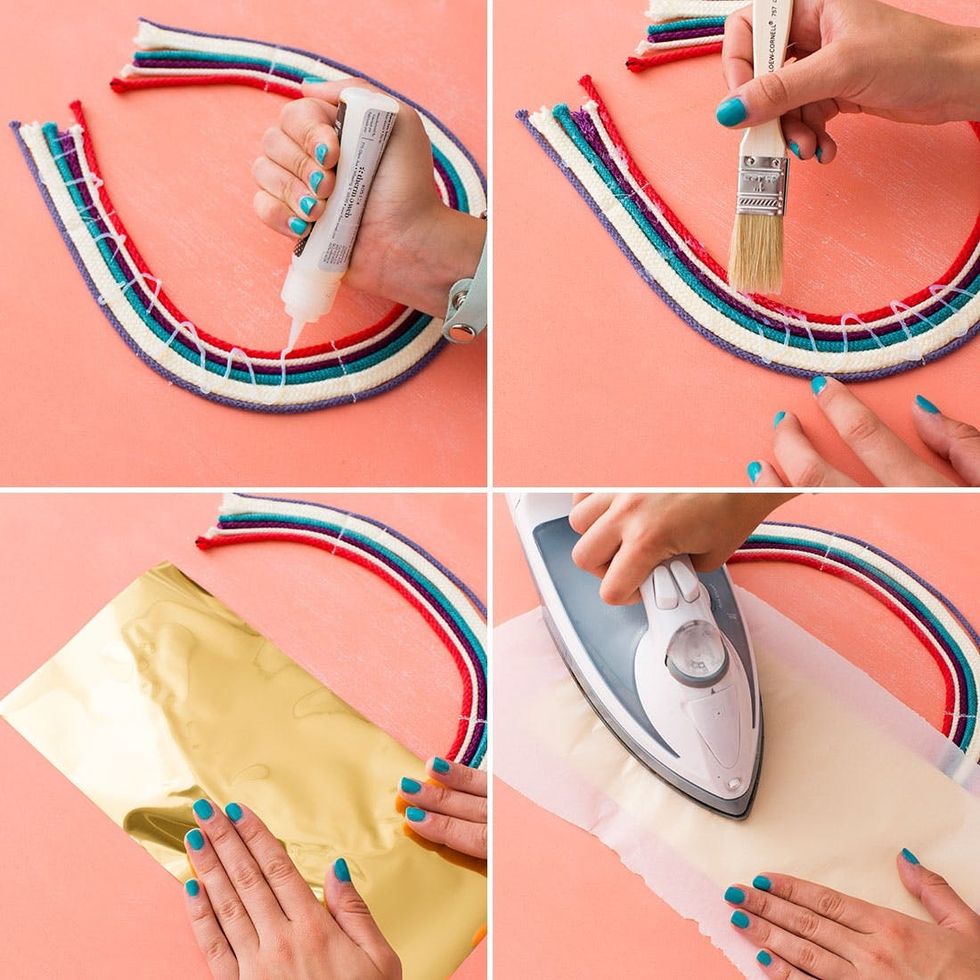
Apply the gold foil adhesive and spread it over the necklace with a paint brush. Lay the gold foil on top of the necklace, then cover it with parchment paper. Iron on top of the parchment paper to adhere the foil to the necklace. We ironed in circles for about five minutes, but we recommend following the instructions provided with the gold foil.
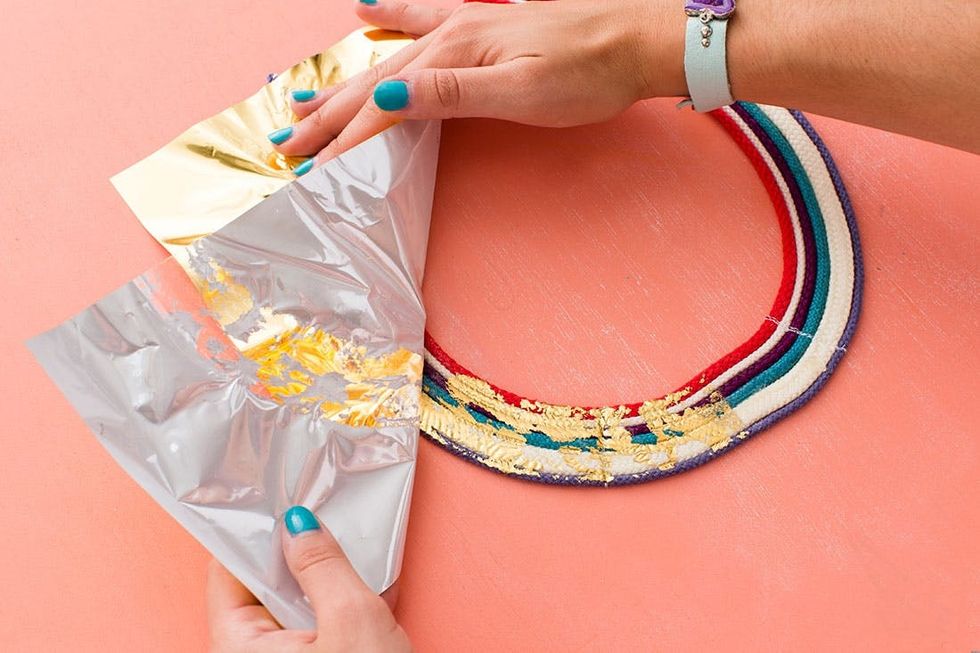
Once cool, peel back the gold foil and apply it to the other side (the sheets aren’t large enough to cover the entire necklace in one go). If you want more foil in certain places, go back and reapply the adhesive and foil.
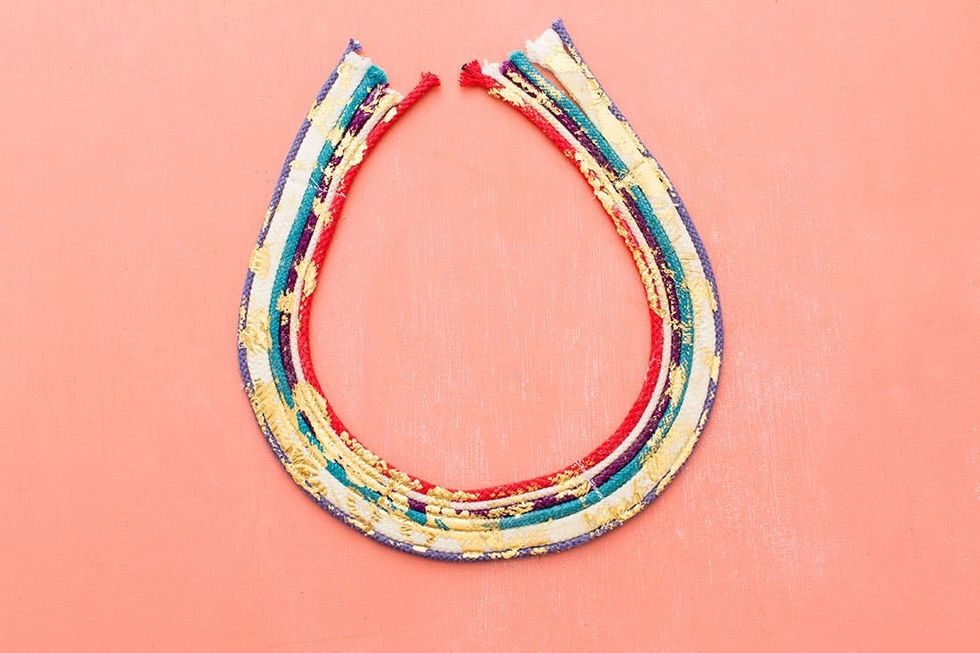
We just love the mix of textures and colors in this statement necklace. We think this would be the perfect necklace to pair with an ancient Egyptian costume for halloween :)
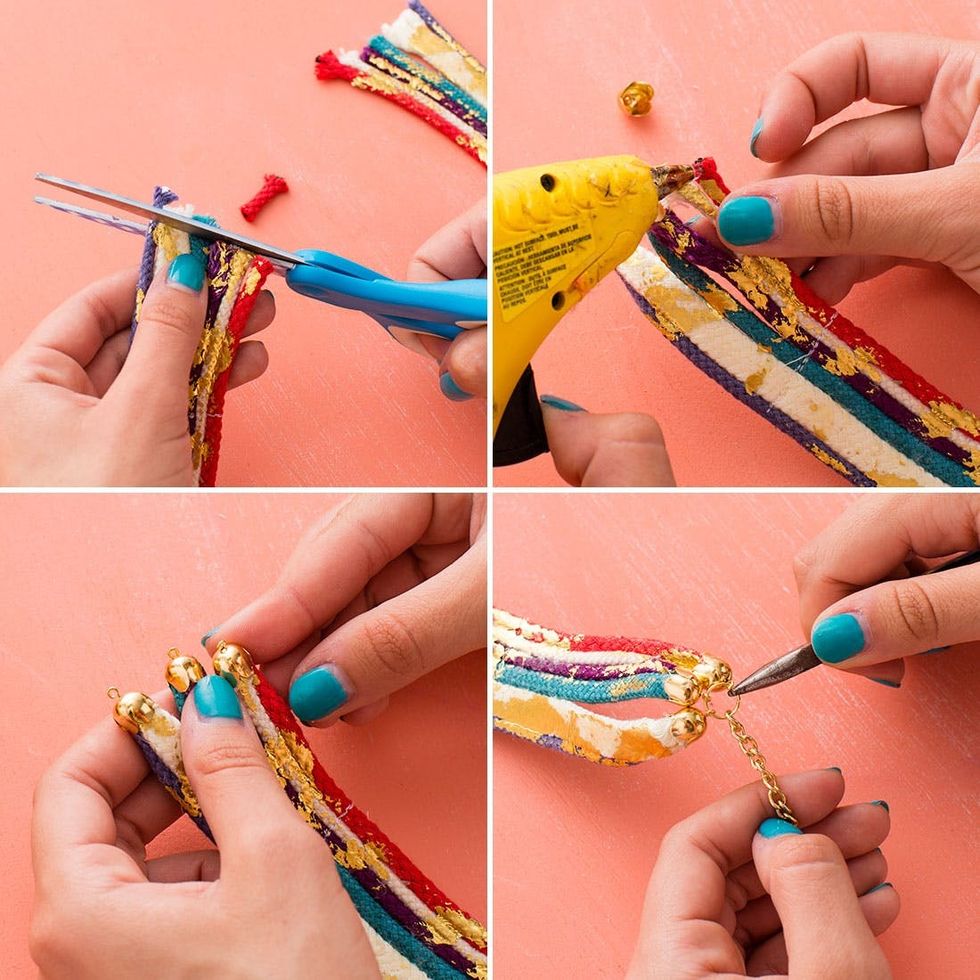
Trim the ends of the cords, and pair them in cord ends using hot glue to attach. Since we have six cords, we ended up with three cord ends on each side. Grab a large jump ring to hold all three cord ends together. Then attach a small piece of chain and a lobster clasp to complete your necklace.
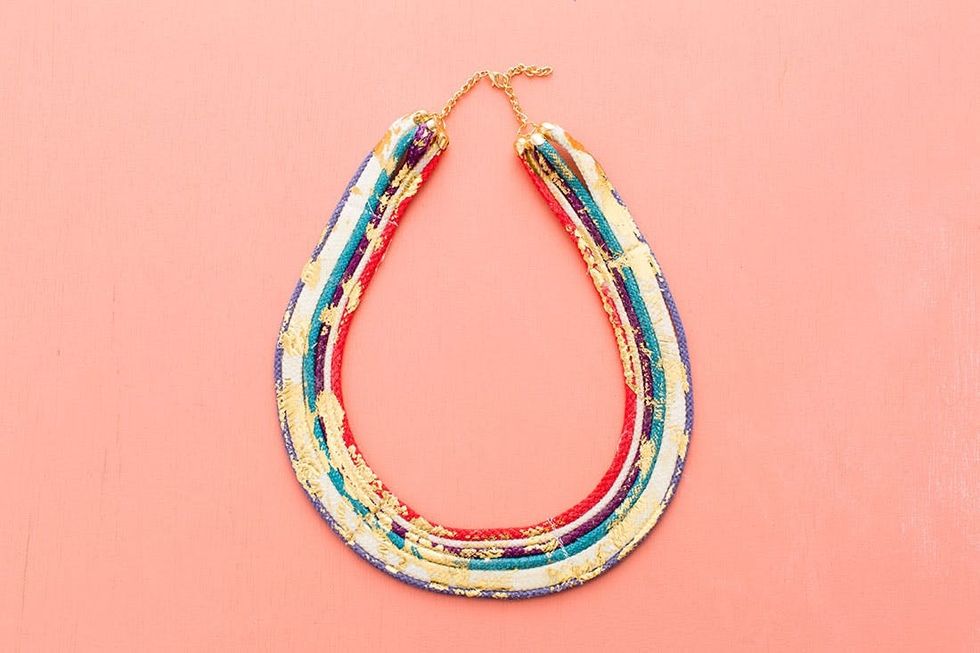
We will be wearing this necklace every day, thank you very much!
Instructions:
Cotton Bracelet
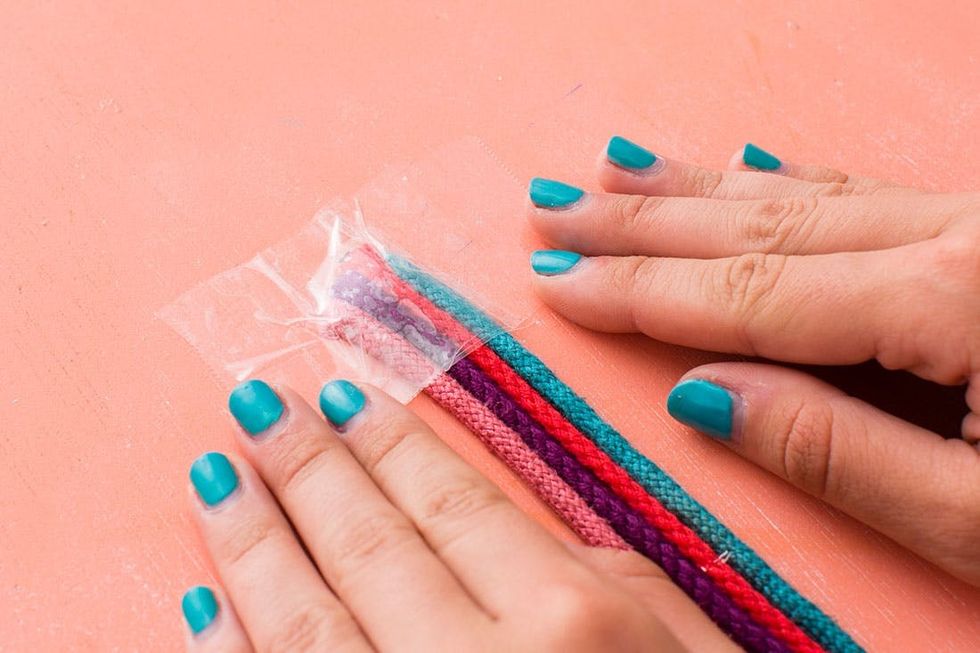
1. Tape down four pieces of cotton cord that measure at least 20 inches.
2. Use your first cord to make the number four on top of the second cord (the first cord creates the angular part of the four and the second cord is the vertical line). Wrap the tail of the four (the first cord) back under the vertical line (the second cord), and pull it through the middle of the four to form a knot at the top of bundle. Repeat this knotting process with the other two cords.
3. Repeat this pattern until you have created a long enough bracelet for your wrist. With each new row, your first cord will be a different color.
4. Tape down the tail of the bracelet and apply foil using the method outlined above for the necklace. Spread the adhesive around with a paint brush, lay the foil on top and then iron using a piece of parchment paper.
5. Once it has cooled, peel off the gold foil and trim the cord. Use hot glue to apply the cord ends to the bracelet.
6. Using pliers, attach jump rings and a lobster clasp to finish the bracelet.
Since you will be tying knots to create this bracelet, you need the cords to stay in place on your work surface. We used tape to hold them down, but a clipboard would work perfectly.
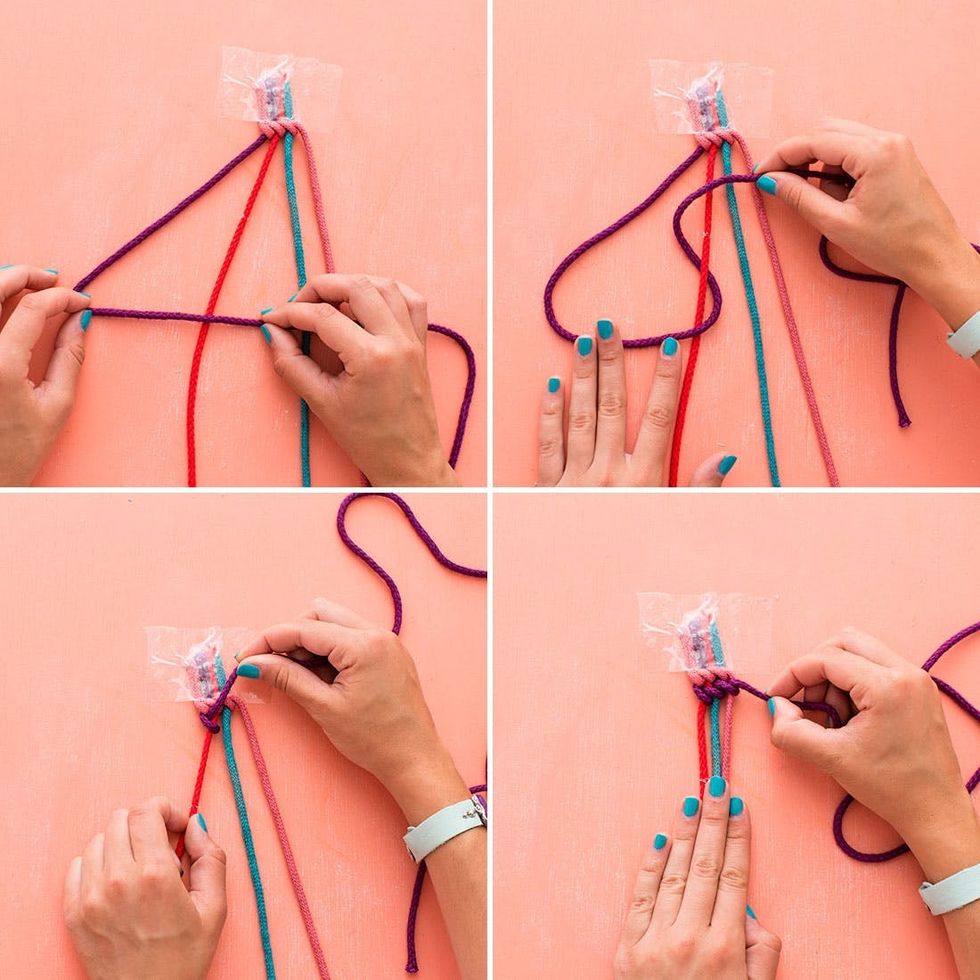
Use the first and second cord to create the number four. The first cord will serve as the angular part of the four, and the second cord will be the vertical line. Make sure the angular part lies on top of the vertical line. Wrap the tail of the four (the first cord) back under the vertical line (the second cord), and pull it through the middle of the four to form a knot at the top of bundle. Repeat this knotting process with the other two cords, using them as the vertical line and continuing to use the first cord as the angular part of the four. Create this knot on all three strands, and then the first strand will become the last. Grab the new first strand and create another row of knots in a different color.

Keep creating knots until it is long enough to fit your wrist. Fair warning: The bracelet will start twisting, but this will stop once we introduce the iron.
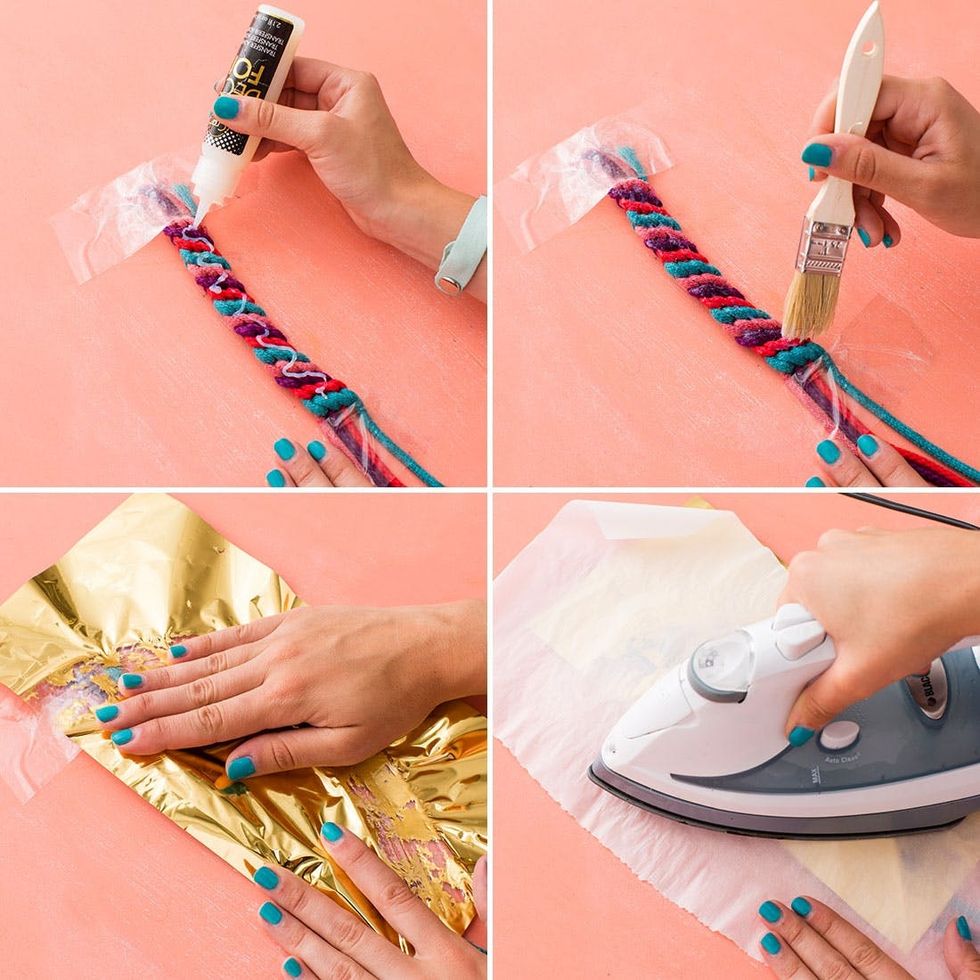
Add the foil adhesive to the bracelet and spread it around with a paintbrush. Lay the gold foil down and then iron your bracelet with a layer of parchment paper.
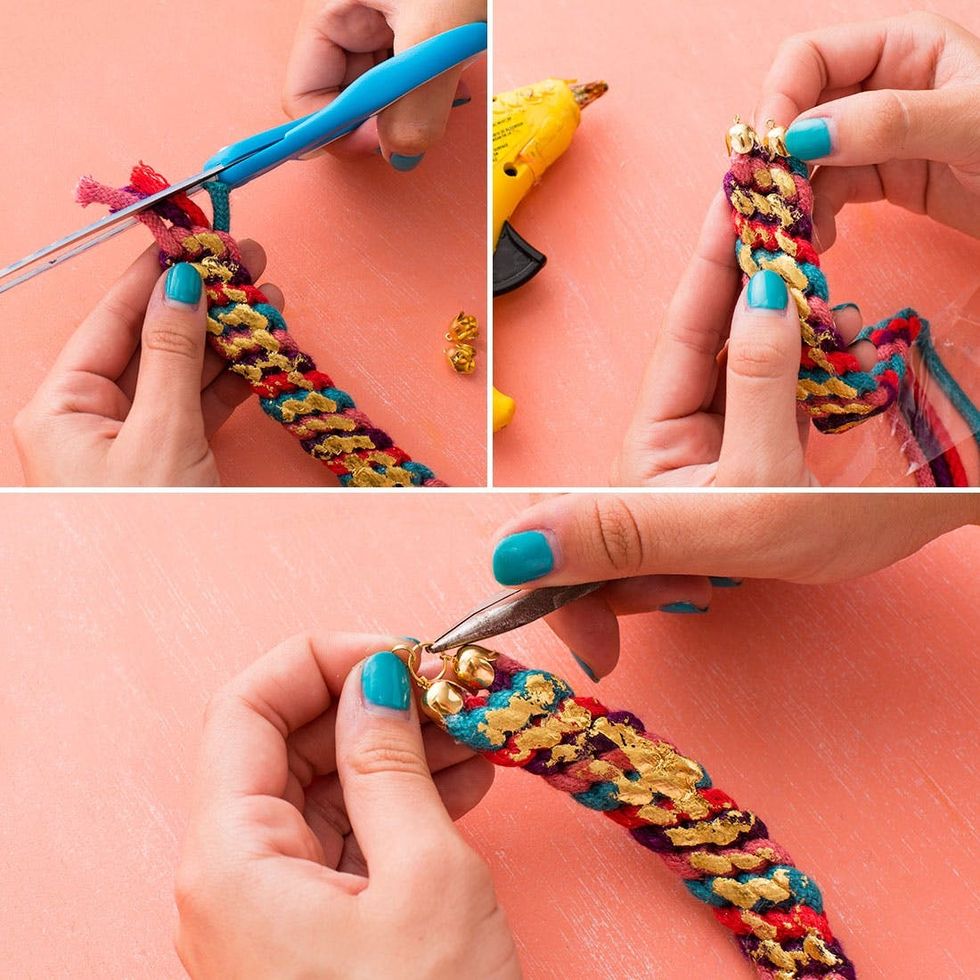
Trim the tips of the cord and attach the cord ends with hot glue. Using the pliers, attach jump rings and a lobster clasp to complete the bracelet.
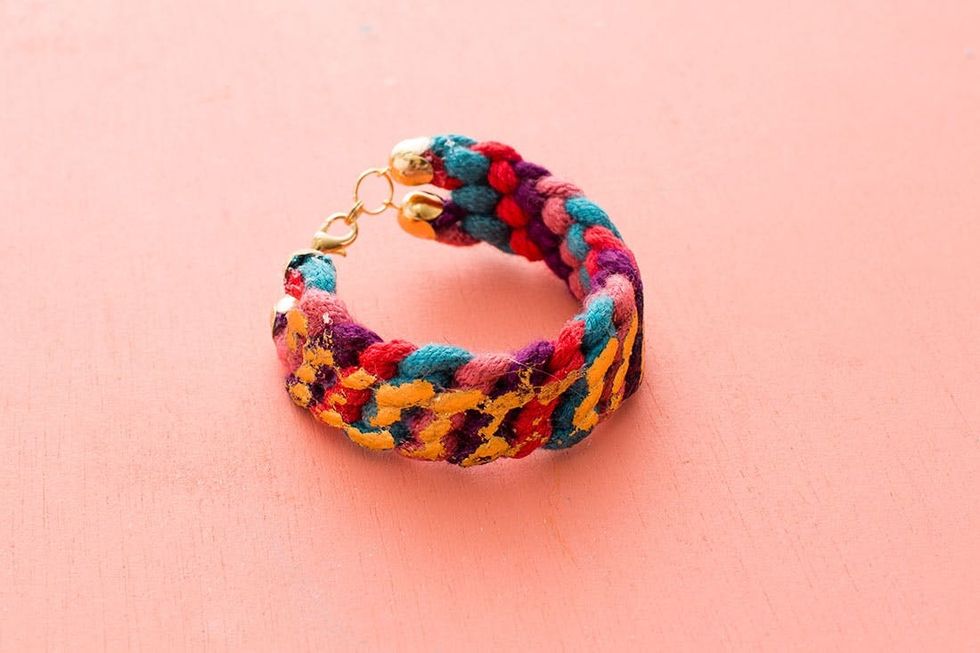
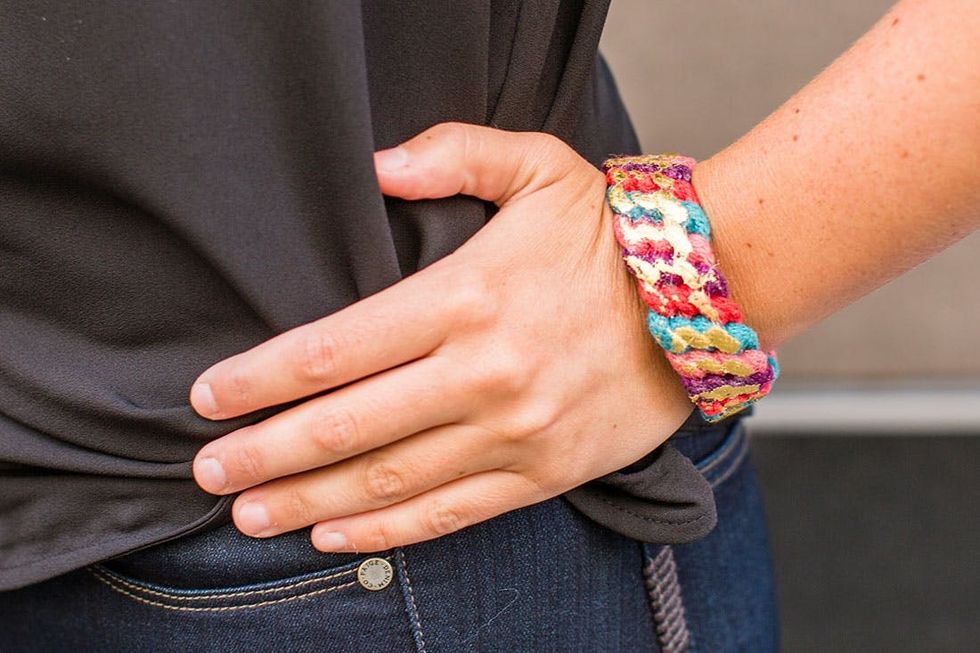
We can’t get enough of this updated sailor cuff!

Our newest creative intern, Brittany, is no newbie when it comes to necklaces. She is always wearing jaw-dropping jewelry. Let’s just say she gave this necklace/bracelet duo a thumbs up.

What do you think about this update on the traditional statement necklace? Let us know in the comments below.