
 Recommended for you
Happy Hammock Day! Grab a cocktail and your favorite book, and kick back for some leisure time to celebrate hanging lounge chairs. Whoever created hammocks: Hats off to you! There’s really no better way to relax (or accidentally fall asleep with your book on your face) than sinking into a floating bed. As it turns out, hammocks are a great DIY project, so today we’re going to get out our tools and make one that is perfect for your yard, porch or even your living room. We took inspiration from Angie Diersman and The Merry Thought, and sprinkled in some skills from our Acrylic E-Class. Check out the tutorial below, and then get swingin’.

Materials:
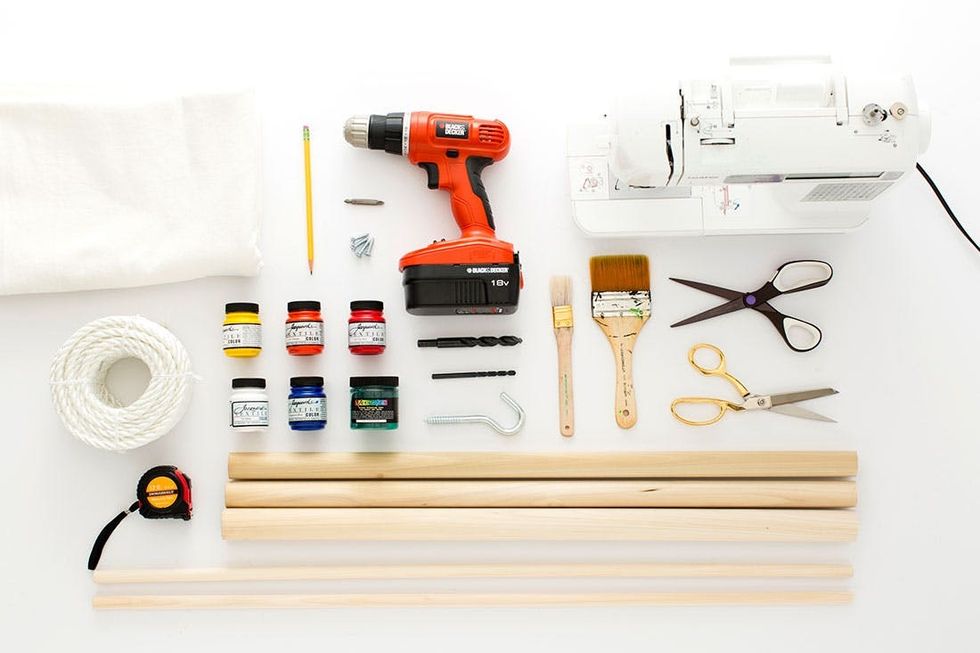
– 3 1¼-inch dowels, 30 inches long
– 2 ⅝-inch hardwood dowels, 36 inches long
– 8+ yards ½-inch rope (weight bearing 300 pounds)
– 4 1-inch wood screws
– canvas cloth
– fabric paint
Tools:
– drill with ⅝-inch drill bit, a ½-inch drill bit and a Phillips head drill bit
– tape measure
– scissors
– fabric scissors
– sewing machine
– paint brushes
– pencil
– drill press or dowel jig (optional but highly recommended)
Instructions:
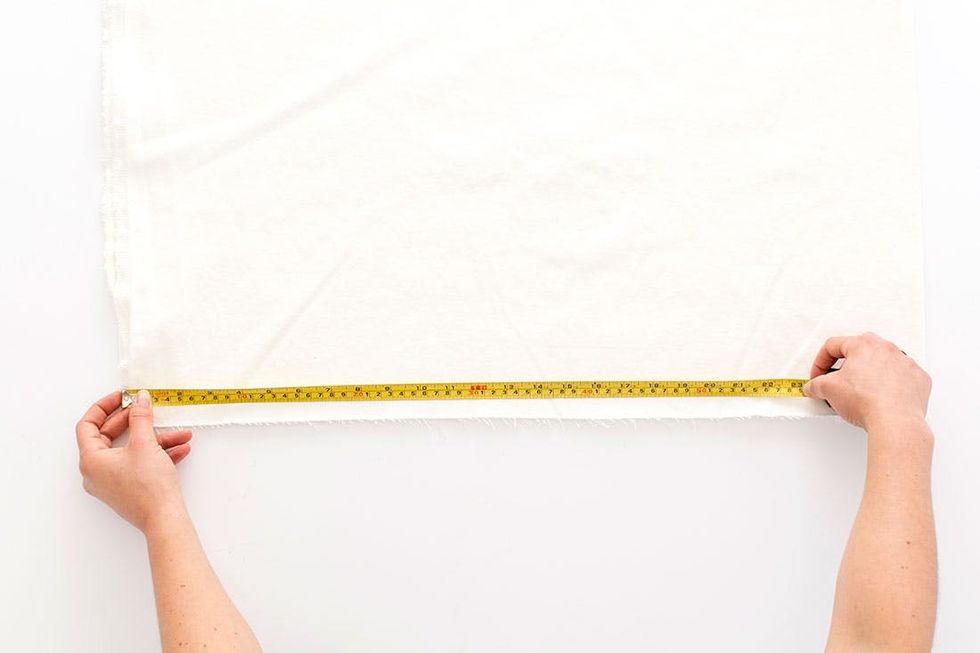
First, measure and cut a piece of canvas 23 x 48 inches. You can make it a little bit longer if you want a deeper seat.
- Measure and cut a piece of canvas 23 x 48 inches.
- Wrap the ends of the canvas over your 1 ¼-inch dowel to create a sleeve that fits, remove the dowel and sew in place.
- Paint your canvas as if it were a piece of art for your wall!
- Grab two of your 1¼-inch dowels, then measure and mark 2 inches and 3½ inches on both ends. On the third 1¼-inch dowel, only mark at 3½ inches.
- Using the ⅝-inch drill bit, drill holes at the 2-inch marks on both dowels.
- Switch over to the ½-inch drill bit, and drill holes at the 3½-inch marks on all three dowels.
- Slip your canvas onto the 1¼-inch dowels (the ones with two holes on each end).
- Slide your ⅝-inch dowels into the ⅝-inch holes to create a frame. Drill a 1-inch wood screw through the intersection of each dowel to secure the frame. Make sure they are even!
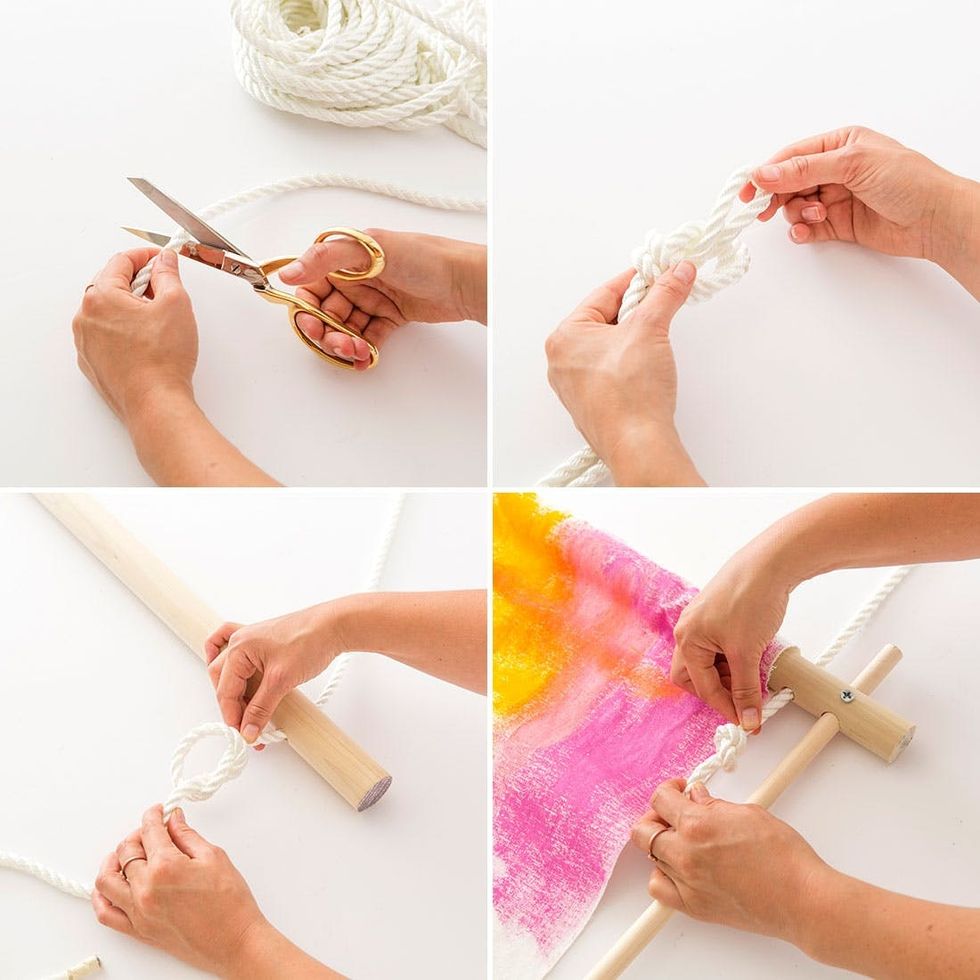
- The length of your rope will depend on the location you are hanging your hammock. We cut a 12-foot piece of rope to hang from a 9-foot ceiling. Fold the rope in half and create a knot at the fold.
- File the rope through the holes of the remaining 1¼-inch dowel (the one with one hole on each end). Make sure the top knot is lined up with the middle of the dowel with about 1½ feet of rope on each side (from the top to the dowel). Then tie knots in the section of rope that you put through the holes. Next, send the rope through the holes on the top of your frame and tie knots to secure.
- Hang your hammock up on a hook that will hold 300 pounds. Adjust the knots to even out the hammock. Then take a length of rope and file it through the hole in the bottom dowel of the frame. Wrap that piece of rope around the solitary dowel up top and tie a knot. Repeat the process on the other side.
- Step back to make sure the hammock is hanging evenly.
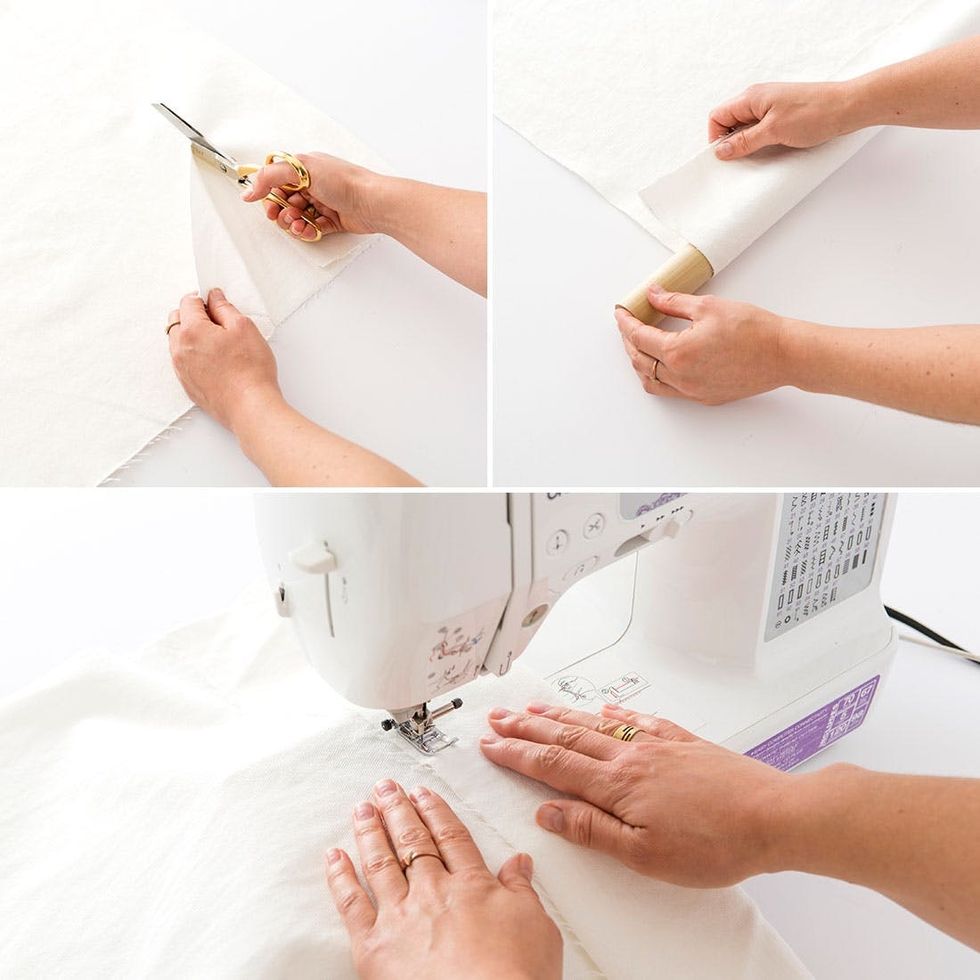
Take one of your 1¼-inch dowels and place it at the long end of the fabric. Wrap the end over the top to create a sleeve, leaving a bit of space so that it is not a tight fit. Then remove the dowel and sew the fabric in place. Do this to both ends.

We’re using canvas, so we figured we might as well paint it :) Either plan out your design or create abstract shapes and paint splatters to create a design that wows. Not sure about your painting skills? Grab our Acrylic E-Class for some tips and tricks. Once you’ve finished your painting, let it dry completely.
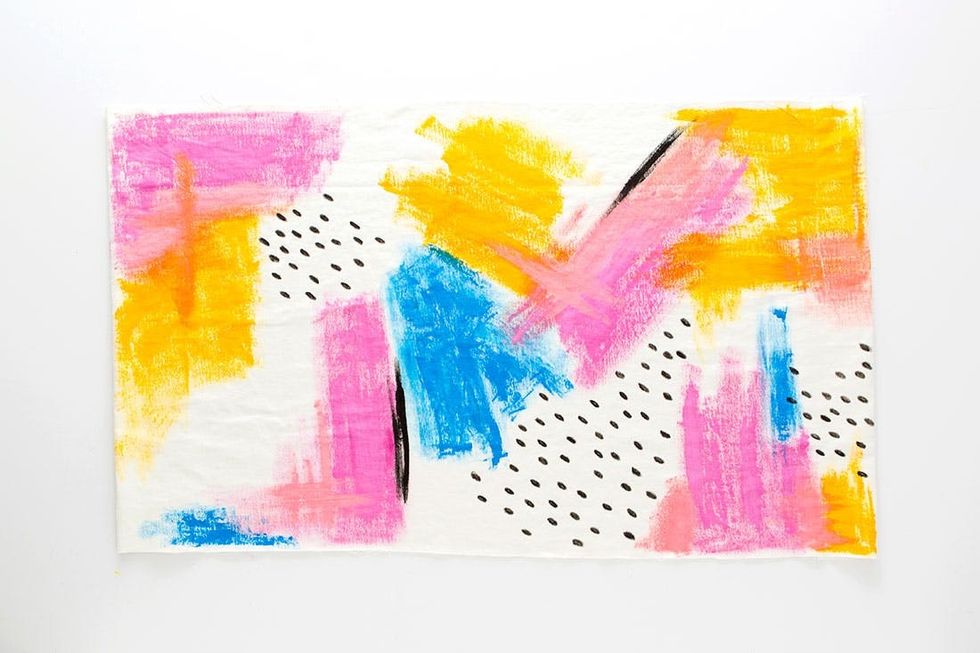
Forget the hammock — we might just hang this on the wall!
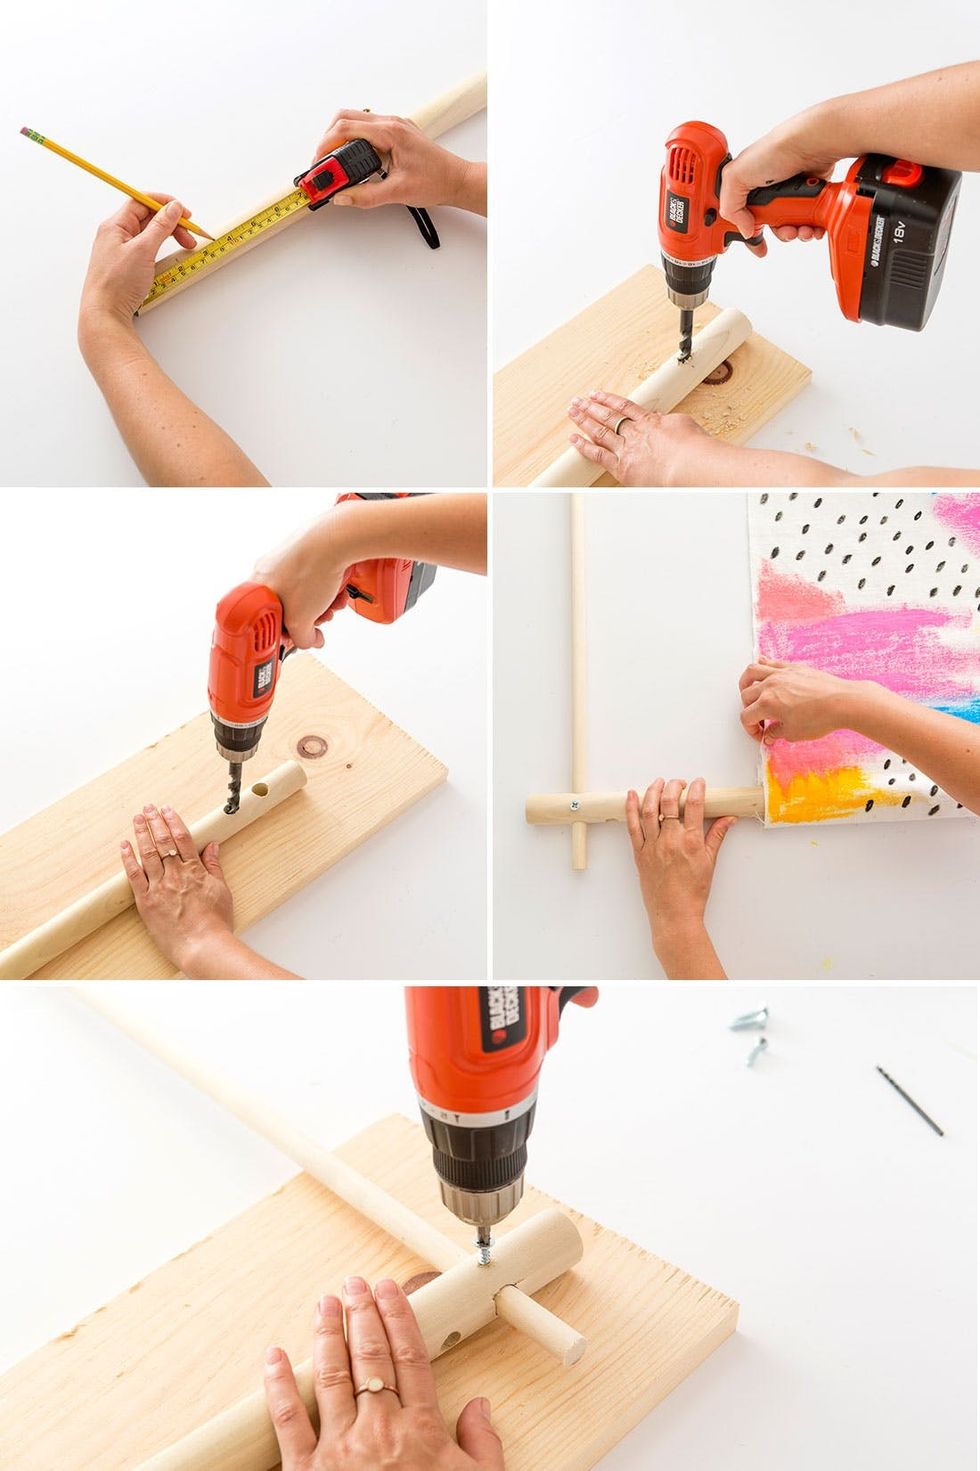
Time to construct your frame. Grab two of your 1¼-inch dowels, then measure and mark 2 inches and 3½ inches on both ends. On the third 1¼-inch dowel, only mark at 3½ inches. Using the ⅝-inch drill bit, drill holes at the 2-inch marks. Switch over to the ½-inch drill bit, and drill holes at the 3½-inch marks. Slip your canvas onto the 1¼-inch dowels (with two holes). Slide your ⅝-inch dowels into the ⅝-inch holes to create a frame. Drill a 1-inch wood screw through the intersection of the dowels on all four corners to secure the frame.
Pro Tip: It is very hard to drill even holes through the dowels. If they are off, your frame will not be square, so it’s really important that you get this part right. The easiest way to make even holes is to use a drill press or a dowel jig. The drill press will make perfectly straight holes; the dowel jig will do the same thing, but it also will keep them level if you don’t twist the dowel and move the jig down to the other end. That all said, we made ours without the help of these tools and it turned out fine!
For this part, you’ll need to figure out your own measurements. Buying eight or more yards of rope should be enough unless you are hanging your hammock chair from a very high tree branch. We cut a 12-foot piece of rope to hang from a 9-foot ceiling. Whatever the length, fold the rope in half and create a knot at the fold. File the rope through the holes of the 1¼-inch dowel that is not part of the frame. Make sure the top knot is lined up with the middle of the dowel with about 1½ feet of rope on each side (from the top to the dowel). Then tie knots in the section of rope that you put through the holes. Then send the rope through the holes on the top of your frame and tie knots to secure.

Hang your hammock up on a hook that will hold 300 pounds. Adjust the knots to even out the hammock. Then take a length of rope and file it through the hole in the bottom dowel of the frame. Wrap that piece of rope around the solitary dowel up top and tie a knot. Repeat the process on the other side. Step back to make sure the hammock is hanging evenly.
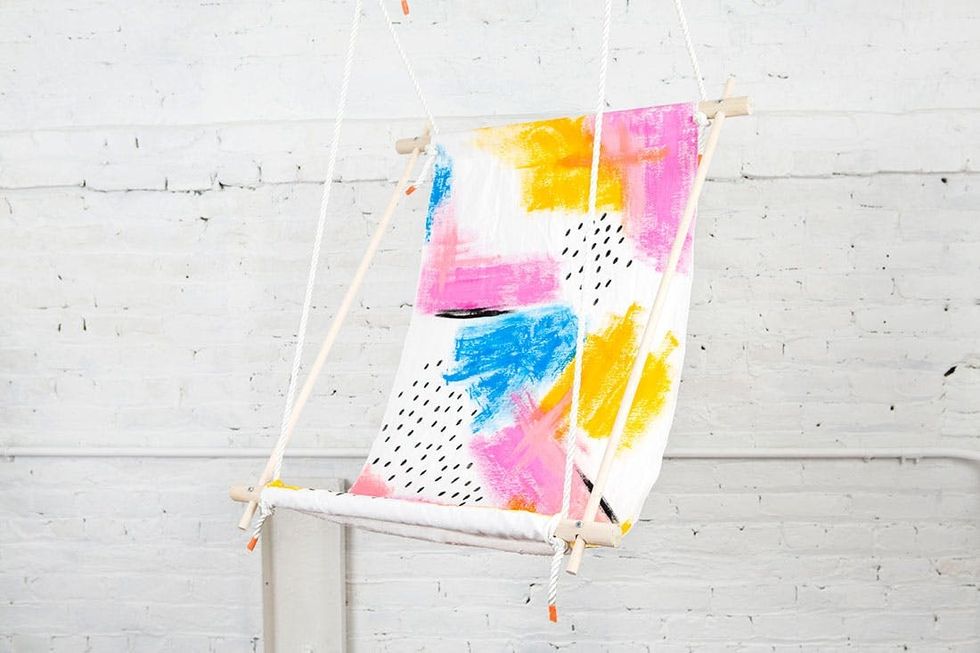
Now go sit on your artwork!

Ready to give this a try? Make your own and then share your photos with us using the hashtags #britstagram and #iamcreative. As always, if you have questions, leave them in the comments below.