DIY These Heart-Shaped Sunglasses Cases This Galentine’s Day

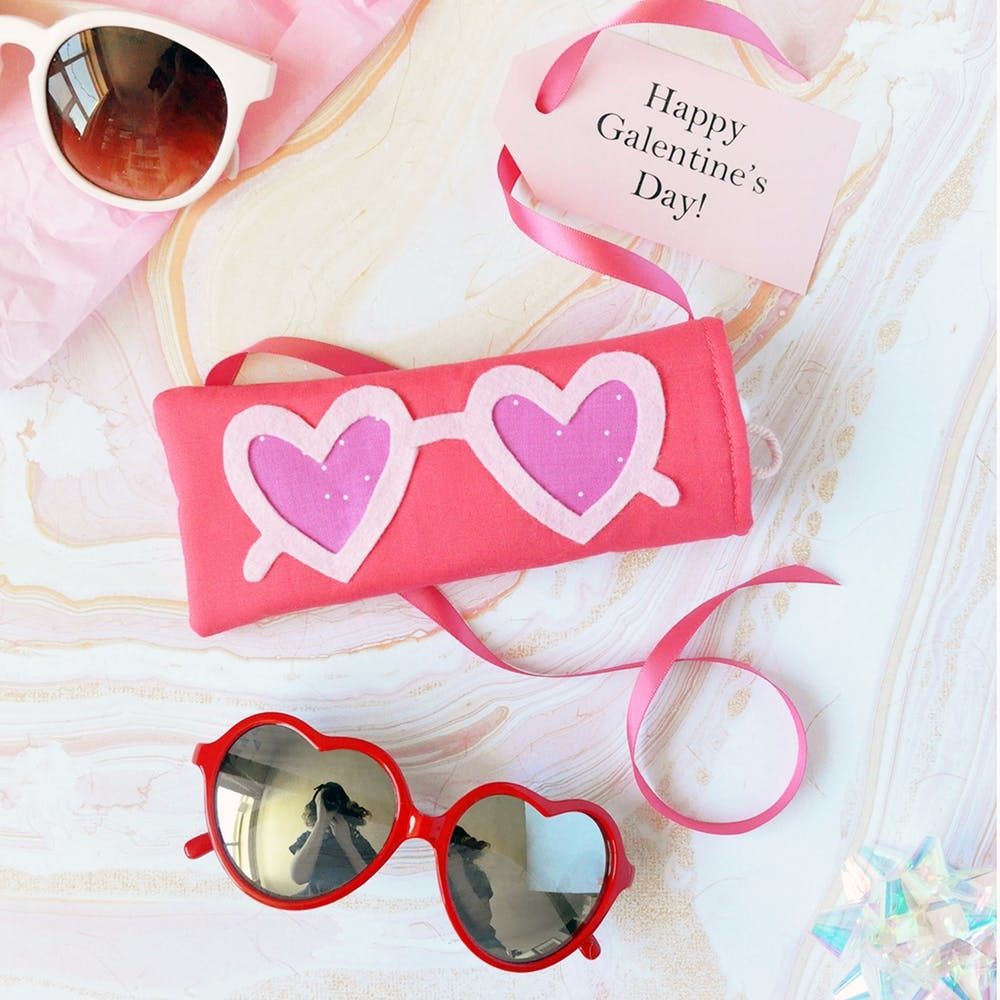
Get your heart-shaped sunnies ready — it’s almost Galentine’s Day! If there’s any time of year to embrace pink, red and heart-shaped everything, it’s got to be the month of February. These DIY sunglasses cases are the perfect excuse to have some fun picking out cute colors and prints at the fabric store. Track down some heart-shaped sunglasses (we used these Forever 21 Mirrored Heart Sunglasses [$8]) and set aside the afternoon to DIY these cases for all your gal pals. A handmade Galentine’s Day gift that’s cute and functional? Yes, please!

Materials and Tools:

  • ruler
  • cotton fabric (solid and/or patterned)
  • matching thread
  • felt
  • quilt batting
  • heart-shaped sunglasses template
  • yarn or cord
  • buttons
  • pins
  • pencil
  • scissors
  • iron-on adhesive (such as Heat n Bond)
  • sewing machine (not pictured)
  • iron and ironing board (not pictured)

Instructions:

  1. Cut your fabric into 8 x 4 1/2-inch pieces. You will need two pieces of cotton lining, two pieces of cotton exterior and two pieces of quilt batting. This allows for 1/2-inch seam allowance on each side.
  2. Size, print and cut out the sunglasses template provided. Cut a piece of felt slightly larger than the paper template and a matching piece of Heat n Bond. Cut two pieces of cotton for the sunglass lenses and matching pieces of Heat n Bond.
  3. Following the directions included with your Heat n Bond, press each set of pieces to adhere.
  4. Once cool enough to touch, use a pencil to trace the sunglasses and lenses onto the paper backing of the Heat n Bond and cut out.
  5. Peel off the paper backing from the sunglasses and lenses and then arrange them on the cotton you already cut as the exterior of the sunglasses case.
  6. Once you’re happy with the placement, remove the sunglasses and press the lenses with the iron to adhere.
  7. Replace the felt sunglasses and press those to adhere as well — I used a thin press cloth over the felt to protect my iron, just in case.
  8. Time to sew! Put both the cotton liners together in a stack, and then layer quilt batting, exterior cotton, exterior cotton and quilt batting in another stack. Make sure the good sides of the cotton are together. Thread your sewing machine and stitch around three sides, leaving the one end open.
  9. Trim the excess seam allowance and then turn the quilt batting and cotton case right-side out. Slide the cotton lining into it so that all the seam allowance is hidden between the layers.
  10. Fold in the edge of cotton and quilt batting layer and fold the edge of cotton lining too so that the raw edges are invisible, sandwiched between the fabric layers. Check that your sunglasses fit inside the case nicely and then pin the folded edges in place.
  11. Cut a short piece of yarn or cord and slide each end between the two folded edges as shown, forming a small U centered on the front of the sunglasses case. This will act as the button loop, so make sure the yarn loop isn’t too small for your button.
  12. On your sewing machine, sew the folded edges of the sunglasses case, making sure to catch both layers. Finally, thread a needle with matching thread and sew on a button opposite the yarn loop, tying off securely.

Cut your fabric into 8 x 4 1/2-inch pieces. You will need two pieces of cotton lining, two pieces of cotton exterior and two pieces of quilt batting. This allows for 1/2-inch seam allowance on each side. Double check these measurements with your sunglasses — if you have an oversized pair, you may need to adjust the case size.

Print and cut out the sunglasses template provided. Cut a piece of felt slightly larger than the paper template and a matching piece of Heat n Bond. Cut two pieces of cotton for the sunglass lenses and matching pieces of Heat n Bond. Try to use contrasting colors for the felt, lenses and case exterior to make it look sharp.

Following the directions included with your Heat n Bond, iron each set of pieces to adhere together.

Once the pieces are cool enough to touch, use a pencil to trace around the sunglasses and lenses templates onto the paper backing of the Heat n Bond. It helps to trace the heart-shaped lenses slightly bigger than the heart-shaped opening so that you have some wiggle room when ironing in place. Carefully cut out using sharp fabric scissors.

Peel off the paper backing from the sunglasses and lenses, and then arrange them on the cotton you already cut as the exterior of the sunglasses case. Keep it mostly centered, but slightly closer to the left side — it doesn’t hurt to leave a little extra fabric for finishing the case opening later.

Once you’re happy with the placement, carefully remove the felt sunglasses and press the lenses with the iron to adhere. Replace the felt sunglasses and press to adhere. I used a thin press cloth over the felt to protect my iron just in case.

Time to get sewing! Place both the cotton liners together in one stack, and then layer quilt batting, exterior cotton, exterior cotton and quilt batting in another stack. Make sure the good sides of the cotton are together! Thread your sewing machine and stitch around three sides, leaving the one end open.

Trim the excess seam allowance, especially in the corners, and then turn the quilt batting and cotton case right-side out. Slide the cotton lining into it so that all the seam allowance is hidden between the layers.

Fold in the edge of cotton and quilt batting layer and then fold the edge of the cotton lining so that the raw edges are sandwiched between the fabric layers. Check that your sunglasses fit inside the case nicely, and then pin the folded edges to secure.

Cut a short piece of yarn (about 1 1/2 inches) and slide each end between the two folded edges as shown, forming a small U centered on the front of the sunglasses case. This will act as the button loop, so make sure it isn’t too small for your button.

On your sewing machine, sew the folded edges of the sunglasses case, making sure to catch both layers. Finally, thread a needle with matching thread and sew on a button opposite the yarn loop, tying off securely.

Don’t forget to make an extra sunglasses case for yourself! ;)

What are your plans for Galentine’s Day? Share your photos with us on Instagram using the hashtag #britstagram and #iamcreative, and follow us on Pinterest for more DIY gifting inspo!

Brit + Co may at times use affiliate links to promote products sold by others, but always offers genuine editorial recommendations.

As cute and clever as store-bought greeting cards are, there's something incredibly thoughtful that can be felt in a homemade birthday card from a friend or loved one. Not only does the act of creating DIY birthday cardsgive you the chance to slow down from the business of life and reflect on what you cherish most about the people you're celebrating, but the one-of-a-kind touch will be super memorable for your recipients as well.

Even if you're not the craftiest person, don't fret, because we've put together a straightforward guide on how to craft your own DIY birthday card for your besties and S.O.'s. Step into the world of DIY magic as we embark on a quest to create birthday cards that will leave your recipients in awe. From unexpected pop-up surprises to mind-bending interactive features, discover fresh ways to make birthday cards burst with fun and excitement. Prepare to unleash your inner artist as we dive into all the tips to help you craft unique and captivating birthday cards. And keep reading for some thoughtful text ideas to ensure that your birthday wishes are just as fun as the card design they're on.

Step 1: Gather Your DIY Birthday Card Supplies

Image via Karolina Grabowska/Pexels

Before embarking on your DIY birthday card adventure, gathering all the necessary supplies is essential. A well-prepared crafter is a confident crafter! So, let's make sure you have everything you need to bring your imaginative card ideas to life.

  1. Start with colored cardstock or paper as the foundation of your cards. Choose a variety of vibrant hues to suit different themes and moods. Scissors are your trusty sidekick, enabling you to precisely cut out shapes, create borders, and trim your cardstock.
  2. Grab glue or adhesive tape to hold everything together securely. Opt for a glue stick for a mess-free experience or double-sided tape for a clean and seamless finish.
  3. Round up all the art supplies you have, from markers and colored pencils, or pens. These magical tools will be your gateway to adding personalized messages, whimsical doodles, and vibrant colors to your DIY creations.
  4. Stock up on a dazzling array of embellishments for an added dose of flair and personality. Let your creativity soar as you explore the boundless possibilities of stickers, sequins, ribbons, twines, buttons, beads, and more. Watch your creations come alive with vibrant colors, textures, and eye-catching details. With these delightful elements at your fingertips, there's no limit to the magic your birthday cards can be infused with.

Step 2: Choose Your Card Design

Image via George Dolgikh/Pexels

The card design will function as the first impression that sets the tone for the entire experience. A well-designed card can evoke emotions ranging from joy and excitement to nostalgia and warmth, leaving friends and family in awe of the thoughtful gesture.

Handmade Watercolor Design:

Express your artistic side by creating a handmade watercolor masterpiece for a genuinely one-of-a-kind birthday card. Start with a blank cardstock or watercolor paper as the base, and let your creativity flow. Use watercolors to paint a vibrant and personalized design, such as flowers, balloons, or a recipient's favorite hobby or color palette. Add a heartfelt birthday message inside to complete the card.

Pop-Up Surprise:

Add an element of surprise and delight to your card with a pop-up feature. Cut out a simple pop-up mechanism using cardstock or colored paper and attach it to the inside of the card. Then, unleash your creativity by designing and cutting out fun shapes, such as cakes, candles, or balloons, and attach them to the pop-up mechanism. When the card is opened, the surprise element will make the birthday celebration of your loved one even more memorable.

Quilled Creations:

Quilling is a paper art technique that involves rolling and shaping thin paper strips to create intricate designs. Use quilling techniques to create beautiful and delicate patterns, flowers, or even personalized messages on your birthday cards. Experiment with different colors and shapes to bring your design to life and make it truly unique. The recipient will appreciate the time and effort put into crafting such an elegant and artistic card.

Hand-Stitched Greeting:

Consider incorporating those skills into your DIY card if you enjoy sewing or embroidery. Use a needle and thread to create hand-stitched designs or patterns on fabric or cardstock. You can stitch the recipient's name, a birthday message, or even cute motifs like balloons or cupcakes. The texture and charm of a hand-stitched card will make it a cherished keepsake.

Interactive Slider Card:

Create an interactive slider card to take your birthday card to the next level. Use cardstock to make a slider mechanism that reveals a hidden message or image as it is pulled. Write a heartfelt message or attach a memorable photo that slides out when the recipient pulls the tab. This interactive element adds a playful touch to your card and makes it truly engaging.

Step 3: Write A Clever Message

Image via June/Pexels

Elevate your birthday card by personalizing it with a heartfelt note to enrich the receiver's experience. Share warm wishes, inside jokes, or memories that make the card even more special and meaningful. Not sure where to start? Here are a few ideas for what to write inside your DIY birthday card!
  1. "Happy birthday, queen of the hashtags! May your day be as fabulous as your Instagram feed."
  2. "You're the avocado to my toast, the squad to my goals. Happy birthday, superstar!"
  3. "It's your birthday, so let's turn up the 'Lit' level and celebrate like it's 1999... or 2023!"
  4. "Birthdays are nature's way of telling us to eat more cake. Enjoy your special day!"
  5. "May your birthday be filled with good vibes and a bottomless brunch. Cheers to another fabulous year!"
  6. "Sending you birthday wishes with all the heart emojis. You deserve all the love and happiness today and always."
  7. "Happy birthday to my favorite extremely online friend. May your Wi-Fi always be strong and your battery never die."
  8. "Time to celebrate another trip around the sun. Let's make this year even more epic than the last!"
  9. "You're not getting older, you're leveling up! Happy birthday, gamer!"
  10. "Happy birthday, trendsetter! May your day be filled with selfie-worthy moments and viral-worthy adventures."

Step 4: Add The Perfect Finishing Touch

Brit + Co

As a bonus, consider creating a DIY envelope to complete the package. Choose decorative paper or repurpose materials like magazine pages or fabric scraps to craft a unique envelope that adds creativity and thoughtfulness to your handmade card. Personalize it by adding hand-drawn designs, stamps, or calligraphy for an extra special touch.

So, there you have it! DIY birthday cards offer endless possibilities for fun, creativity, and the chance to unleash your imagination. With just a few simple steps, you can create customized and sincere cards that will bring joy to your loved ones on their special day. Remember, the beauty of DIY is that there are no limits or rules. Let your creativity run wild, experiment with different techniques, colors, and textures, and, most importantly, have fun. Happy crafting!

For more crafty ideas, check out all of our DIY ideas on Brit + Co.

Are you stressed right now? Maybe not so stressed that you curl up in a ball, or run around screaming, but most of us have at least some stress in our lives. And often that’s a good thing; the right amount of stress motivates us and gets us up in the morning. But if stress gets too much, we start to suffer, become demotivated, and eventually collapse as our nervous system falls apart.

Fortunately, there are ways in which we can build our resilience. Some of these are useful for everyone; getting support from your family and friends, nurturing a positive view of yourself, doing things that you enjoy and find relaxing, developing realistic goals and taking action to achieve them. But some will be unique to you, to your particular circumstances to your personality. If you know your personality type, you will have a head start on knowing what your stress triggers are (and so dealing with them), how you react to stress, and how to cope with that reaction. In other words, how to build resilience.

Personality Types And How They Deal With Stress

Image via Photo by Mikhail Nilov/Pexels

The personality type framework, as measured by the Myers-Briggs(MBTI) assessment, looks at four aspects of personality:

  • Extraversion-Introversion — People with an Extraversion personality preference are energized by and focus their attention on what’s happening around them, their external world. They are likely to find spending too much time alone without enough external stimulation quite stressful. People with an Introversion preference are energized by and focus their attention on their inner world of thoughts and feelings. They can become stressed if they are forced to spend too much time with others, or when they have to cope with too many external distractions.
  • Sensing-Intuition — is all about how we take in information. People with a Sensing preference prefer information that is realistic, practical, built on past or present real-life experiences, and often detailed. They can be stressed when things are ambiguous and unclear, without any clear direction. People with an Intuition preference are interested in the big picture, in how things connect, and in ideas rather than facts. They will find having to follow exact instructions stressful, and working with people who demand lots of detail.
  • Thinking-Feeling —People with a Thinking preference want to make decisions using objective logic and will be stressed when decisions seem to be subjective, or when they are forced to concentrate on people rather than the task at hand. People with a Feeling preference want to make decisions that line up with their values and they will be stressed if they feel that those values are not being respected, and when there is conflict.
  • Judging-Perceiving — People with a Judging preference want to live in an organized, planned way and will find dealing with disorganized people stressful, or having to rush things at the last minute. People with a Judging preference want to live in a more spontaneous, emergent way and will become stressed when they have to deal with inflexible people, or when they are forced to make decisions before they feel they really need to.

Image via Photo by Mike Jones/Pexels

Everyone will have a preference for Extraversion (E) or Introversion (I), for Sensing (S) or for Intuition (N), for Thinking (T) or for Feeling (F), and for Judging (J) or for Perceiving (P). These four preferences combine together dynamically to give one of 16 types. For example, if someone has preferences for Extraversion, Sensing, Thinking and Judging, then their overall type would be ESTJ. If you know your type, you can identify your likely stressors (and so avoid or mitigate them), your typical behavior under everyday stress (so that you can recognize when you are stressed) and what to do to cope with that reaction, stop the stress cycle and so build resilience. Here’s the detail for each type.

Image via Photo by Pavel Danilyuk/Pexels

ESTP and ESFP

Stressors

  • Lack of stimulation and excitement
  • Theoretical, abstract tasks without any practical application right now
  • Being physically confined, e.g. though illness or circumstance

Behavior under everyday stress

  • Seeks out more and more external stimulation and excitement
  • May behave in a thrill-seeking or dangerous way or over-indulge
  • Lives solely in the present moment and will not make any decisions

How to stop the stress cycle

  • Pause, stop what you are doing, or think through what you will do next before you do it

Image via Photo by Karolina Grabowska/Pexels

ESTJ and ENTJ

Stressors

  • Inefficient people, systems, or organizations
  • Lack of closure, not being able to make decisions, blockers
  • Having to focus on people's feelings, rather than the task

Behavior under everyday stress

  • Becomes overly directive, forceful, or even aggressive
  • Makes snap decisions and imposes them on others
  • Dismisses evidence/other opinions that don't fir your view

How to stop the stress cycle

  • Stop making any decisions until you have taken some time out to explore all the available information.

Image via Photo by Ketut Subiyanto/Pexels

ENTP and ENFP

Stressors

  • People who say "it'll never work"
  • Too much seemingly irrelevant detail
  • Lack of variety; not being able to do anything new

Behavior under everyday stress

  • Shares increasingly impractical ideas with more and more people
  • Unable to take things seriously, becomes destructively 'playful'
  • Will be tied down to decisions

How to stop the stress cycle

  • Slow down. Take some time out to quietly decide on a course of action

Image via Anna Shvets/Pexels

ESFJ and ENFJ

Stressors

  • Conflict with others and between others
  • Lack of warmth, not having friendliness reciprocated
  • Injustice in the world at large

Behavior under everyday stress

  • Become effusive and over-friendly
  • Becomes demanding in getting your own and others' needs met
  • Interprets situations in terms of your values, ignoring any other evidence

How to stop the stress cycle

  • Step back from the situation and the people involved and consider alternatives and the facts

Image via Yan Krukau/Pexels

INTP and ISTP

Stressors

  • Having your carefully reasoned solutions dismissed or ignored
  • Illogical decisions that have not been thought through
  • Excessive displays of approval or emotion from others

Behavior under everyday stress

  • Withdraws to solve problems by yourself
  • Fixates on finding the one correct solution
  • Ignores other people; makes decisions without informing them

How to stop the stress cycle

  • Talk to others to explore information and ideas

Image via Mizuno K/Pexels

ISTJ and ISFJ

Stressors

  • Having to act without detailed, practical information or plans
  • Having the lessons of your experience dismissed by others
  • Changing things that already work

Behavior under everyday stress

  • Obsessively searches for that one important piece of information
  • Withdraws from the outer world
  • Cannot make a decision until all the information has been found

How to stop the stress cycle

  • Talk to others to help you prioritize and make a decision

Image via Tima Miroshnichenko/Pexels

ISFP and INFP

Stressors

  • People who ignore, dismiss, or contravene your values
  • Working in a job that is at odds with those values
  • Inflexible and unthinking people or organizations

Behavior under everyday stress

  • Withdraws into an inner dialogue
  • Obsessively works through decisions that fir your values
  • Ignores facts that do not fit with the picture you have painted

How to stop the stress cycle

  • Talk to others to get their reassurance and help in considering the facts and alternatives

Image viaMART PRODUCTION/Pexels

INTJ and INFJ

Stressors

  • Not having time to think through possibilities before answering
  • Having your well-considered ideas dismissed or ignored
  • Disorganized, opinionated people

Behavior under everyday stress

  • Withdraws to build increasingly complex ideas in your head
  • These models may become divorced from reality
  • Unable to act under every possibility has been explored

How to stop the stress cycle

  • Talk to others to help decide which of your many ideas should be pursued

When you feel stressed, it can get in the way of dealing effectively with life’s demands, and it can affect everything you do. Understanding your MBTI personality type will help you to build resilience.

Looking for more advice geared towards your MBTI? Be sure to sign up for our weekly newsletter!

Lead image viaKarolina Grabowska/Pexels

We're all about colorful Easter egg dye come spring, but if we're honest, we're not always thrilled with the cleanup. Whether you're dyeing with or without a kit, there are tons of bowls, spoons, and paper towels to scrub once your finished. And don't even get us started on what happens if you spill the dye!

If you want to dye eggs this year but are feeling hesitant about everything it entails, don't worry because this hack from Reynoldsis here to save the day. We like to hard boil our eggs before dyeing, but blown eggs work just as well. Then just grab your slow cooker and get dyeing!

An Easy + Clean Egg Dye Hack

Image via Reynolds Kitchens

First, make some DIY slow cooker dividers with cardboard wrapped in aluminum foil.

Once your slow cooker is divided into four sections, line each section with saran wrap, plastic bags, or slow cooker liners. This will let you use more than one color, but still gives you enough space to dye multiple eggs at once!

Next, fill each section with water. Make sure that, while you want to fill them enough for multiple eggs to be submerged, you don't fill them too high. You don't want the water to overflow — that's definitely not mess-free!

Image via Reynolds Kitchens

Add your Easter egg dye to each section. Pink, purple, and blue are classic shades!

Image via Reynolds Kitchens

Gather your hard boiled or blown eggs to add to the water. You can use strips of tape or string to make all kinds of striped and dotted designs. Then all you have to do is just drop them in the water and wait! This is the perfect opportunity to make a colorful Easter cocktail ;).

The longer the eggs sit in the dye, the darker the color will turn out. So if you prefer pastel eggs, only leave them in for a few minutes.

Image via Reynolds Kitchens

When you remove your eggs from the dye, let them dry on a cookie rack before you remove the tape and the string. Display them on a pretty plate along with your Easter desserts, or as a centerpiece!

Image via Reynolds Kitchens

Voilà! A rainbow of colorful eggs, all boasting different designs. And the best part is, all you have to do to clean up is throw away the liners and the cardboard, then put your slow cooker back in your cabinet. We'll definitely be doing this from here on out.

How To Dye Easter Eggs: More Colored Egg Dye Ideas For Display

Marbled Nail Polish Eggs

If you're not too keen on buying food coloring that you'll only use every once in awhile, just use your nail polish! Instead of adding dye to the sections, pour in your polish. You can use a toothpick to swirl everything around and achieve that marbled look. Have some nail polish remover nearby because your fingers will get messy.

Mosaic Easter Eggs

This hack is a great option for using up hard boiled eggs because you have to peel one to make it! (AKA, you'll have a snack to accompany your DIY). After you peel an egg that you've already dyed, use a hot glue gun to attach the broken shell pieces to a second, plain egg. Easy-peasy.

Sharpie Tie Dye Eggs

This Easter egg design only takes ten minutes, which makes it perfect for busy evenings or for kids who can't sit still for too long. Fill your slow cooker sections with nail polish remover instead of water, then color your eggs with as many Sharpie colors as you want. Dunk them into the nail polish remover (or smear with a wet Q-tip) to give them that tie-dye look.

Housefront Easter Eggs

Paint your favorite TV characters' apartment building or your childhood home onto eggs for a fun and nostalgic DIY. Once you've drawn your design, you'll want to tape up the rest of the egg to make sure the dye stays where you want it. Paint the house with the egg dye, or submerge the whole egg in a slow cooker section. Set to dry.

Enjoyed learnign how to dye Easter eggs? Follow us on Pinterest and subscribe to our email newsletter for more Easter egg dye hacks!

Brit + Co may at times use affiliate links to promote products sold by others, but always offers genuine editorial recommendations.

I'm not sure about you, but it's that time of year that I'm already planning multiple vacations in my head where I'm sitting somewhere by a beach in full-blown relaxation mode. And while I love to look ahead at my itinerary, my favorite part of vacation planning is definitely the outfits! I get so excited that I create a Pinterest board, packing list, vacation wishlist, and schedule the outfits all in advance on my notes app — it's serious business! With all that in mind, I thought I'd share with you some white vacation dresses that are to-die-for right now!

Writer's Note: A lot of these will be either linen, cotton, and silks, or satins because they're the most breathable materials and can really help in hotter temperatures! So I almost always stick to those fabrics because they allow for me to be in hotter temperatures and not feel like 100 degrees.

Shop White Vacation Dresses Here!

ASTR The Label Off-Shoulder Dress

Everyone needs the quintessential linen white dress for vacation, and this is IT! Everything about this is romantic and perfect for vacation with the off-shoulder, side slit, and midi style of the dress. You can dress is up with some heels, or dress it down with sandals for a day at the beach.

J.Crew Stretch Linen Dress

J.Crew's been killing the game lately with their innovative and fun styles, and this one is no different! I love the linen (again we want breathable fabric for summer) along with the fun gold detailing on the straps. This one is also on sale for 40% off right now, so definitely grab this one for you summer vacations!

Halogen Halter Neck Linen Dress

The halter neck of this chic dress gives it a more modest and classic feel that I love. It's giving me serious Meghan Markle vibes, so you know it's good! Grab this one to fulfill all of your summer plans!

Abercrombie Slip Maxi Dress

I had to add this one in the mix because of its unique design that's giving me all the Italian summer on the Amalfi coast feels! The sweet fruit pattern is the perfect touch to brighten up a simple white dress. And for under $100, it's at such a great price-point!

Chelsea28 Tiered Maxi Dress

A tired dress is another staple to your vacation wardrobe. I love this boho chic one because it looks straight out of Mamma Mia on an island off the coast of Greece. An idyllic dress for all of your Euro-Summer-2024 plans!

Banana Republic Silk Maxi

You can never have too many silk dresses for vacation, and this cream, silk dress takes thecake! I love how vintage-inspired it is with the pleats at the top. I picture this stunning dress at a dinner paired with metallic heels like above and a matching mini bag. I just adore this piece!

ASTR Floral Lace Dress

Lace has entered the chat! And can you believe it's only $109?! I love this ASTR The Label dress for their super cute pieces at such an affordable price. This one screams vacation by the beach to me!

House of CB Emmelina Dress

House of CB is one of my favorite brands at the moment because their designs are so feminine and flattering for so many different body types and sizes. This dress is one that I personally have had on my wishlist for summer vacation for quite some time because of its elegant shape and cut. You're sure to look phenomenal in this classic piece!

Abercrombie Plunge Satin Dress

For every vacation, a simple silk dress is a must because of its breathability and versatility when it comes to styling. This dress is ideal for walks on the beach or for a nice dinner on the coast. Plus the low back is an amazing addition as well for a more sexy look. Abercrombie does it again, ladies!

J.Crew Bungalow Maxi Dress

Can you think of a better dress that works as both a beach coverup and adorable lunch dress? This linen maxi dress from J.Crew will take you from beach to dinner in the chicest way. I love the cuts at the bottom to not make it too billowy and the low V-neck looks super flattering as well. Adding this to my wishlist ASAP!

Looking for more vacation inspo? Sign up for our newsletter for the latest trends!

Brit + Co may at times use affiliate links to promote products sold by others, but always offers genuine editorial recommendations.

Lead image via Banana Republic.

We all want to step out in style, and these sneaker trends are your one-way ticket to getting there. From sportier silhouettes to sleek, fashion-forward footwear, we’re seeing a specific handful of unique (and sometimes controversial)sneakers out on the streets that suit anyone and everyone! No matter what look you're going for, we’ve got a range of trending sneaker styles for 2024 that’ll compliment your very best ‘fits and your budget.

Sporty Sneakers

Adidas Samba OG Shoes

The first sneaker trend needs no introduction. You’ve seen ‘em on all the cool fashion girls (and beyond), enough to know that sporty sneakers are in.

Adidas sneakers are the prime example of the sporty sneaker trend. The most popular styles – Gazelles and Sambas – have history with soccer and handball, but they’re not quite being sported for sport anymore. They’re easy to wear with your most casual jeans or even paired with a flowy maxi skirt!

On the other side of the spectrum, gorp-core brands like Salomon have more technical-looking sneakers that still fit into the everyday.

The Samba OG shoes come in a variety of colors, but these white-on-black ones are the most approachable. A limited color palette makes way for endless matching possibilities, plus these are just so comfy!

The Adidas Samba OG Shoes are $100.

New Balance 1906 Utility Unisex Sneakers

Flaunting a sizable tread and a plush platform, these sneakers from New Balance are unquestionably sporty, but get a stylish edge from the muted green and brown details. Since they're designed for running, you can feel the utmost support from these shoes – even if you're not trying to beat your current mile time.

The New Balance 1906 Utility Unisex Sneakers are $160.

Salomon XT-6 Unisex Sportstyle Shoes

These sleek sneakers skip the laces, favoring an easy on-and-off drawstring for the perfect fit. While they're chunkier and more detailed than your average Adidas sneaker, the Salomon XT-6's give a unique, fashion-forward vibe with their iconic logo. Any sneakerhead will be fascinated by these sneaks.

The Salomon XT-6 sneakers are available in 15 other colors for $200.

Blue Sneakers

Nike Blazer Low '77 Sneaker

If you don’t quite know what sneaker trends to shop for in terms of shape and silhouette, going for a specific color can help guide you to the perfect pair. Blue sneakers are totally hot right now amongst the cool fashion gals, whether they rock 'em in royal hues or lighter blues, like the styles listed.

These slimmer sneakers are reminiscent of the famed Adidas ones, but the suede material makes them less sporty and more casual for everyday wear.

The Nike Blazer Low '77 Sneakers are $100 at Nordstrom.

Puma Palermo Leather Sneaker

Another low-profile blue shoe, these Pumas are a total 80's throwback. They flaunt classic details like the rubber role and paneled toe, plus the Puma logo you just can't miss. The lighter blue would go great with this season's trending colors, like butter yellow or even lilac.

The Puma Palermo Leather Sneakers are $90 at Nordstrom.

Adidas Handball Spezial Shoes

Think of these Adidas sneaks as your new everyday shoe, but more colorful. From the grocery store to the park, you'll be stepping in style with this contrasting style! The trio of stripes on each side of these shoes is super iconic, so your looks will immediately be on-trend, no matter what you're wearing.

The Adidas Handball Spezial Shoes also come in a number of other color combos, and go for $110.

Metallic Sneakers

New Balance 1906R Unisex Sneakers

In addition to all things blue, metallic sneakers have been hitting the pavement and turning heads everywhere. I’ve mostly spotted silver sneakers in the wild, but metallic sneakers are also shoppable in golds and other eye-catching shades.

If you don't want to rock a full-on shiny shoe quite yet, these New Balance sneakers are the perfect place to start. They're fitted with metallic detailing along the sides for a stunning effect. You'll love 'em even more for their added cushiness and support around the arch and ankles.

The New Balance 1906R Unisex Sneakers are $155.

ALOHAS tb. 490 Leather Sneakers

These ALOHAS shoes are a low-key dupe for the well-loved Adidas sneakers. The rubber sole, low-sitting profile, and layered paneling along the toe give the same effect, except these have an exceptional shine.

These sneakers go for $190 at Urban Outfitters. You can also shop them in four other fun colors.

Adidas Country OG Shoes

These best-selling shoes will (literally) outshine all of the other pairs hanging out in your wardrobe. They have that oh-so 70's feel in shape, but carry a modern twist in the silver shininess.

The Adidas Country OG Shoes are $120.

Ballet Sneakers

Skechers Relaxed Fit: Breathe-Easy Shoes

They're not ballet flats, but they’re not quite sneakers, either. Ballet sneakers are on the rise right now, with unique (and a bit divisive) styles like the New Balance 1906L and the Kiko Kostadinov x Heaven by Marc Jacobs x Gel-Lokros shoes hitting the high-end market.

Ballet sneakers are a great way to toe the line between comfy and cute, especially when your soles need some extra support since they’re often bulkier than your average flat.

I am obsessed with this sporty move that Skechers made on their Mary Jane-esque shoes. These ballet sneakers have a nice tread on the bottom and secure on top with a velcro strap. The black colorway is super easy to wear alone or with socks for a layered look!

These supportive Skechers Relaxed Fit: Breathe-Easy Shoes cost $63.

Heaven by Marc Jacobs x Kiko Kostadinov Vapor Cosmos

These strappy sneakers also approach Mary Jane territory with stretchy straps and buckles up top, though the bottoms are cushier and traditionally sneaker-like. This pair flaunts some coquette-ish details, from the scalloped trim to the star-shaped stitching on the toes.

This pair of Heaven by Marc Jacobs x Kiko Kostadinov Vapor Cosmos go for $222 on StockX.

Buffalo Binary Ballet Sneaker

These adorable pink ballet sneakers are ready to hit the pavement with a chunky sole. The upper half of the shoe is more delicate, with tiny pleats and a seamless buckle detail.

The Buffalo Binary Ballet Sneakers are $180 at Urban Outfitters.

Subscribe to our newsletter to stay on top of all the latest fashion trends!

Brit + Co may at times use affiliate links to promote products sold by others, but always offers genuine editorial recommendations.